How to copy Coinbase’s programmatic SEO strategy
A step-by-step guide for building thousands of crypto SEO pages like Coinbase.
- Pre-cursors
- Architecture
- Webflow
- 1) Create a Webflow CMS collection called “Cryptocurrencies”
- 2) Create a Webflow CMS collection called “Conversions”
- 3) Add a few test records you can use as you design
- 4) Go to the Conversions template page and design your page
- 5) Insert dynamic data into elements by clicking “settings” and then “get text from Conversions”
- 6) Use the “Code Embed” element where you need more customization in dynamic elements
- 7) Publish your Webflow site
- Whalesync
- 1) Create a new Sync and connect Webflow and Airtable
- 2) Select the table “Cryptocurrencies” in Webflow and “Create new table” in Airtable
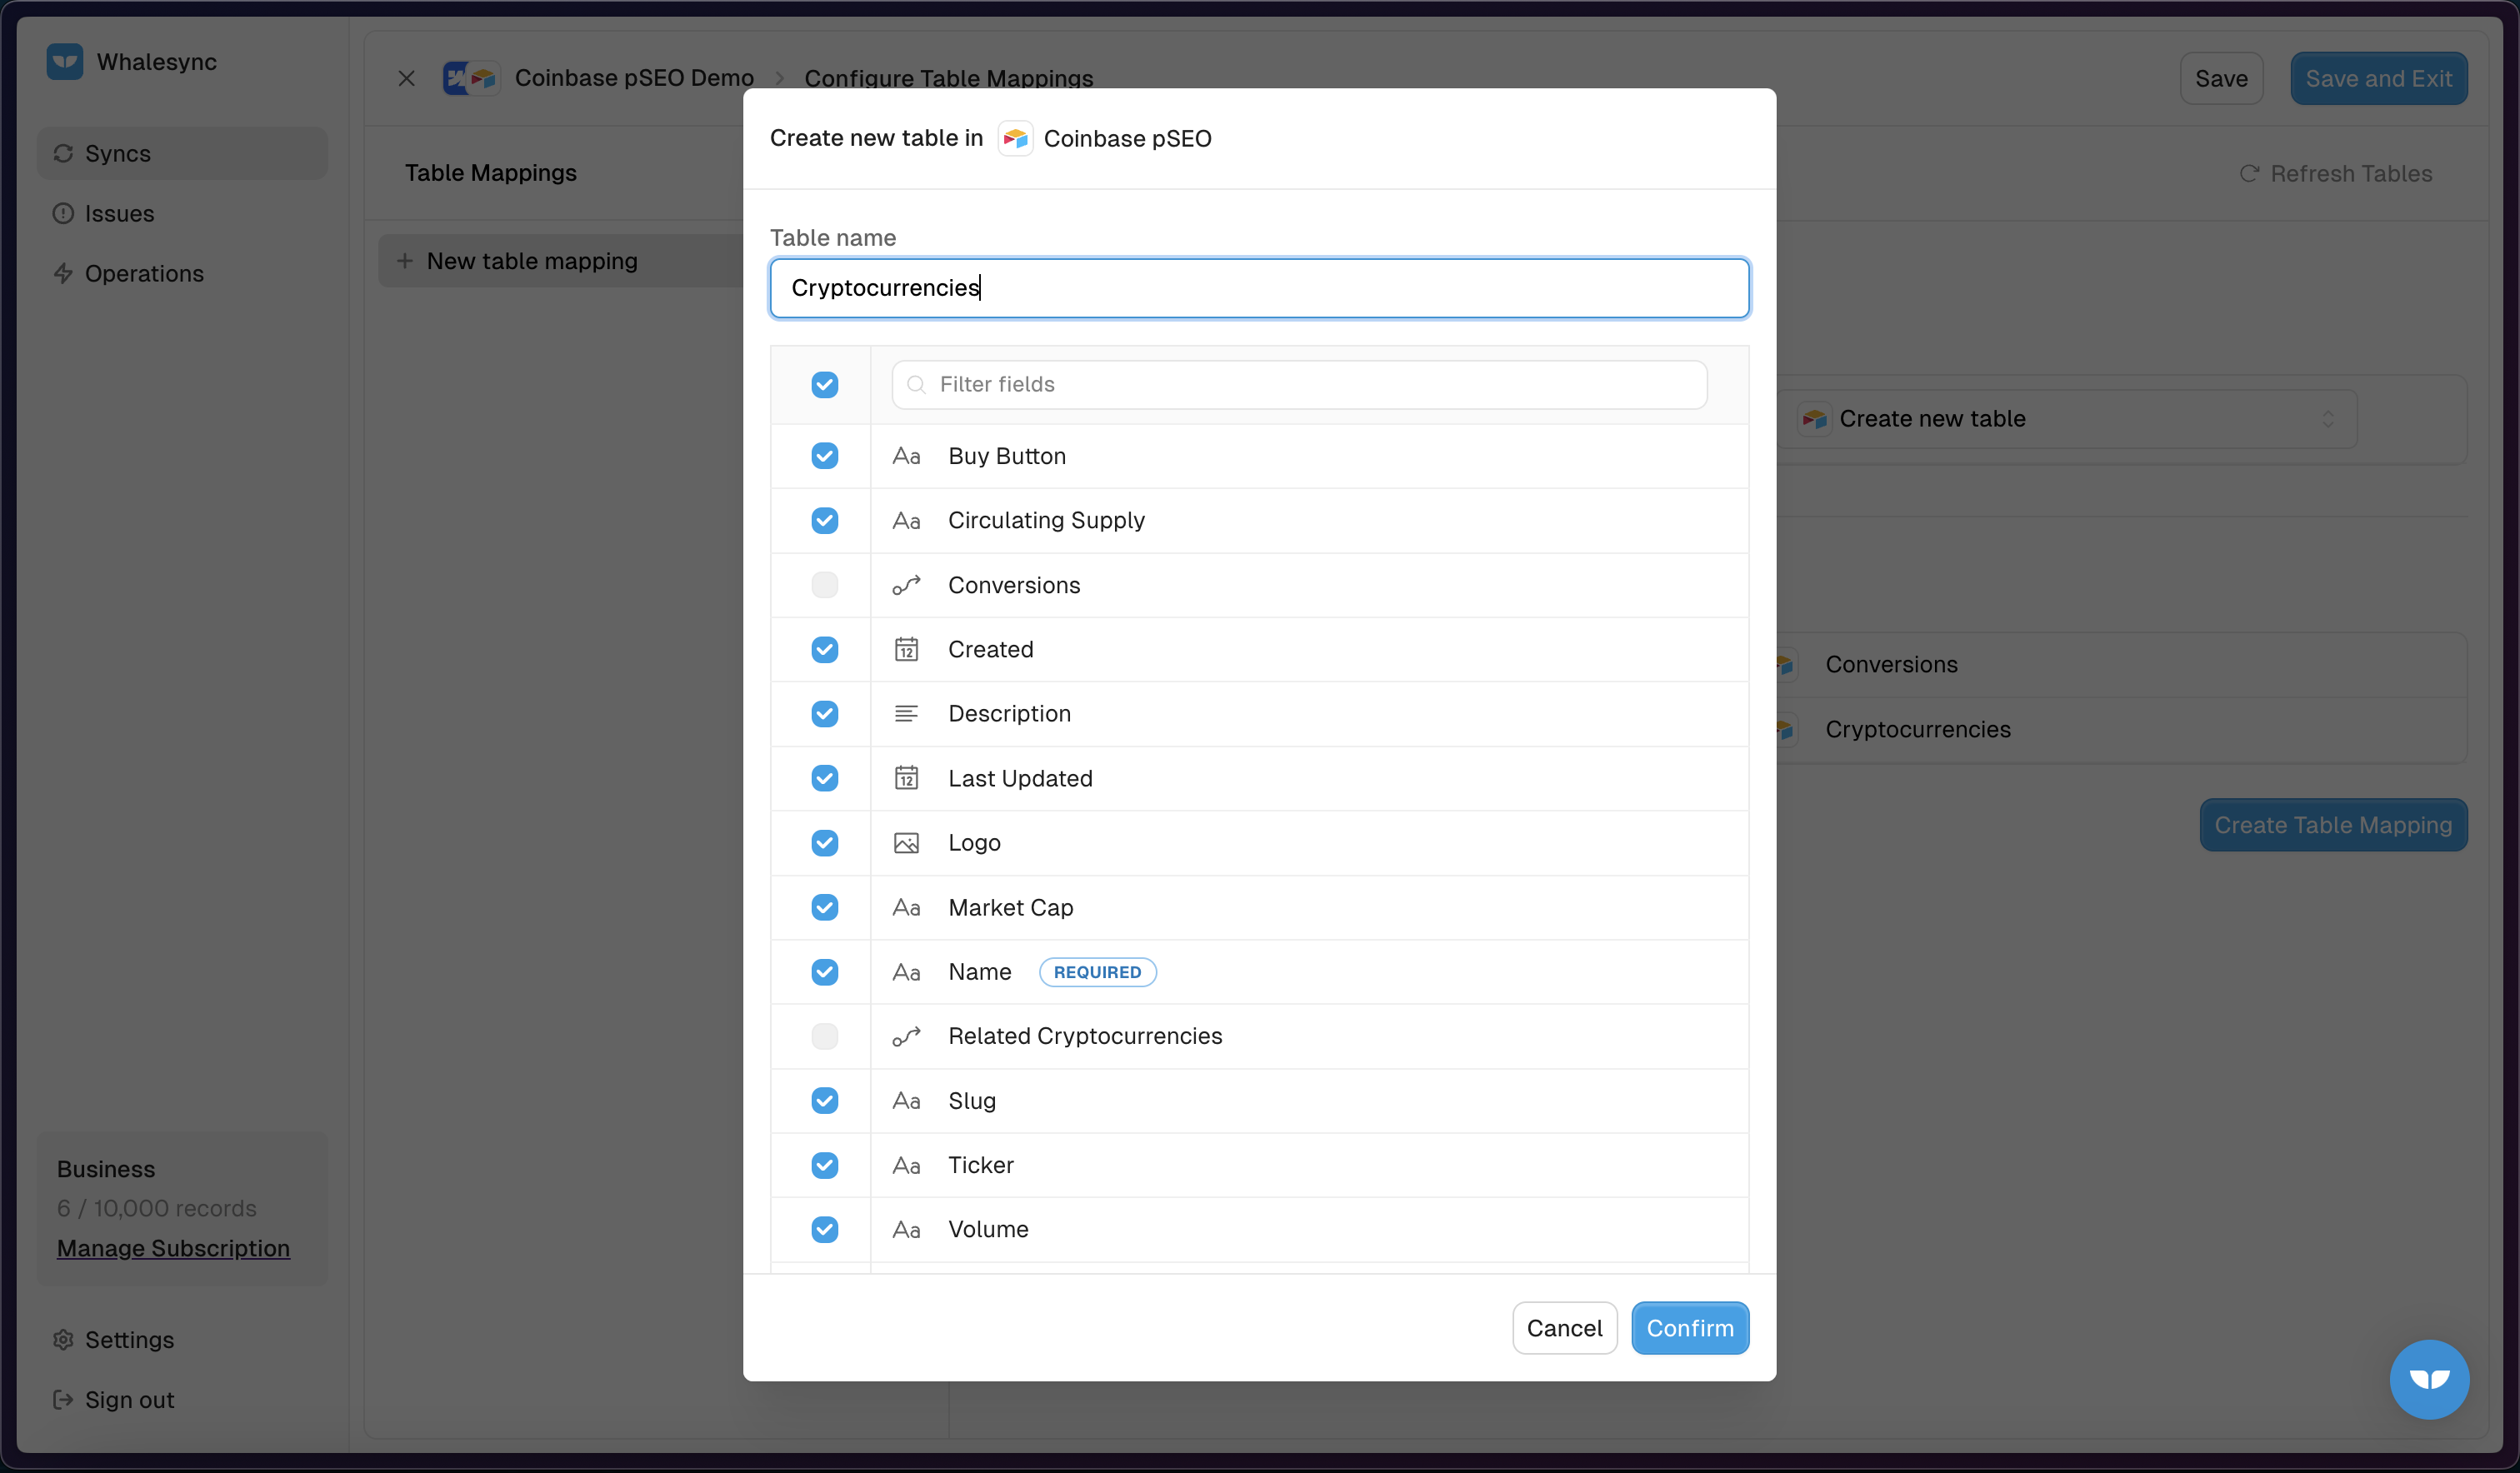
- 3) Select all fields and confirm the auto-created table in Airtable
- 4) Automap all the fields
- 5) Click “New table mapping” and repeat steps for the “Conversions table
- 6) Prepare an initial sync and activate sync
- Airtable
- 1) Convert the slug field into a formula
- 2) Use Lookup fields to bring crypto prices into our conversion table
- 3) Use those lookup fields to calculate a converted amount
- 4) Use an AI field to write descriptions about each cryptocurrency
- CoinMarketCap + Data Fetcher
- 1) Go to CoinMarketCap.com and click “API”
- 3) Add the Data Fetcher extension
- 4) Click “Create request”
- 5) Choose CoinMarketCap, enter your API key, and choose the endpoint you want
- 6) Save and run the request to fetch all the latest crypto prices
- 7) Choose the fields you want
- Airtable
- 1) Add more records into Airtable as you please!
- Summary
Matthew is the co-founder of Whalesync.
Everybody knows Coinbase - the $67B company that enables you to buy and sell cryptocurrency. What you might not know is that they’re experts in something called “programmatic SEO” which helps drive millions of visitors to their site every month.
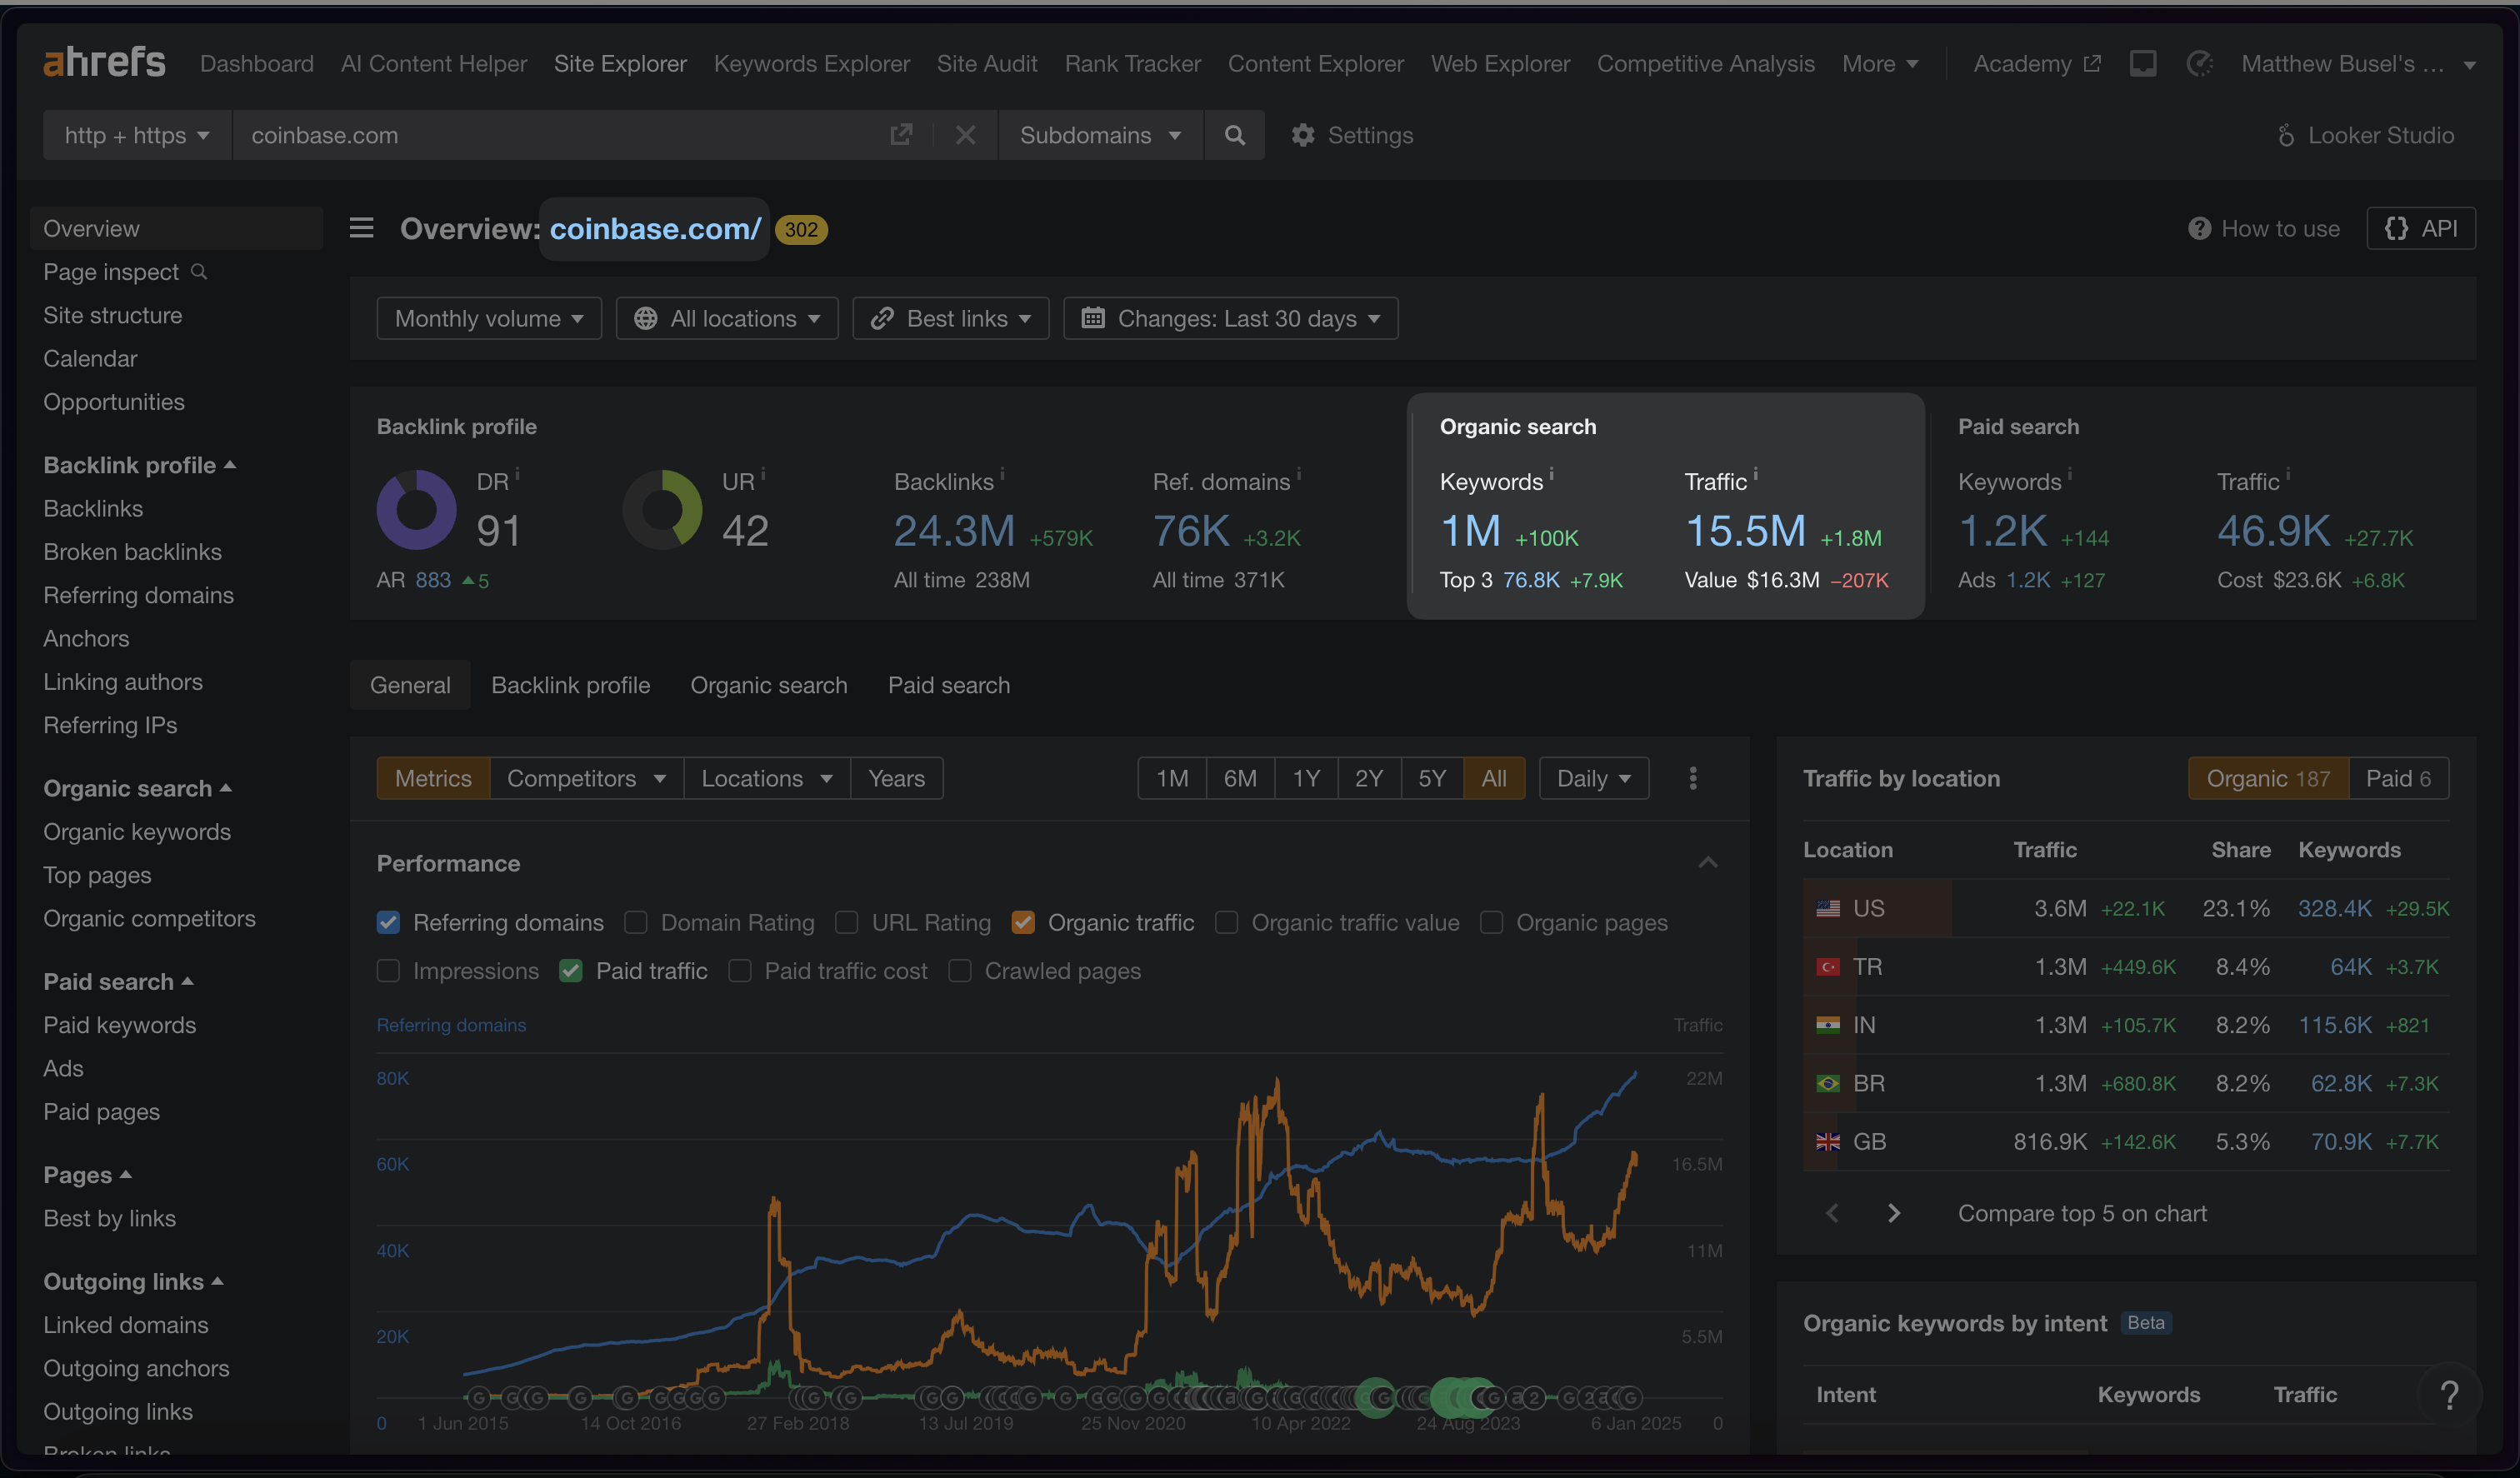
Specifically, when you search “convert bitcoin to solana” in Google, Coinbase pops up! The same goes for pretty much any combination of “convert {cryptocurrency} to {cryptocurrency}”.

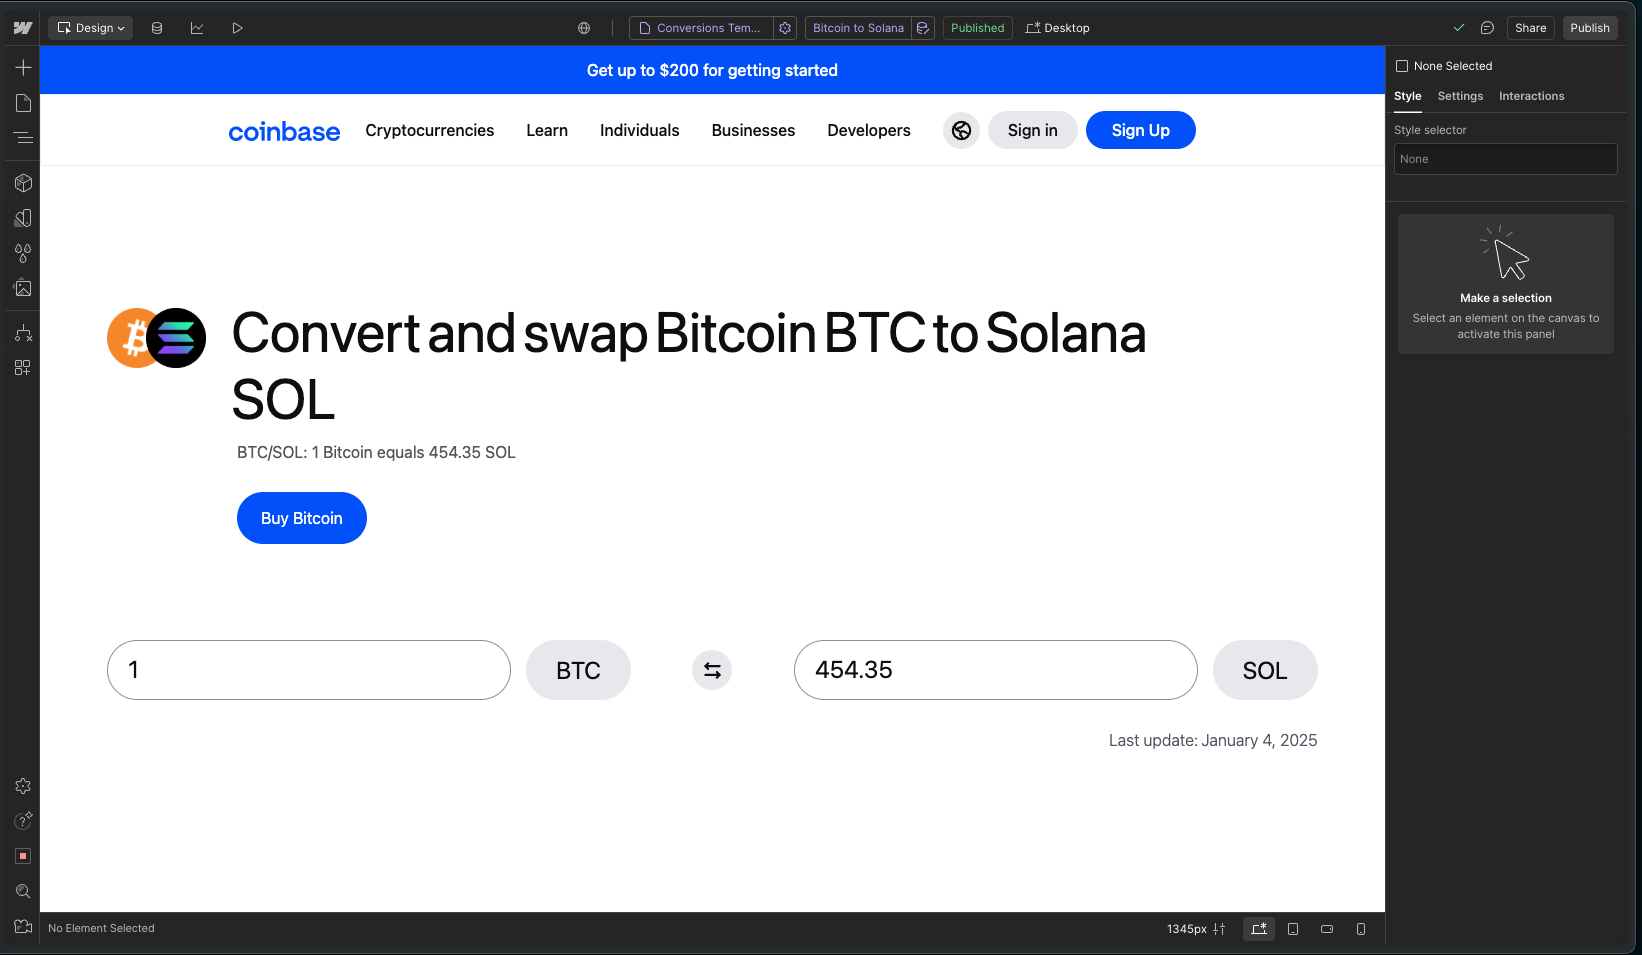
When you click on one of those links, you’re taken to a page like the one below. Coinbase has programmatically created thousands of pages just like this that all rank highly on Google.

While Coinbase has a team of designers, marketers, and engineers that have built these pages, this tutorial will show you how you can recreate the same pages in about one hour 🤯. All of this is possible thanks to AI and a handful of no-code tools. Here’s a preview of what your programmatic SEO pages will look like:
If you’re excited to become a 10x marketer who can build thousands of pages that rank on Google in minutes, read on! 🫡
Pre-cursors
- You will need accounts with Webflow, Airtable, Whalesync, and Data Fetcher.
- You will need a basic understanding of Webflow.
If you’d like to shortcut this tutorial or follow along more easily, you can use our free Coinbase Template Pack: https://www.whalesync.com/template-packs/programmatic-seo---coinbase
Architecture
Here’s an overview of the different tools we’ll be using for this tutorial and how they all fit together:

- Webflow is the frontend of our website that creates the pages.
- Airtable is the backend where we store the data for each page.
- Whalesync connects our backend to our frontend.
- CoinMarketCap is the API that provides live cryptocurrency prices.
- Data Fetcher pulls data from the CoinMarketCap API into our Airtable backend.
Webflow
1) Create a Webflow CMS collection called “Cryptocurrencies”
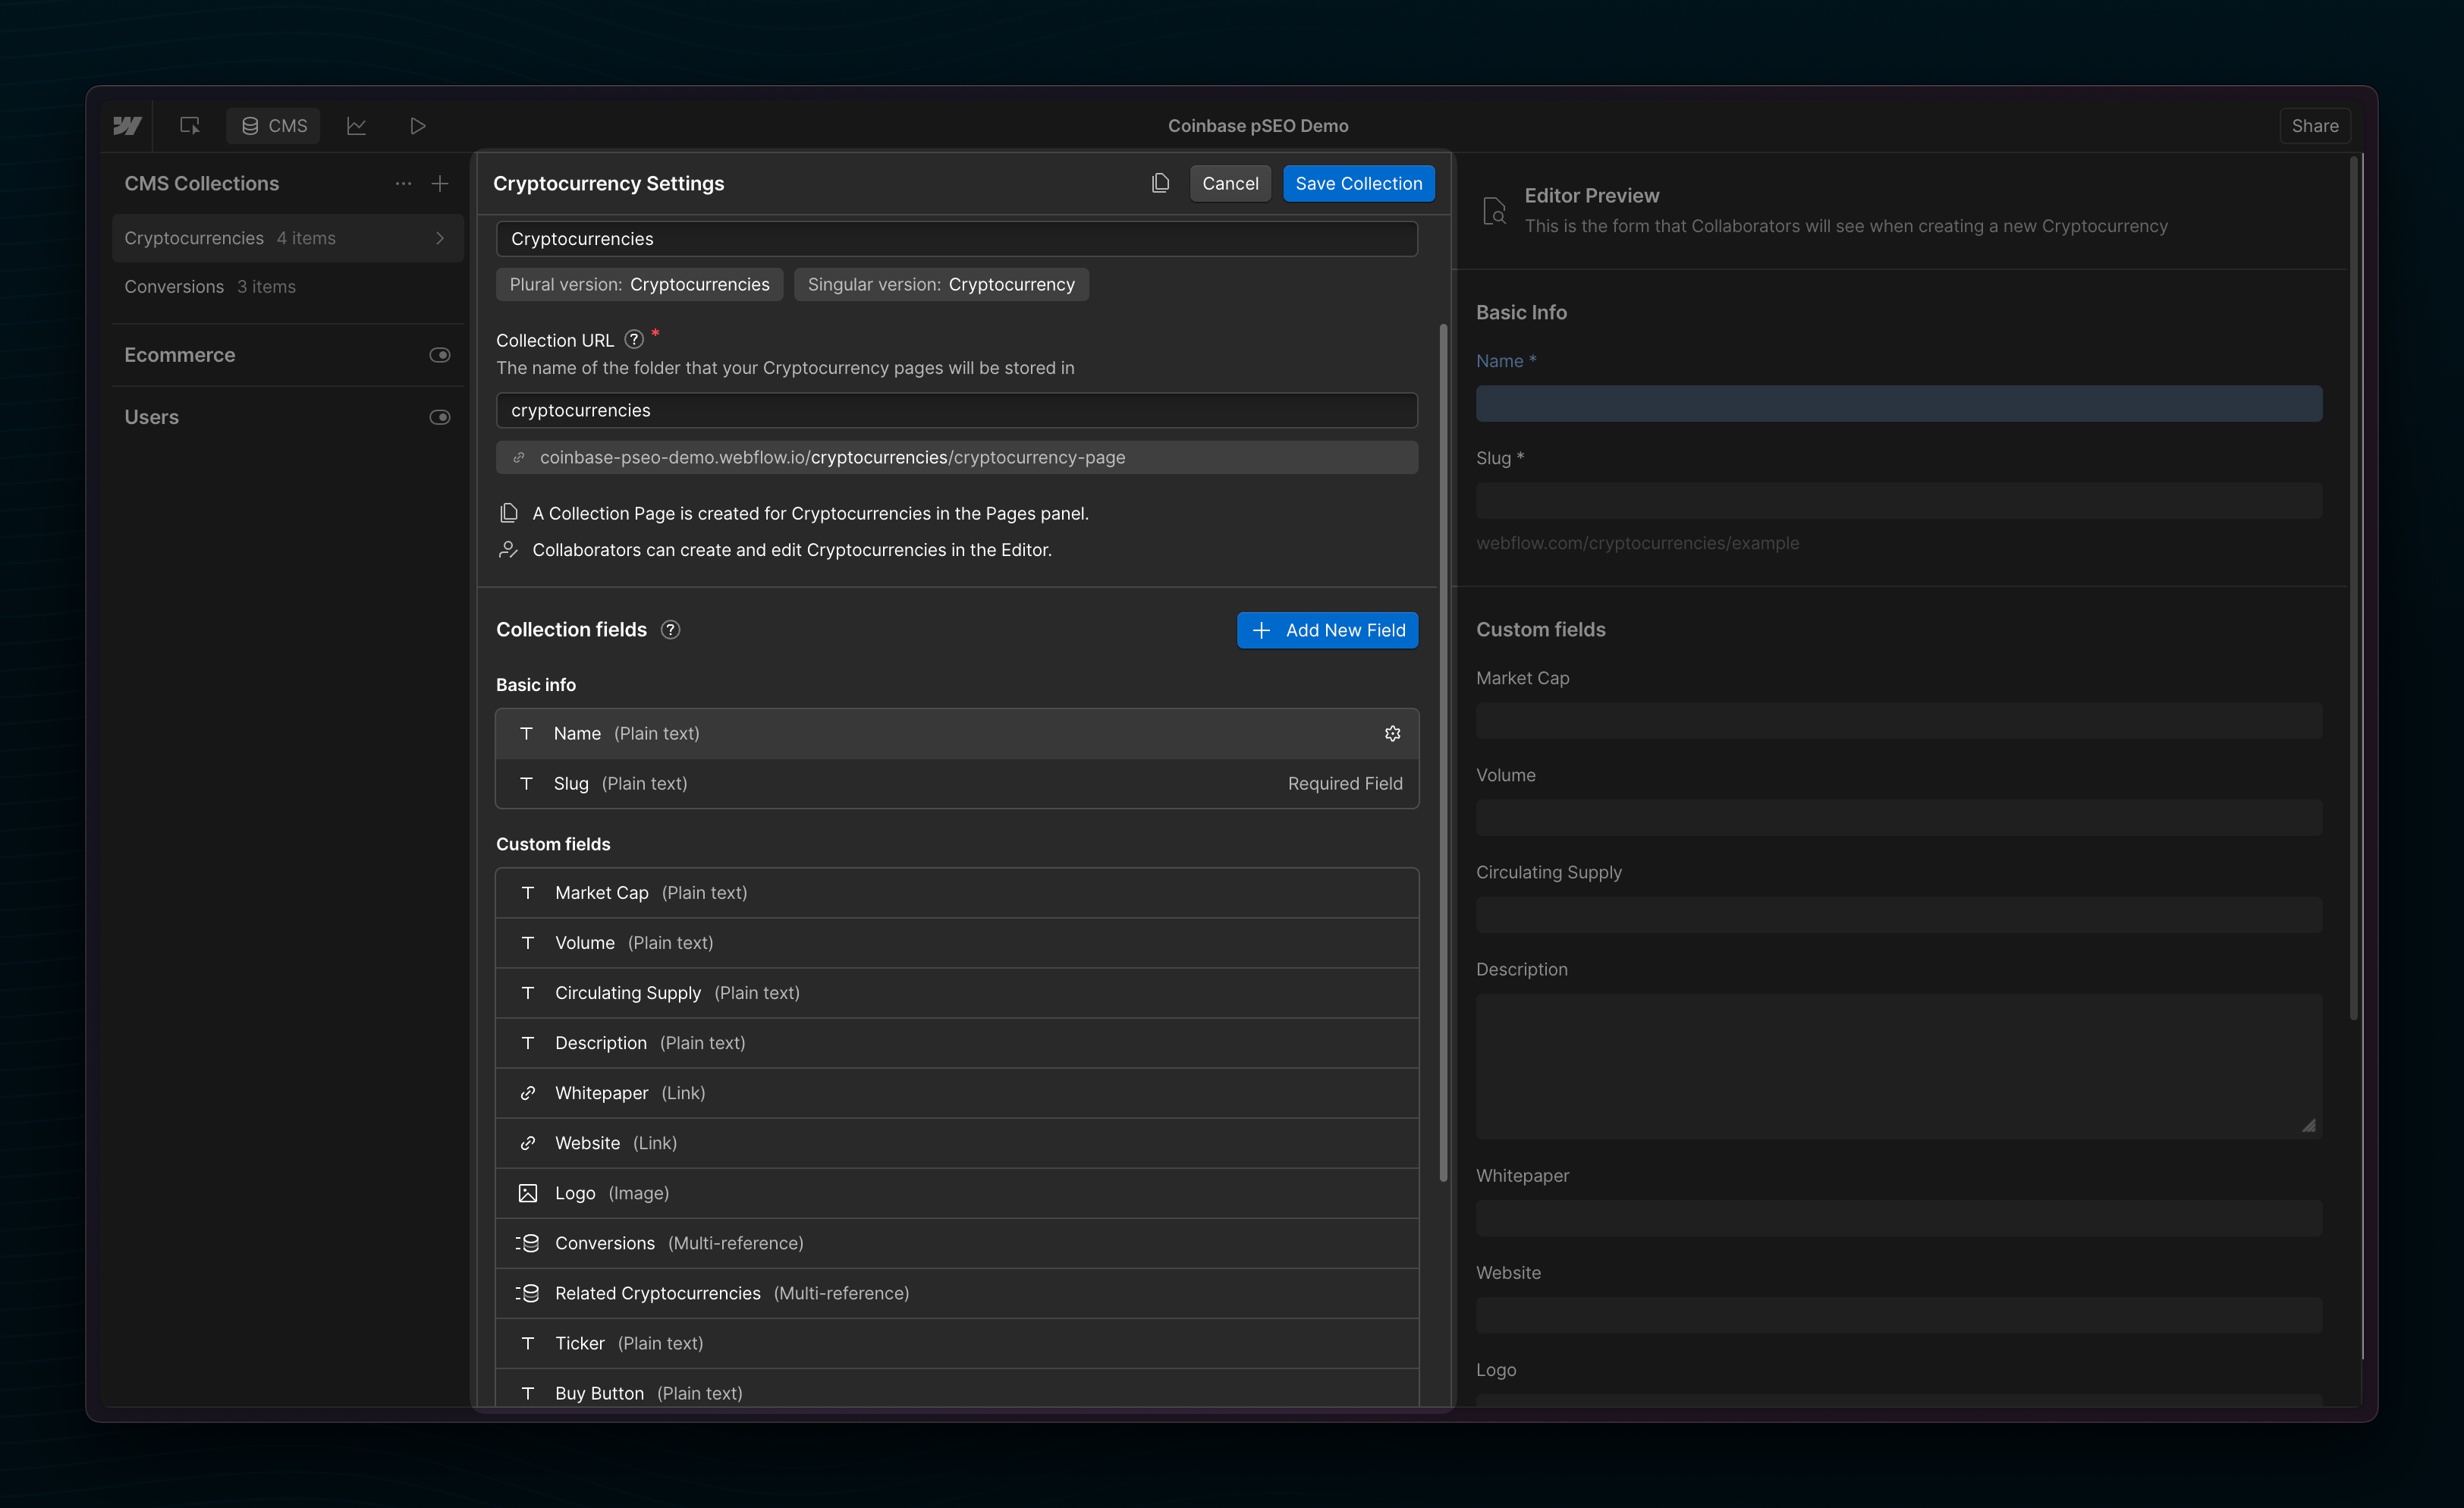
Your collection should include the following fields:
- Name
- Slug
- Market Cap
- Volume
- Circulating Supply
- Description
- Whitepaper
- Website
- Logo
- Ticker
- Buy Button
2) Create a Webflow CMS collection called “Conversions”
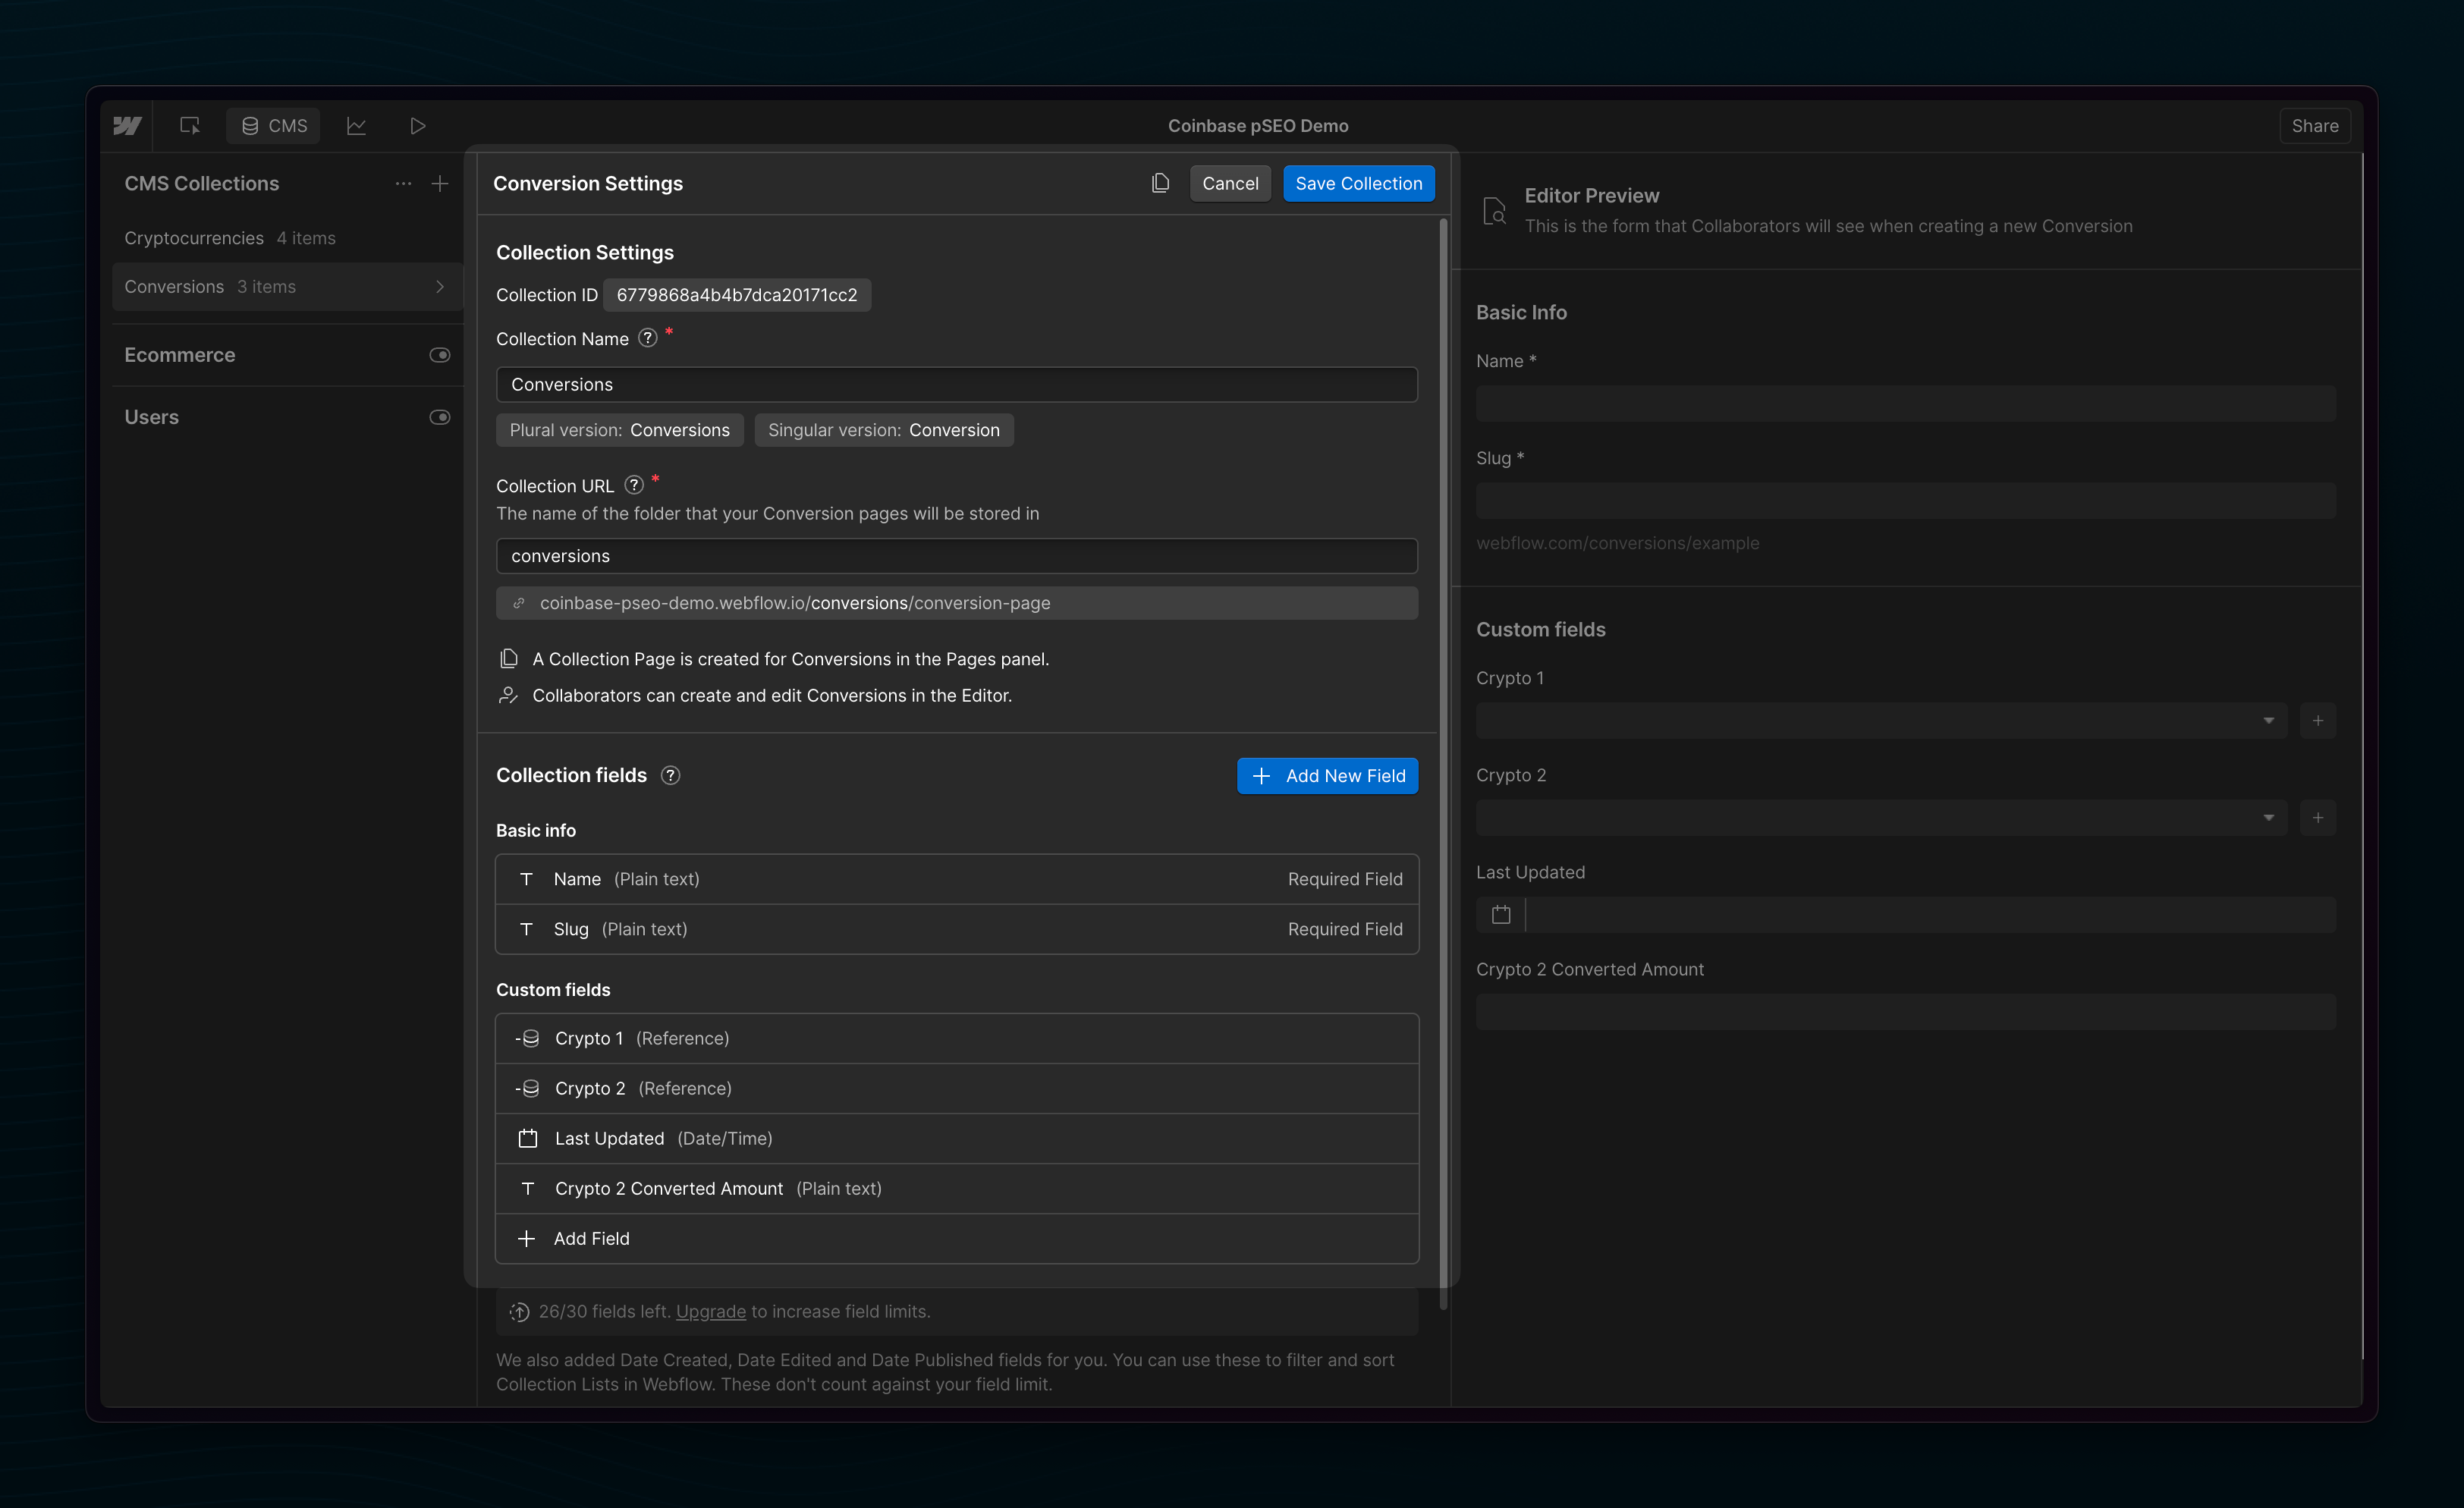
This collection should include the following fields:
- Name
- Slug
- Crypto 1 (Reference to Cryptocurrencies)
- Crypto 2 (Reference to Cryptocurrencies)
- Last Updated
- Crypto 2 Converted Amount
3) Add a few test records you can use as you design
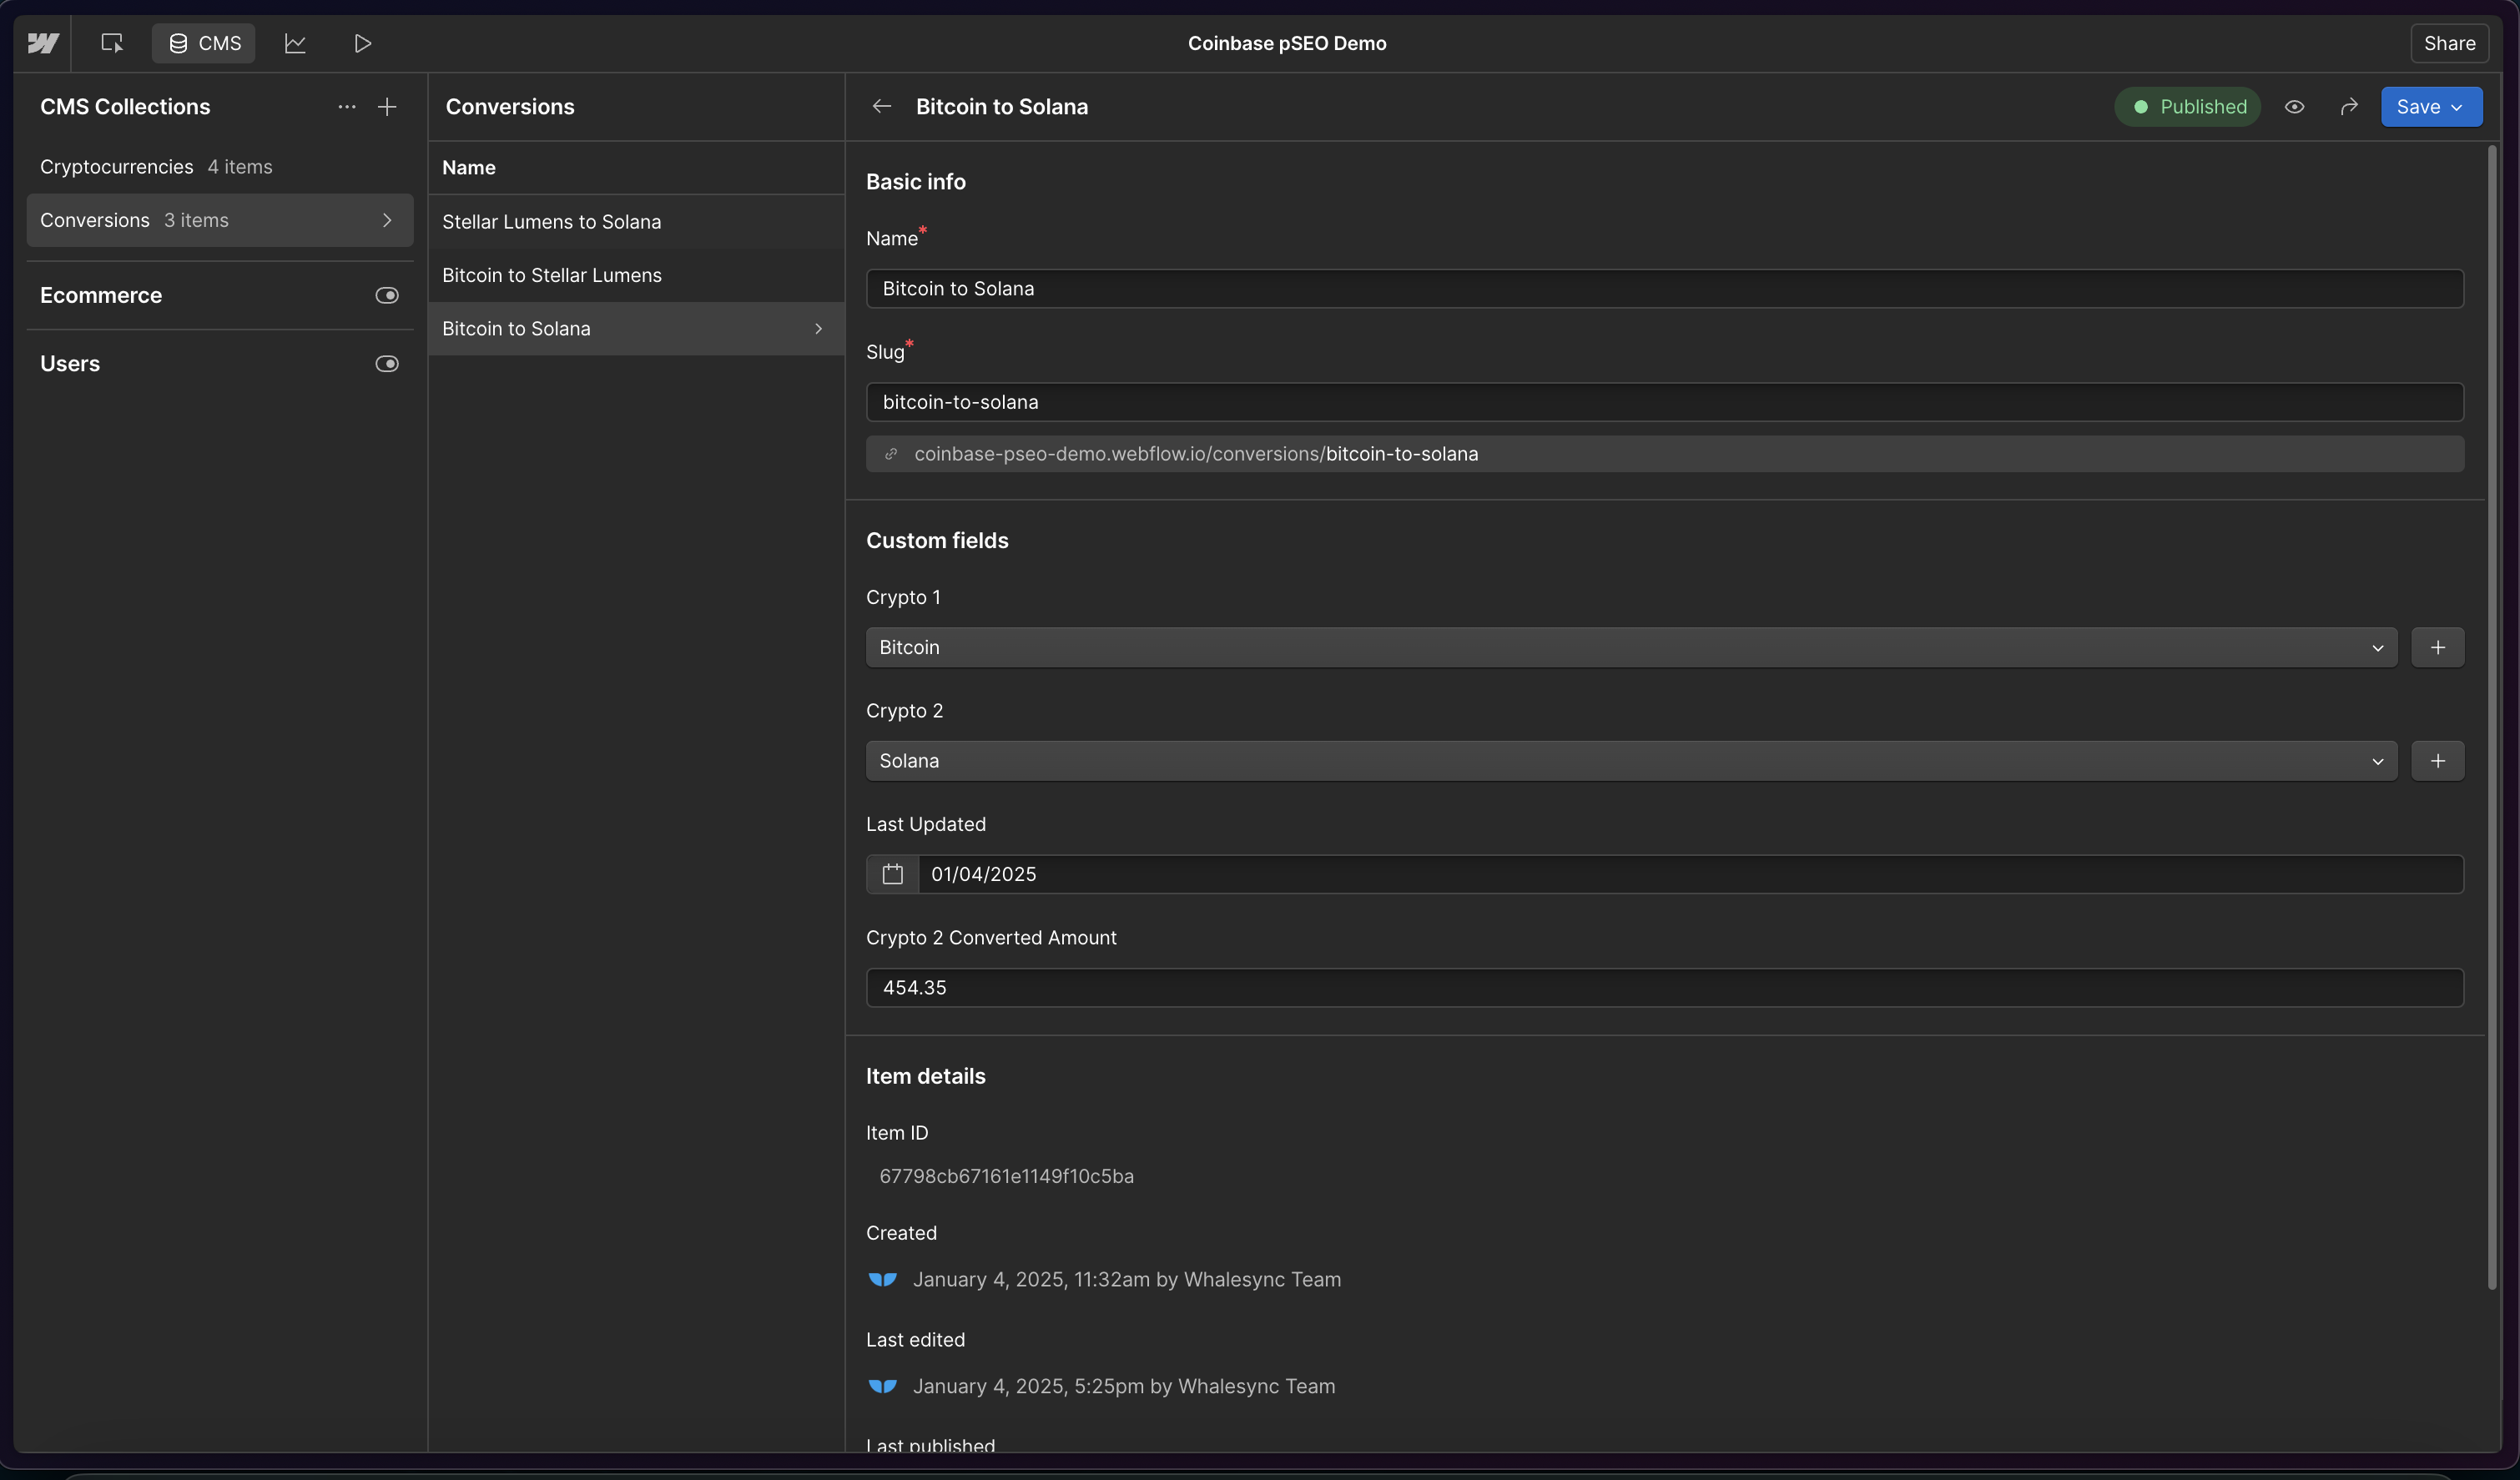
For example, in Cryptocurrencies add the items:
- Bitcoin
- Solana
And in Conversions add the item:
- Bitcoin to Solana
4) Go to the Conversions template page and design your page
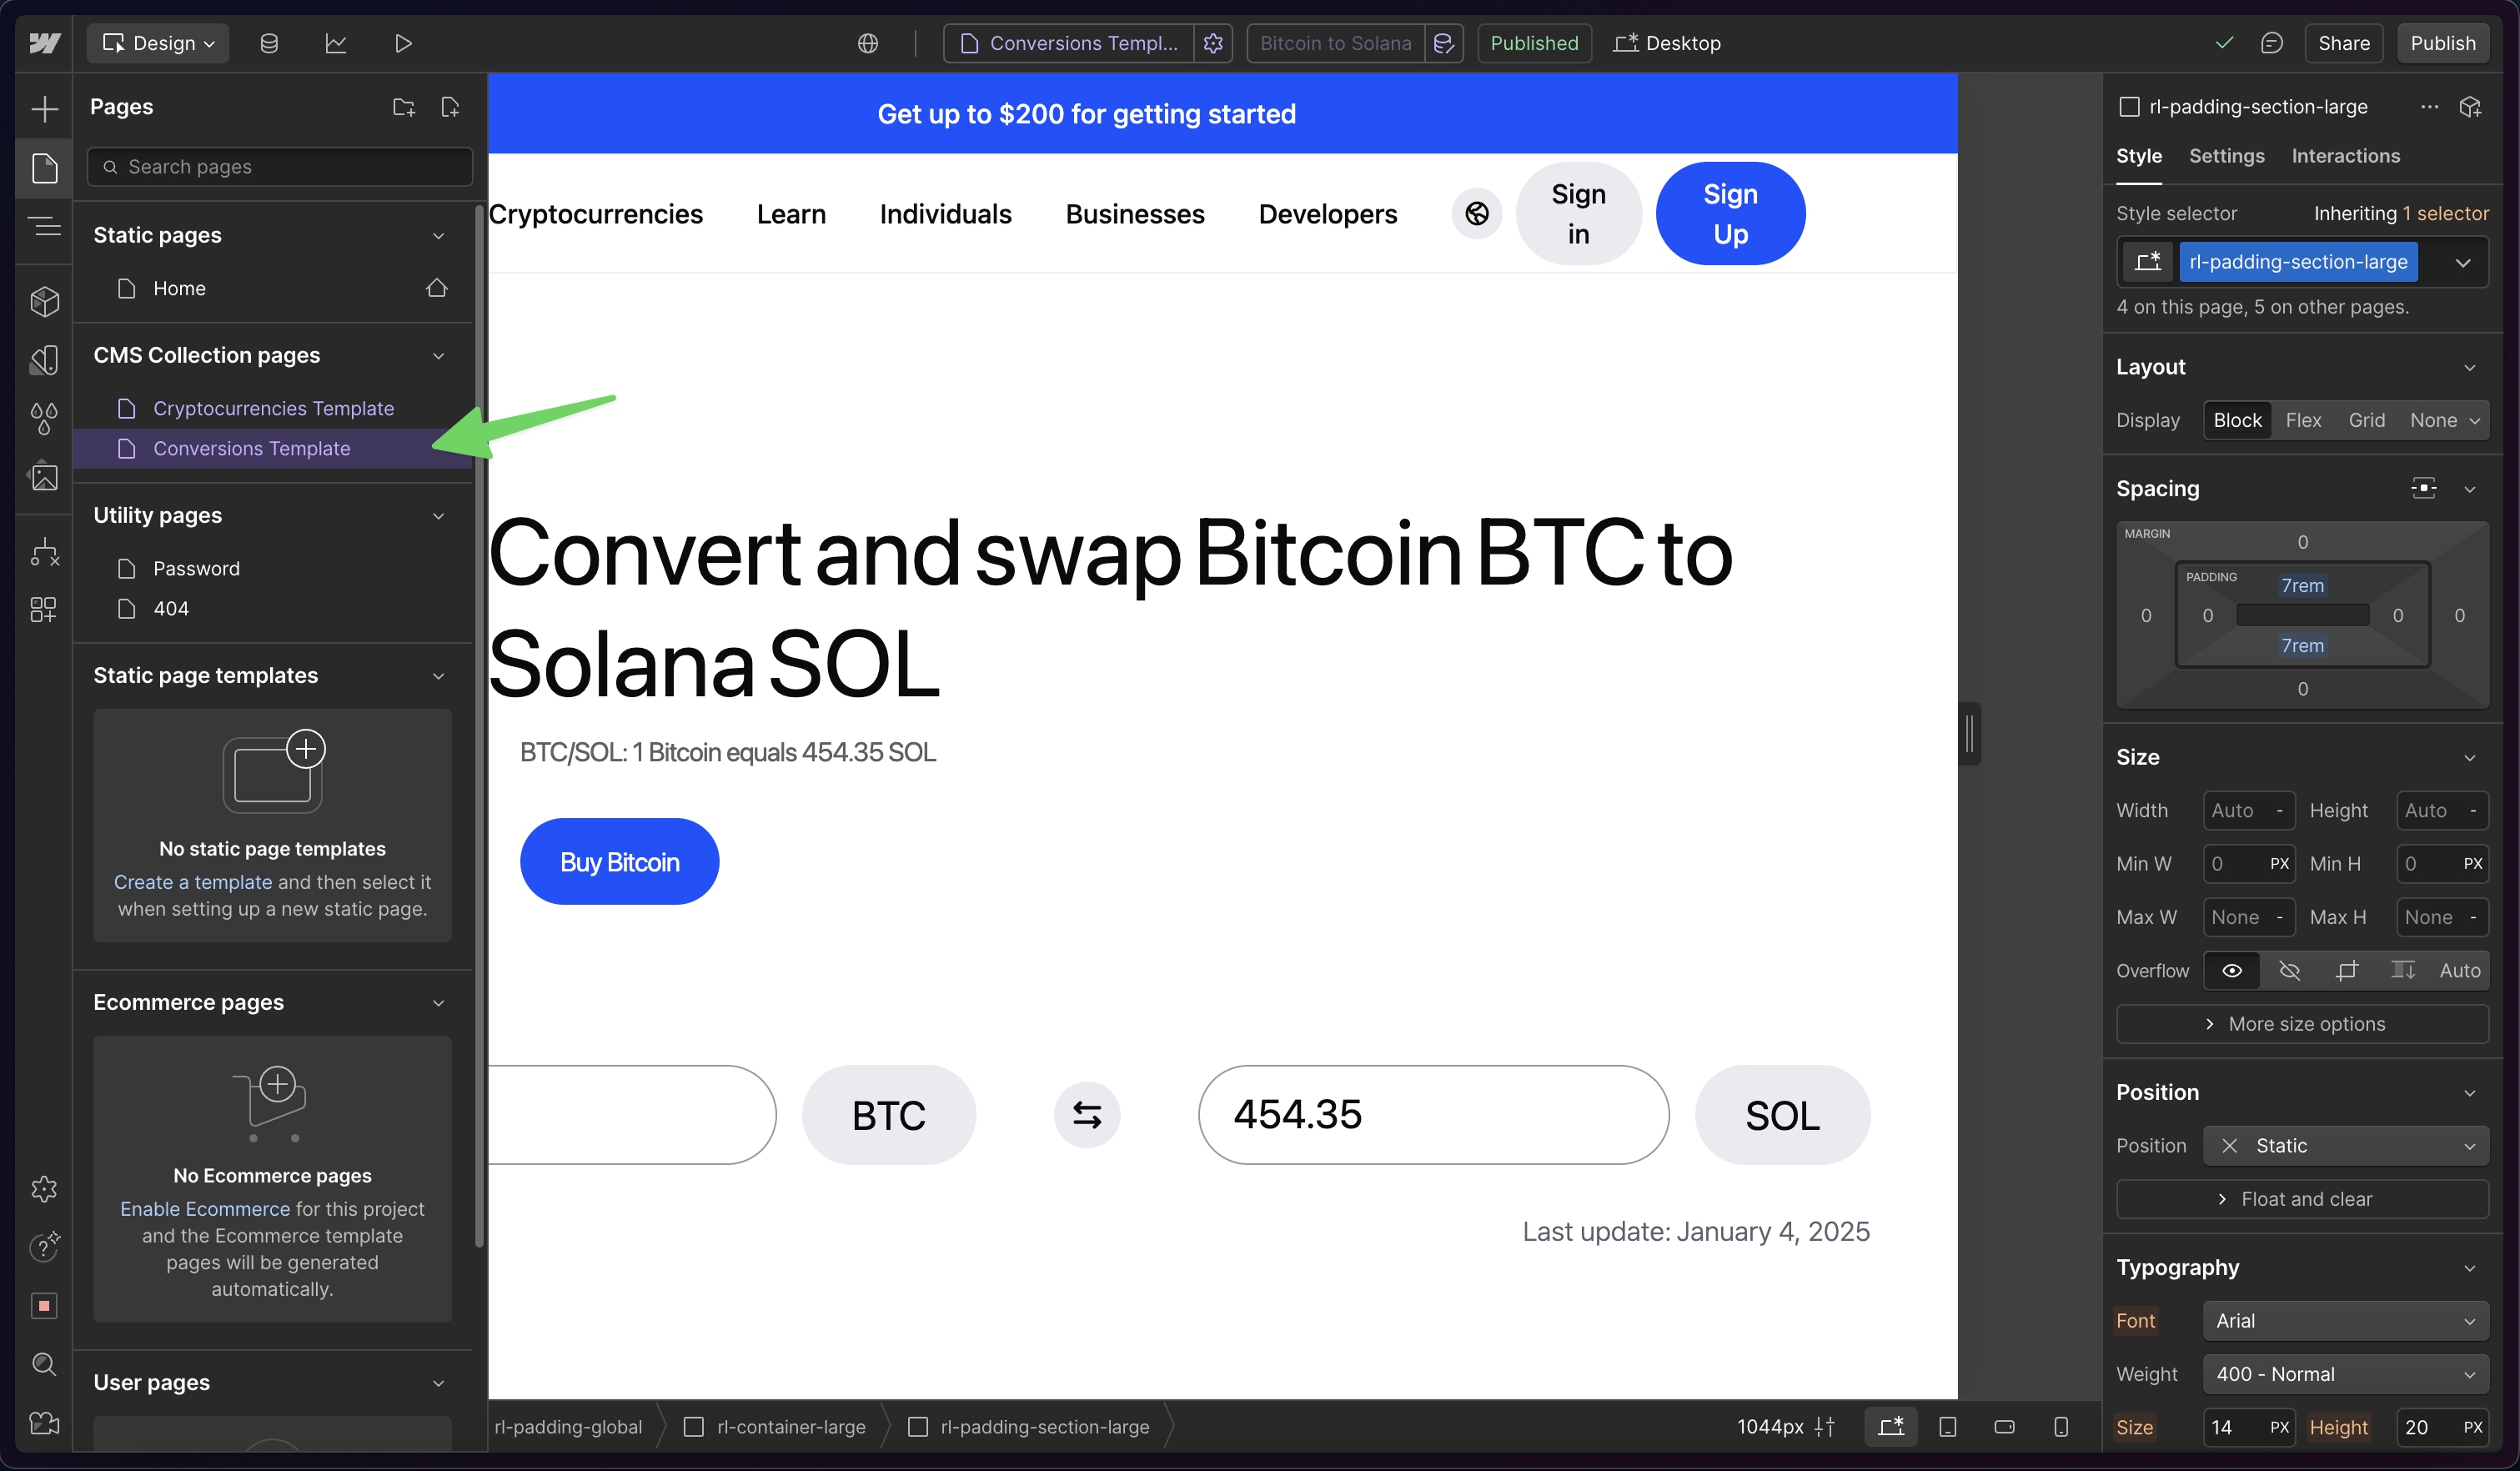
For now, don’t worry about dynamic data or programmatic SEO. Just build out your page as you would normally in Webflow. If you’re new to Webflow, check out Webflow University to learn the basics.
Here’s the Coinbase page this design is based off of for reference: https://www.coinbase.com/converter/btc/sol.
5) Insert dynamic data into elements by clicking “settings” and then “get text from Conversions”
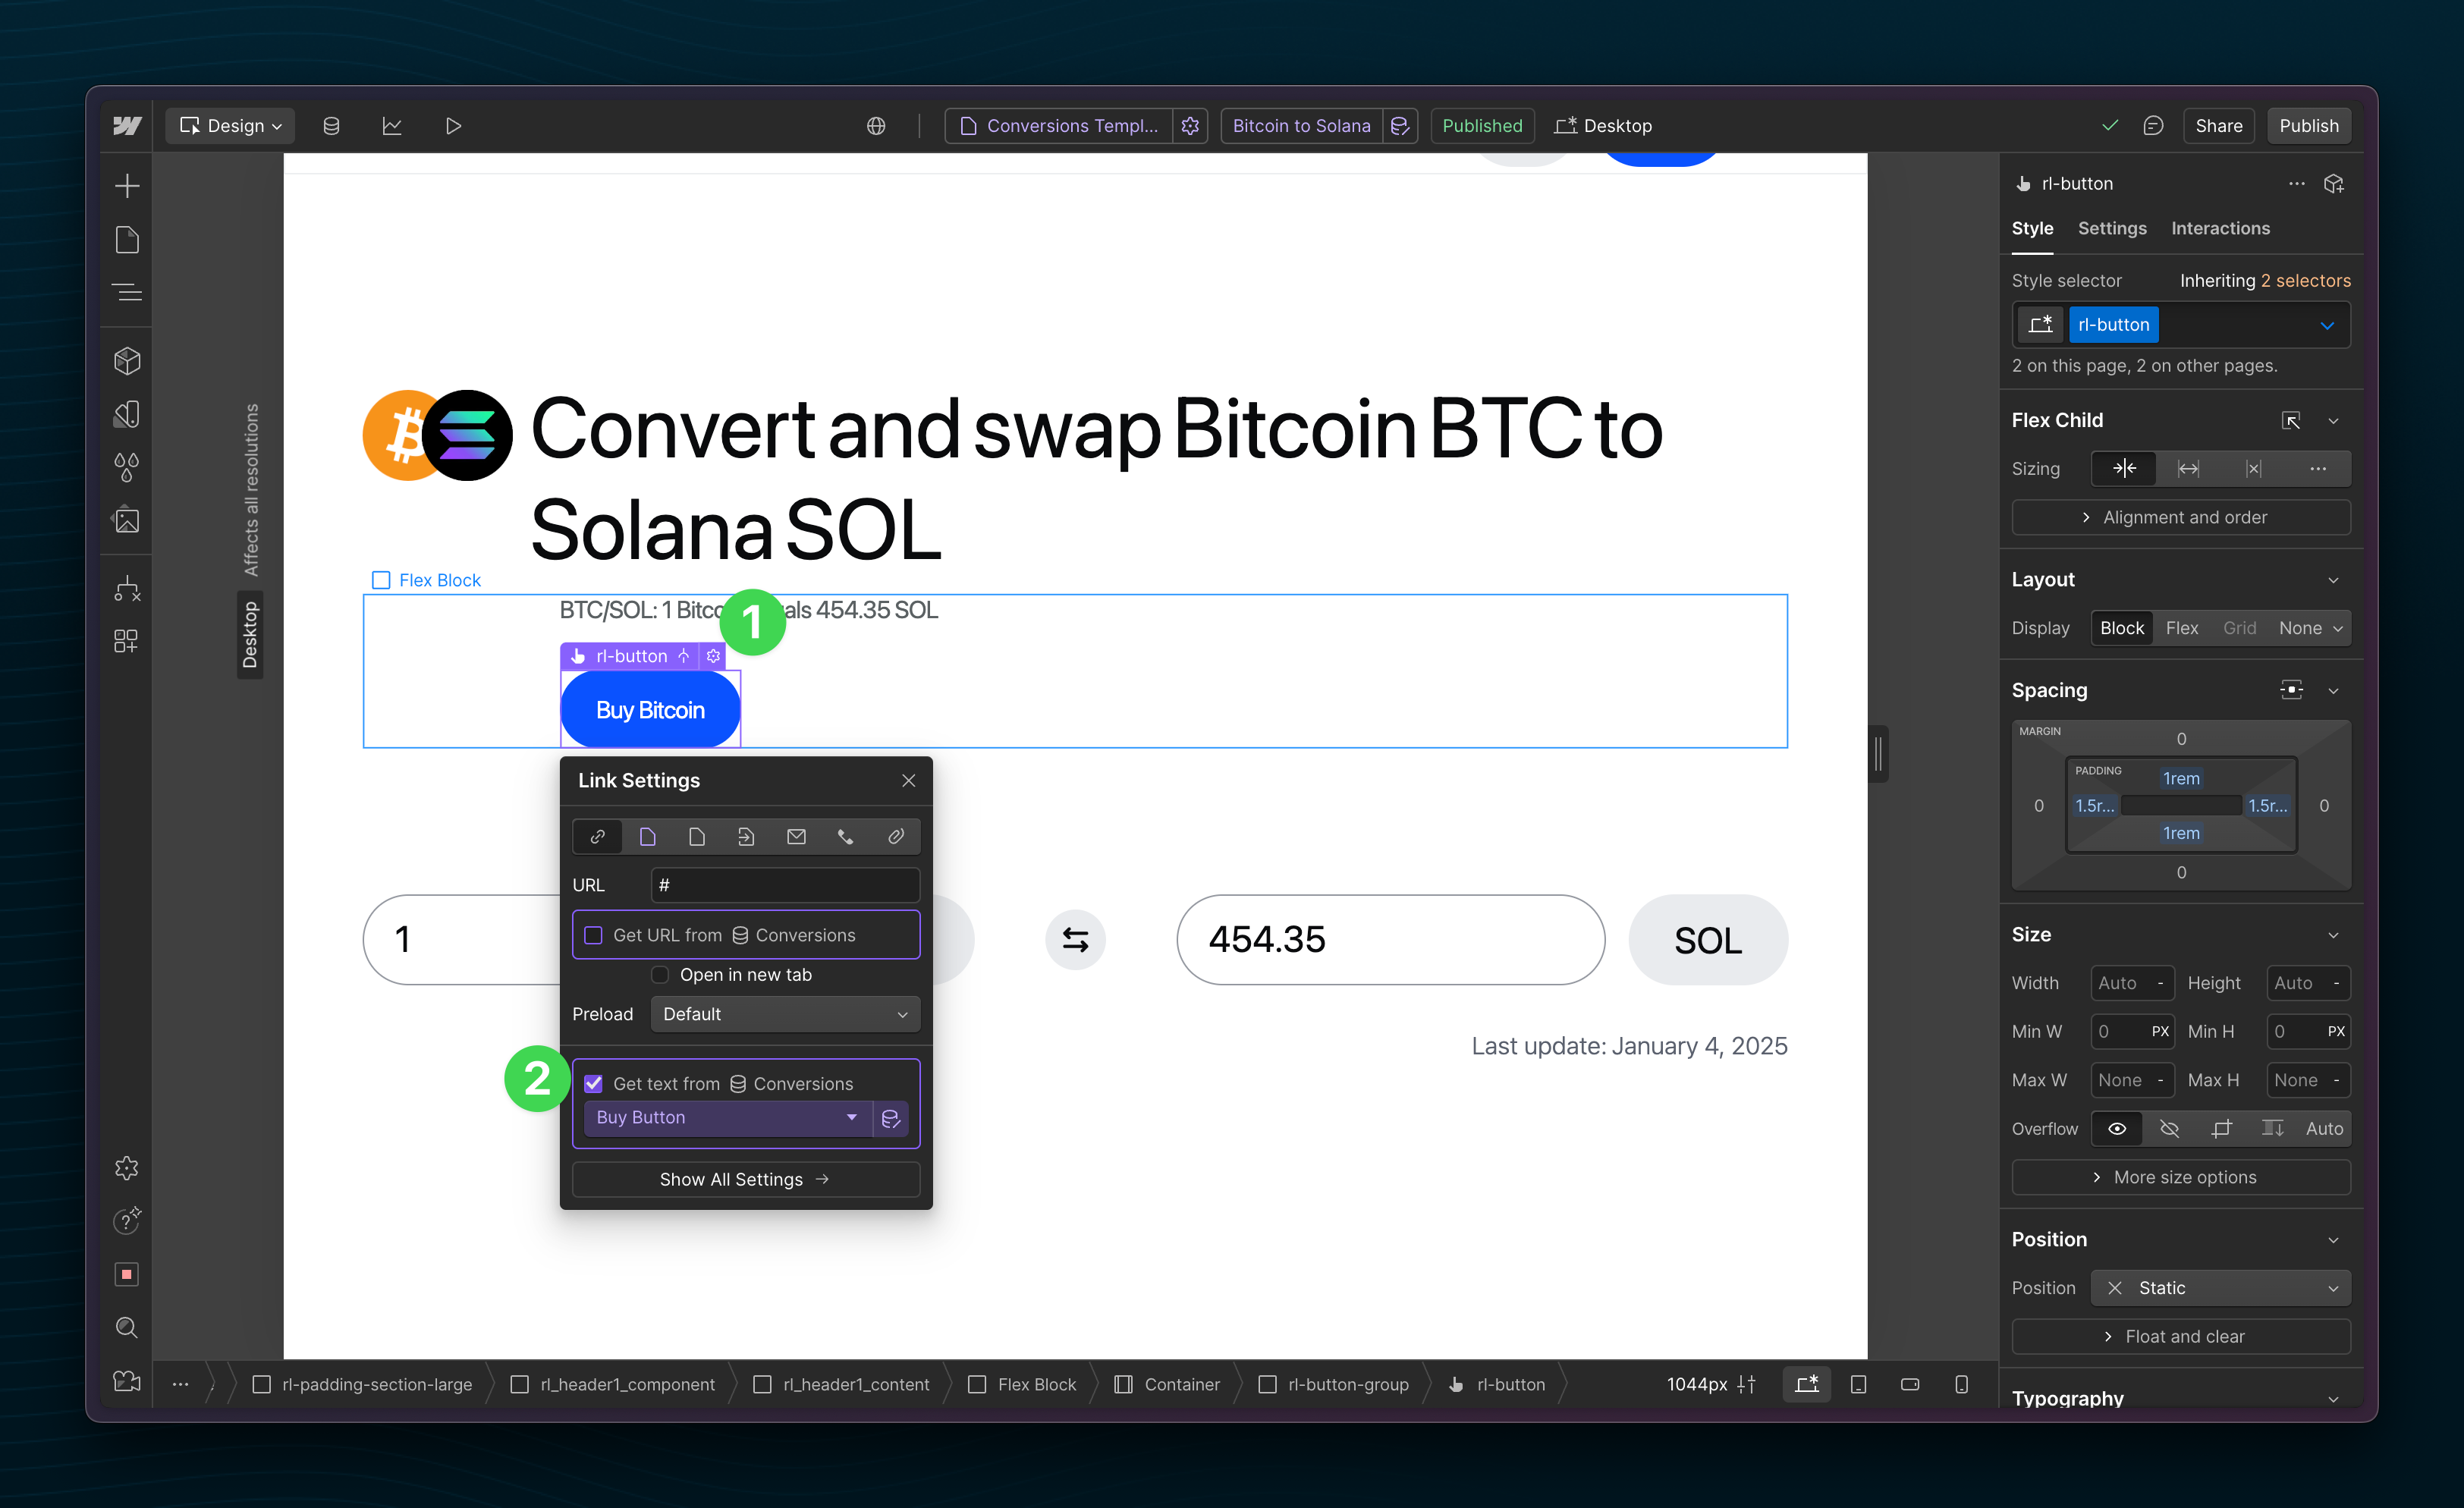
In the example above, we’re adding dynamic text to a button so it says “Buy {cryptocurrency}”. On this page it says “Buy Bitcoin” but, since it’s dynamic, on other pages it will say “Buy Solana”.
Repeat this for every piece of content you’d like to be dynamic. For example, you’ll likely want the divs below that say “SOL” to be dynamic and show the cryptocurrency Ticker.
6) Use the “Code Embed” element where you need more customization in dynamic elements
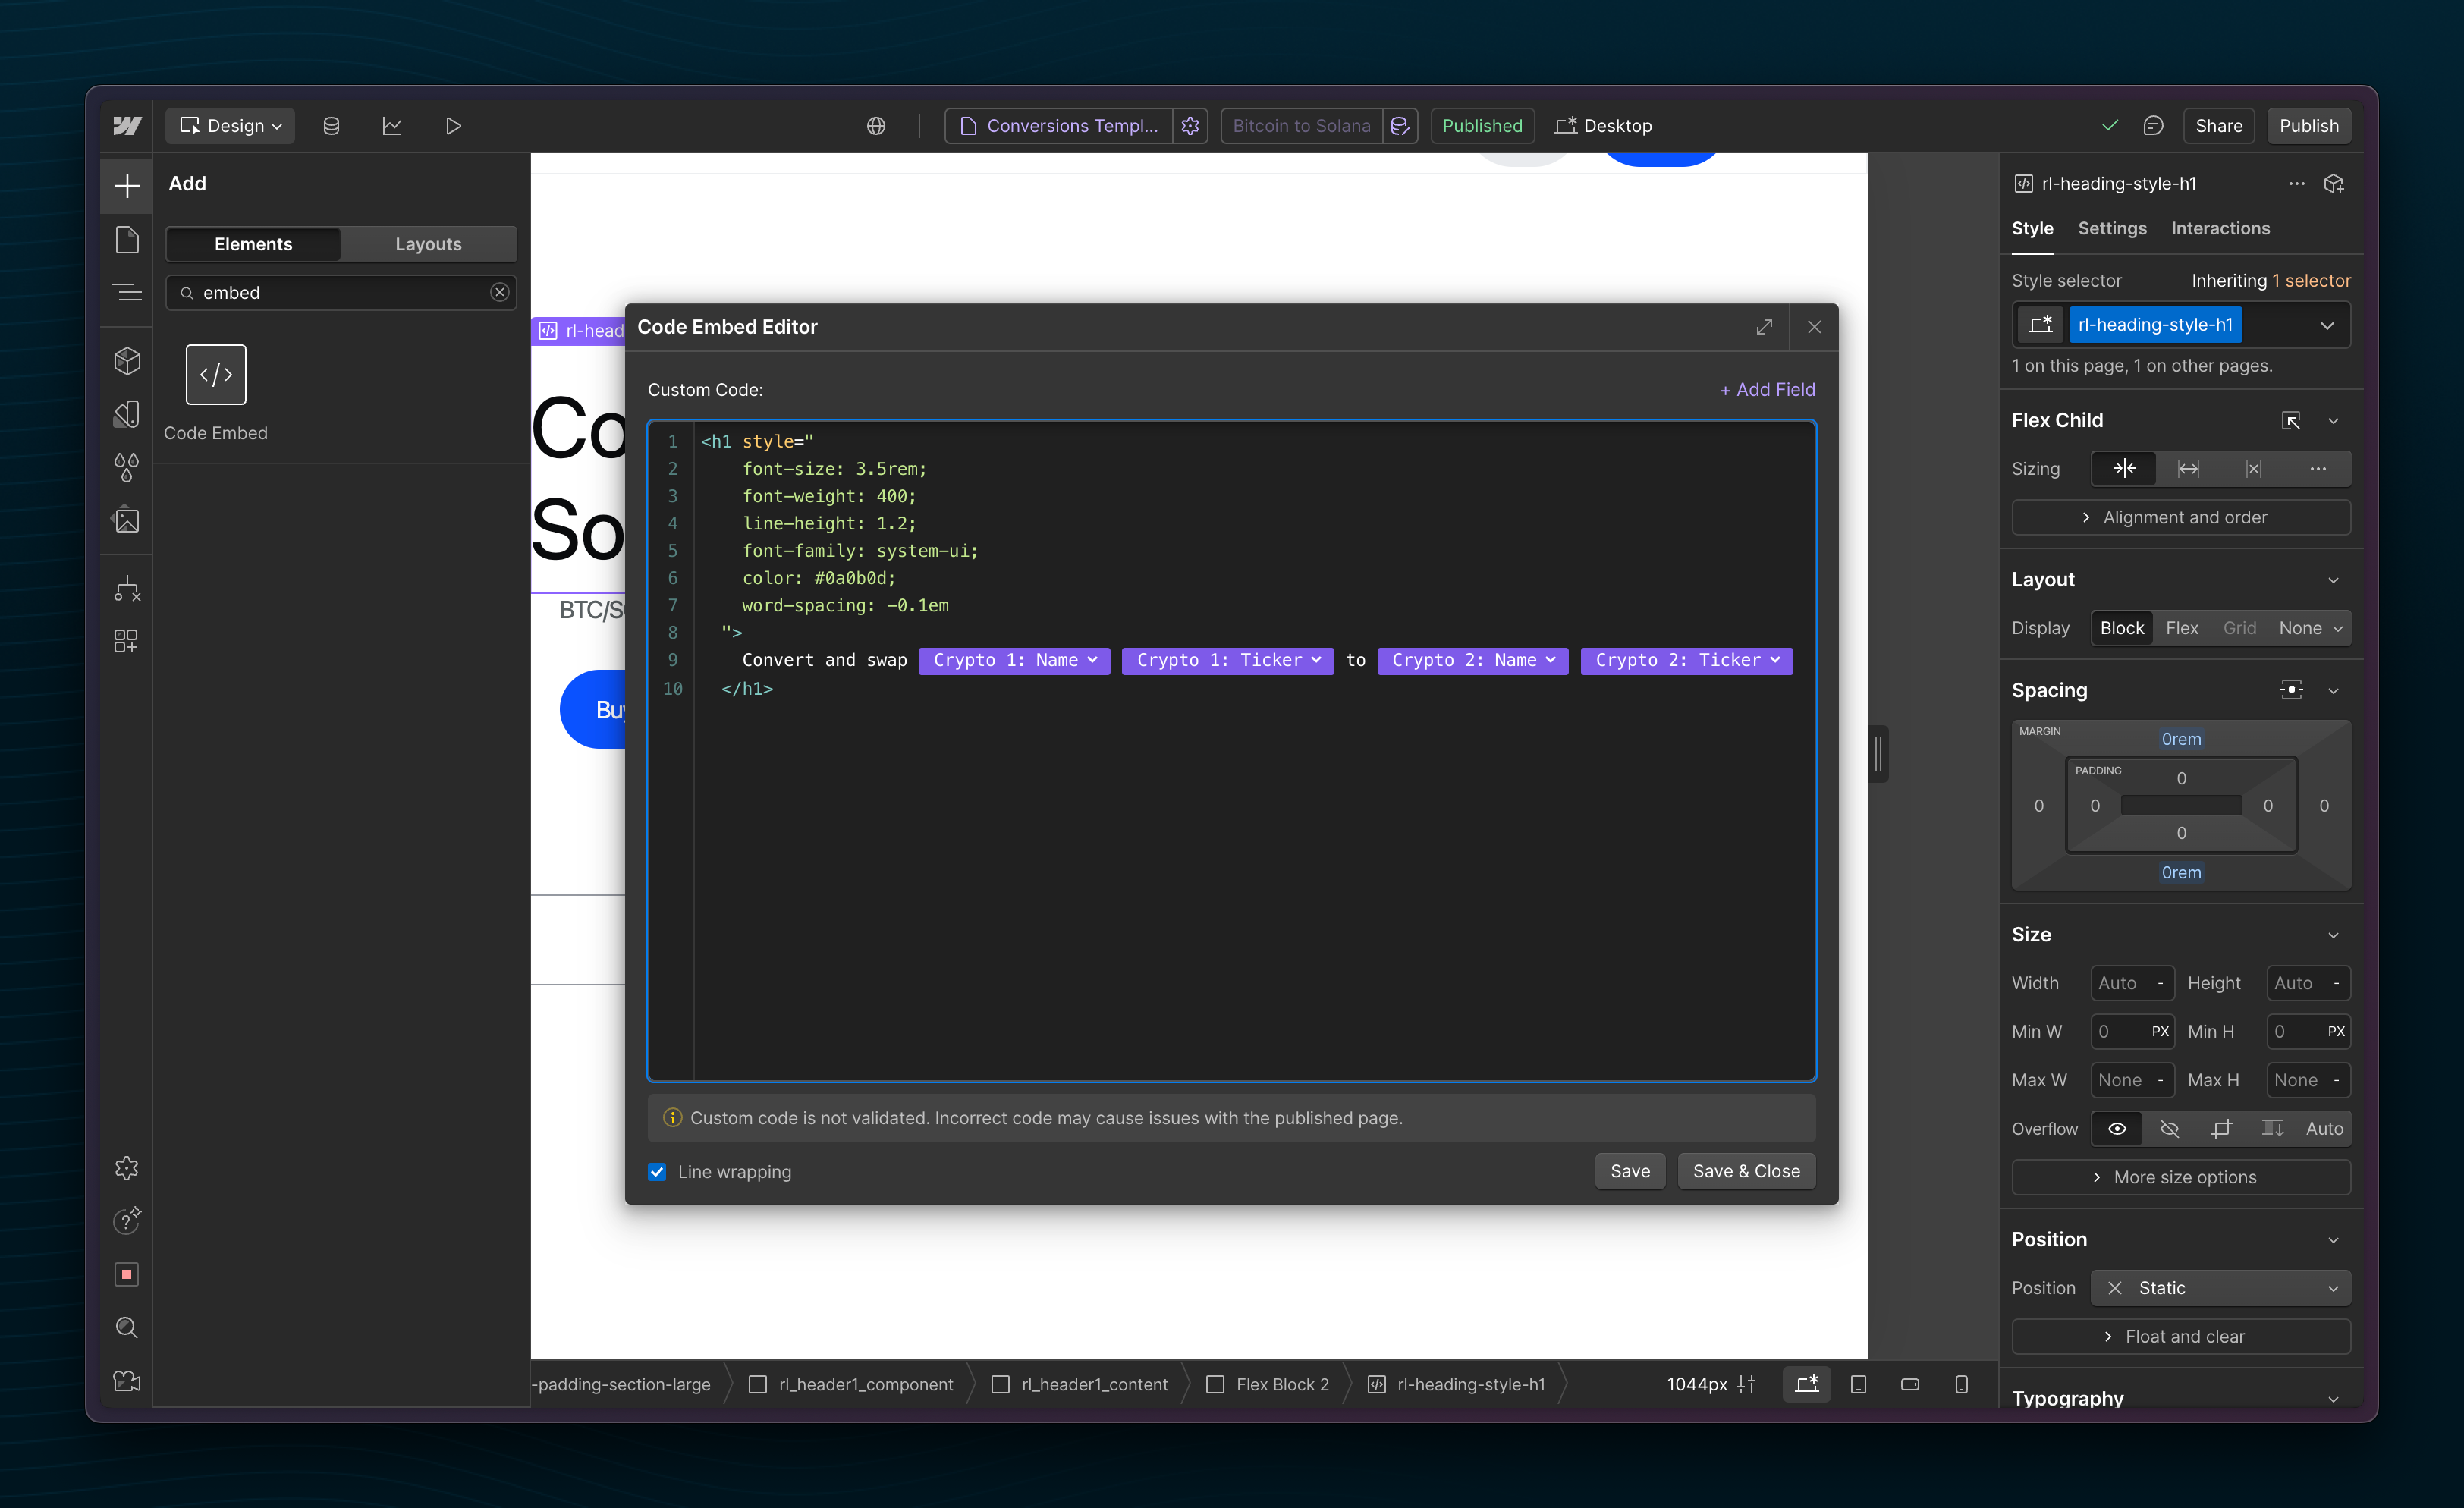
While Webflow’s “get text from” feature is pretty powerful, sometimes you need more customization for dynamic sentences. Instead of just inserting “Bitcoin” in some places you might want to insert “Convert and swap Bitcoin”. Here is where Webflow’s “Code Embed” element comes in.
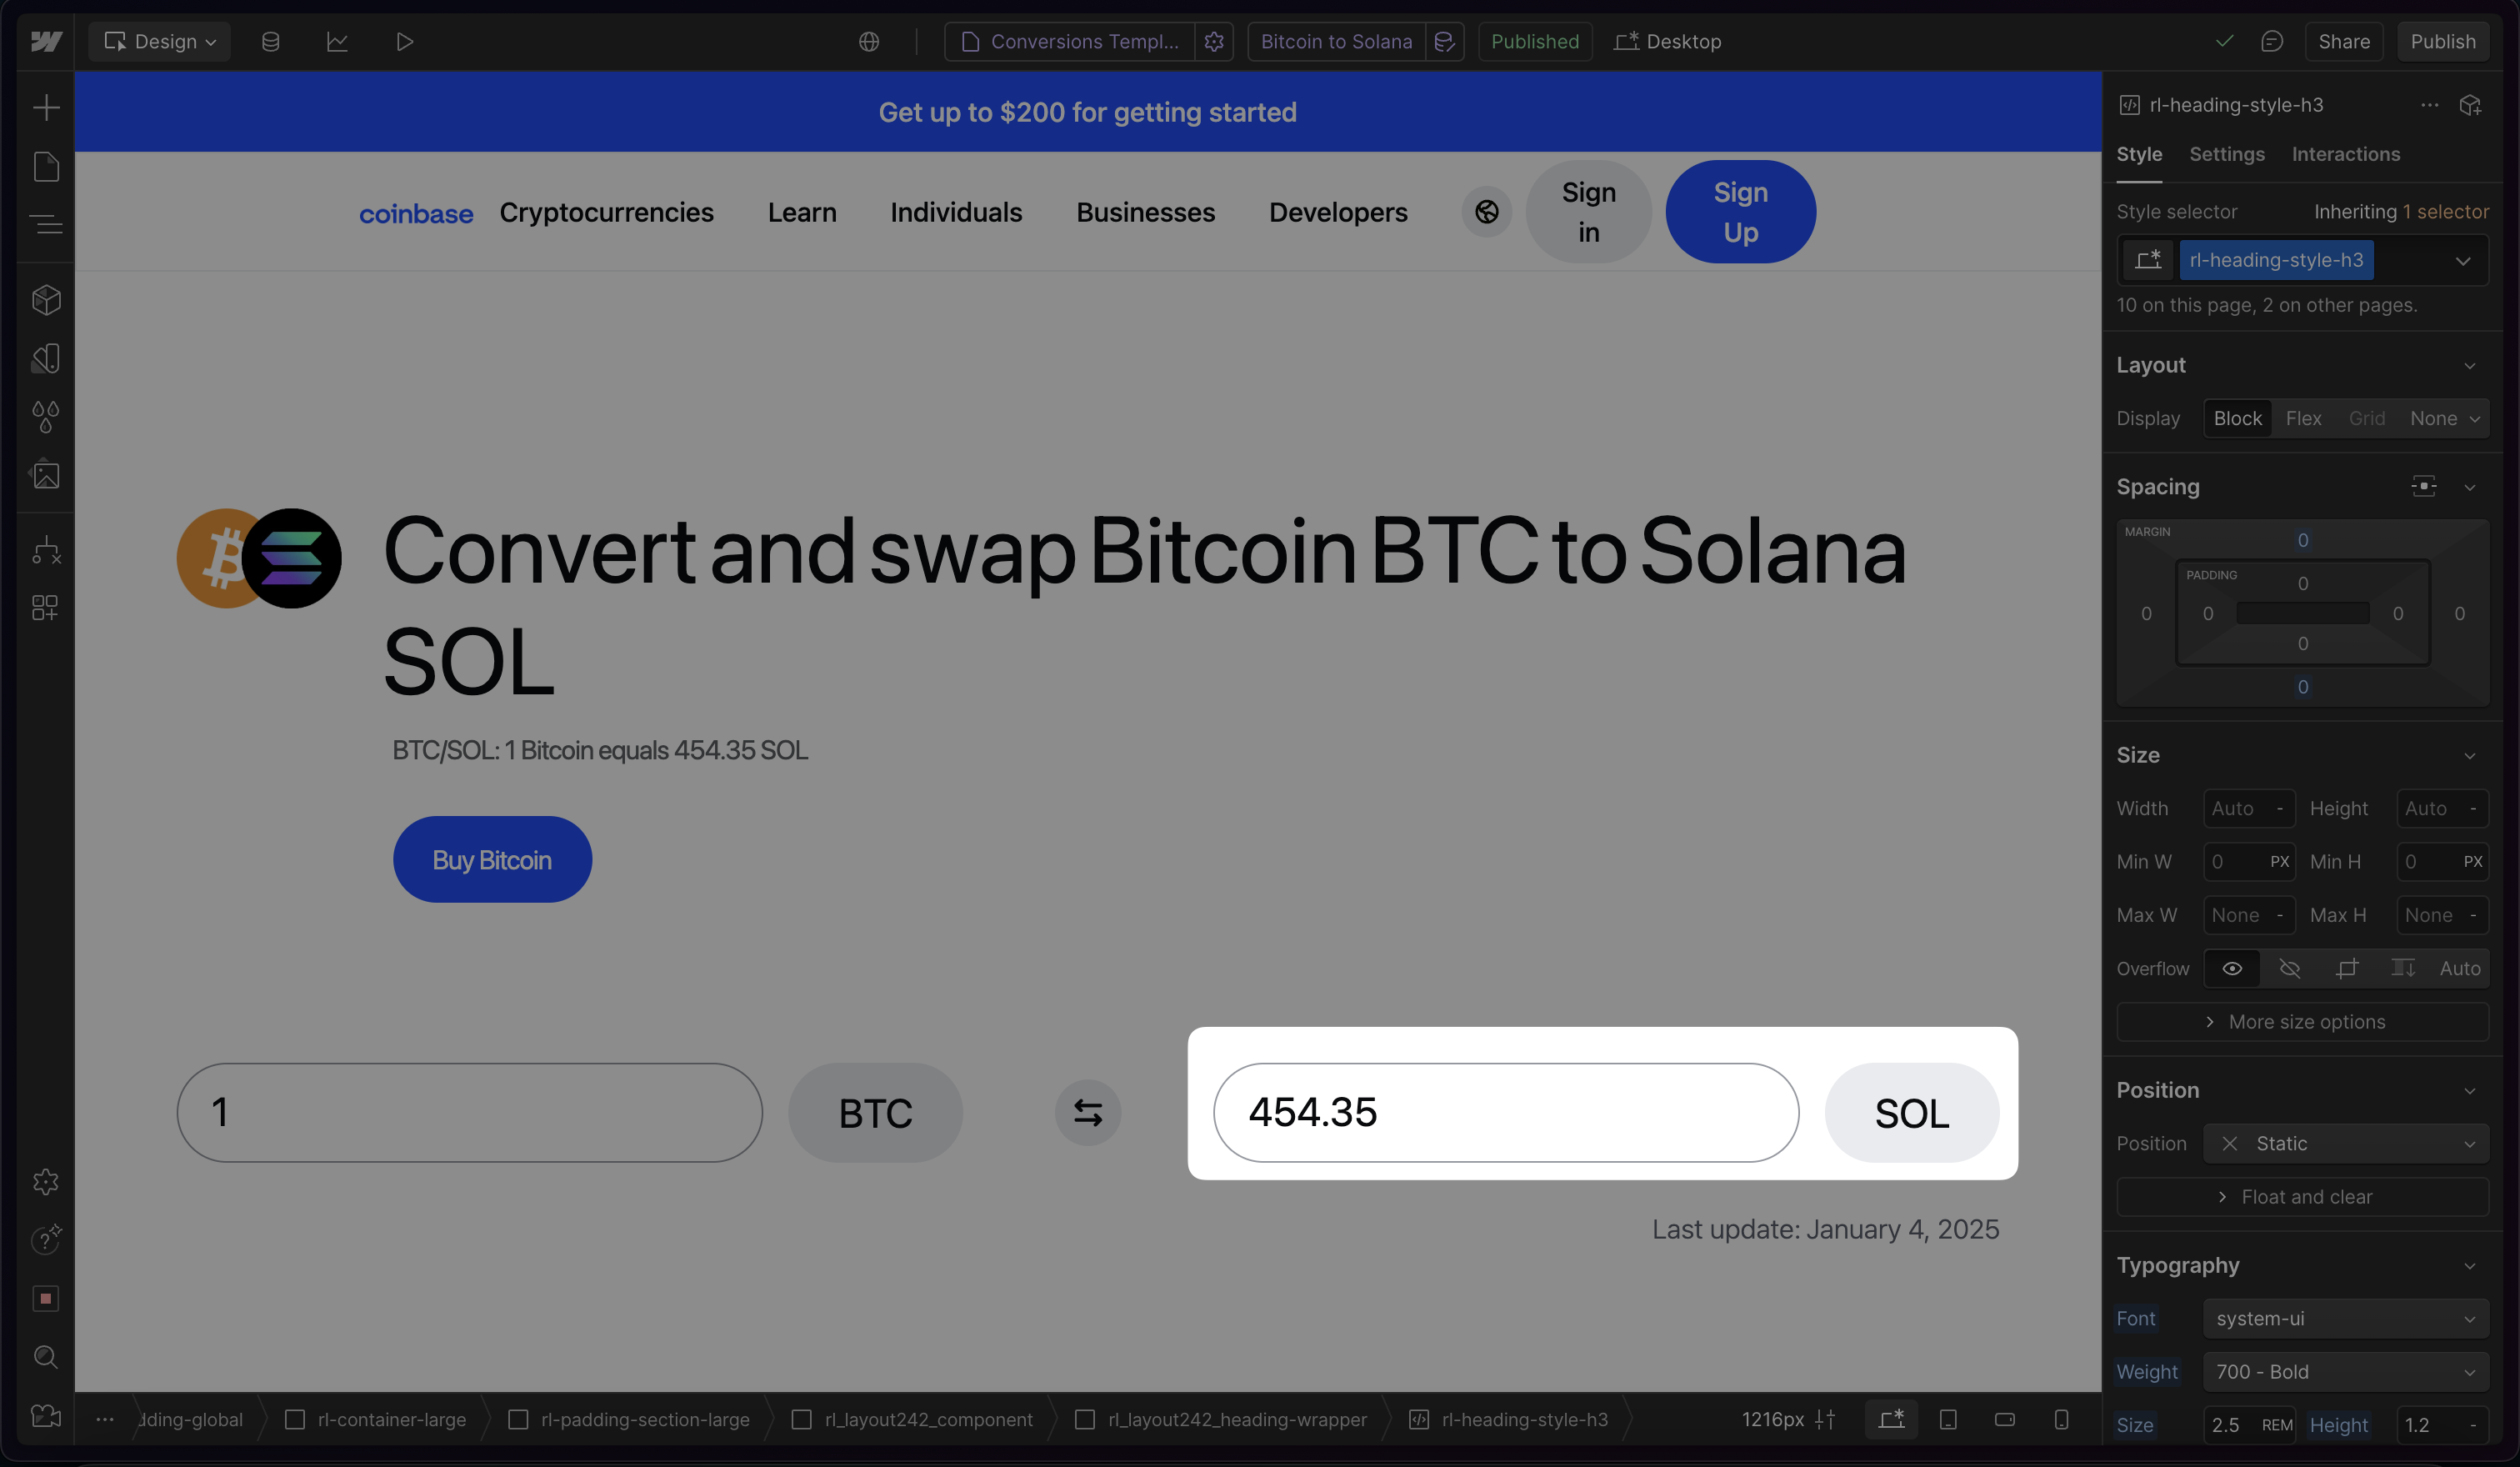
For example, in our H1, we want to say “Convert and swap {crypto_1} {crypto_1_ticker} to {crypto_2} {crypto_2_ticker} like so:
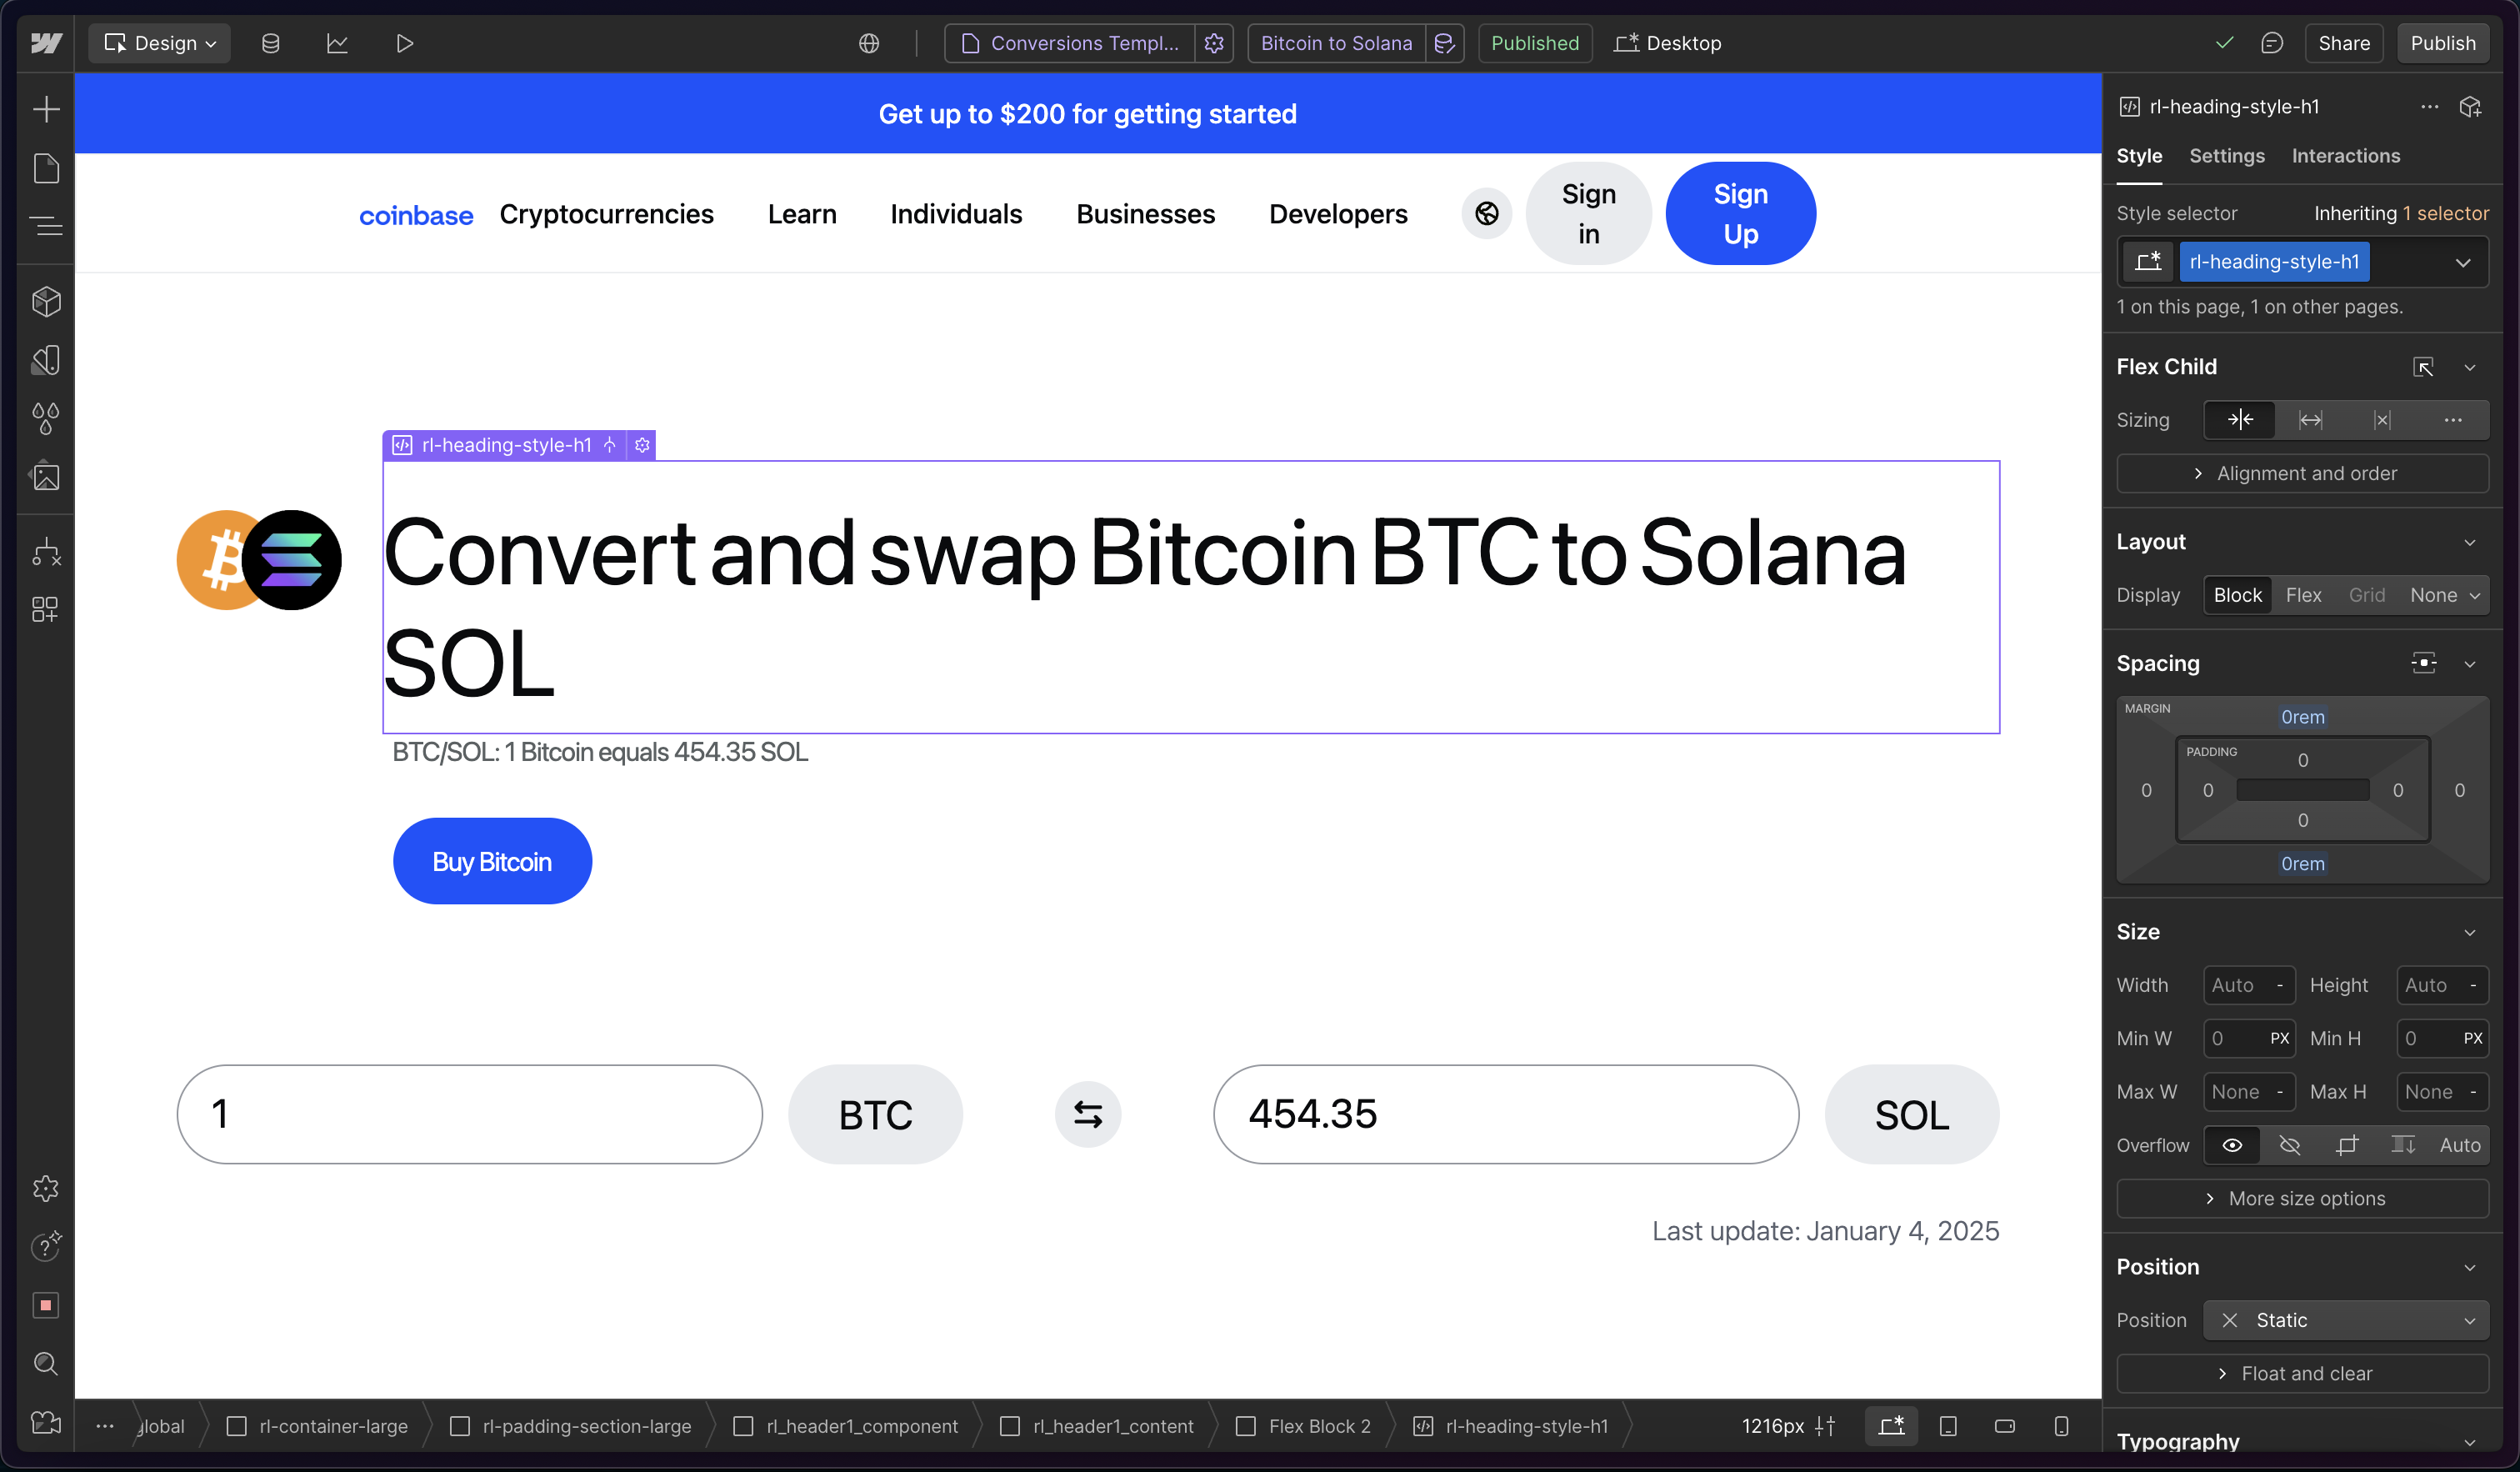
Webflow’s code embed element let’s us do this. Here’s the code from the code embed above:
<h1 style="
font-size: 3.5rem;
font-weight: 400;
line-height: 1.2;
font-family: system-ui;
color: #0a0b0d;
word-spacing: -0.1em
">
Convert and swap {{wf {"path":"crypto-1:name","type":"PlainText"\} }} {{wf {"path":"crypto-1:ticker","type":"PlainText"\} }} to {{wf {"path":"crypto-2:name","type":"PlainText"\} }} {{wf {"path":"crypto-2:ticker","type":"PlainText"\} }}
</h1>
7) Publish your Webflow site
You’ve set up your frontend, congrats! Now time to start working on the backend 💪.
Whalesync
Once you’ve set up your page template in Webflow, we’ll need to connect those pages to a database where we’ll store all the data for thousands of pages. Whalesync is a tool that connects Webflow with Airtable for this exact purpose!
While Whalesync’s main value is in continuously two-way syncing your data, it can also be used to create the necessary tables in Airtable for your sync.
1) Create a new Sync and connect Webflow and Airtable
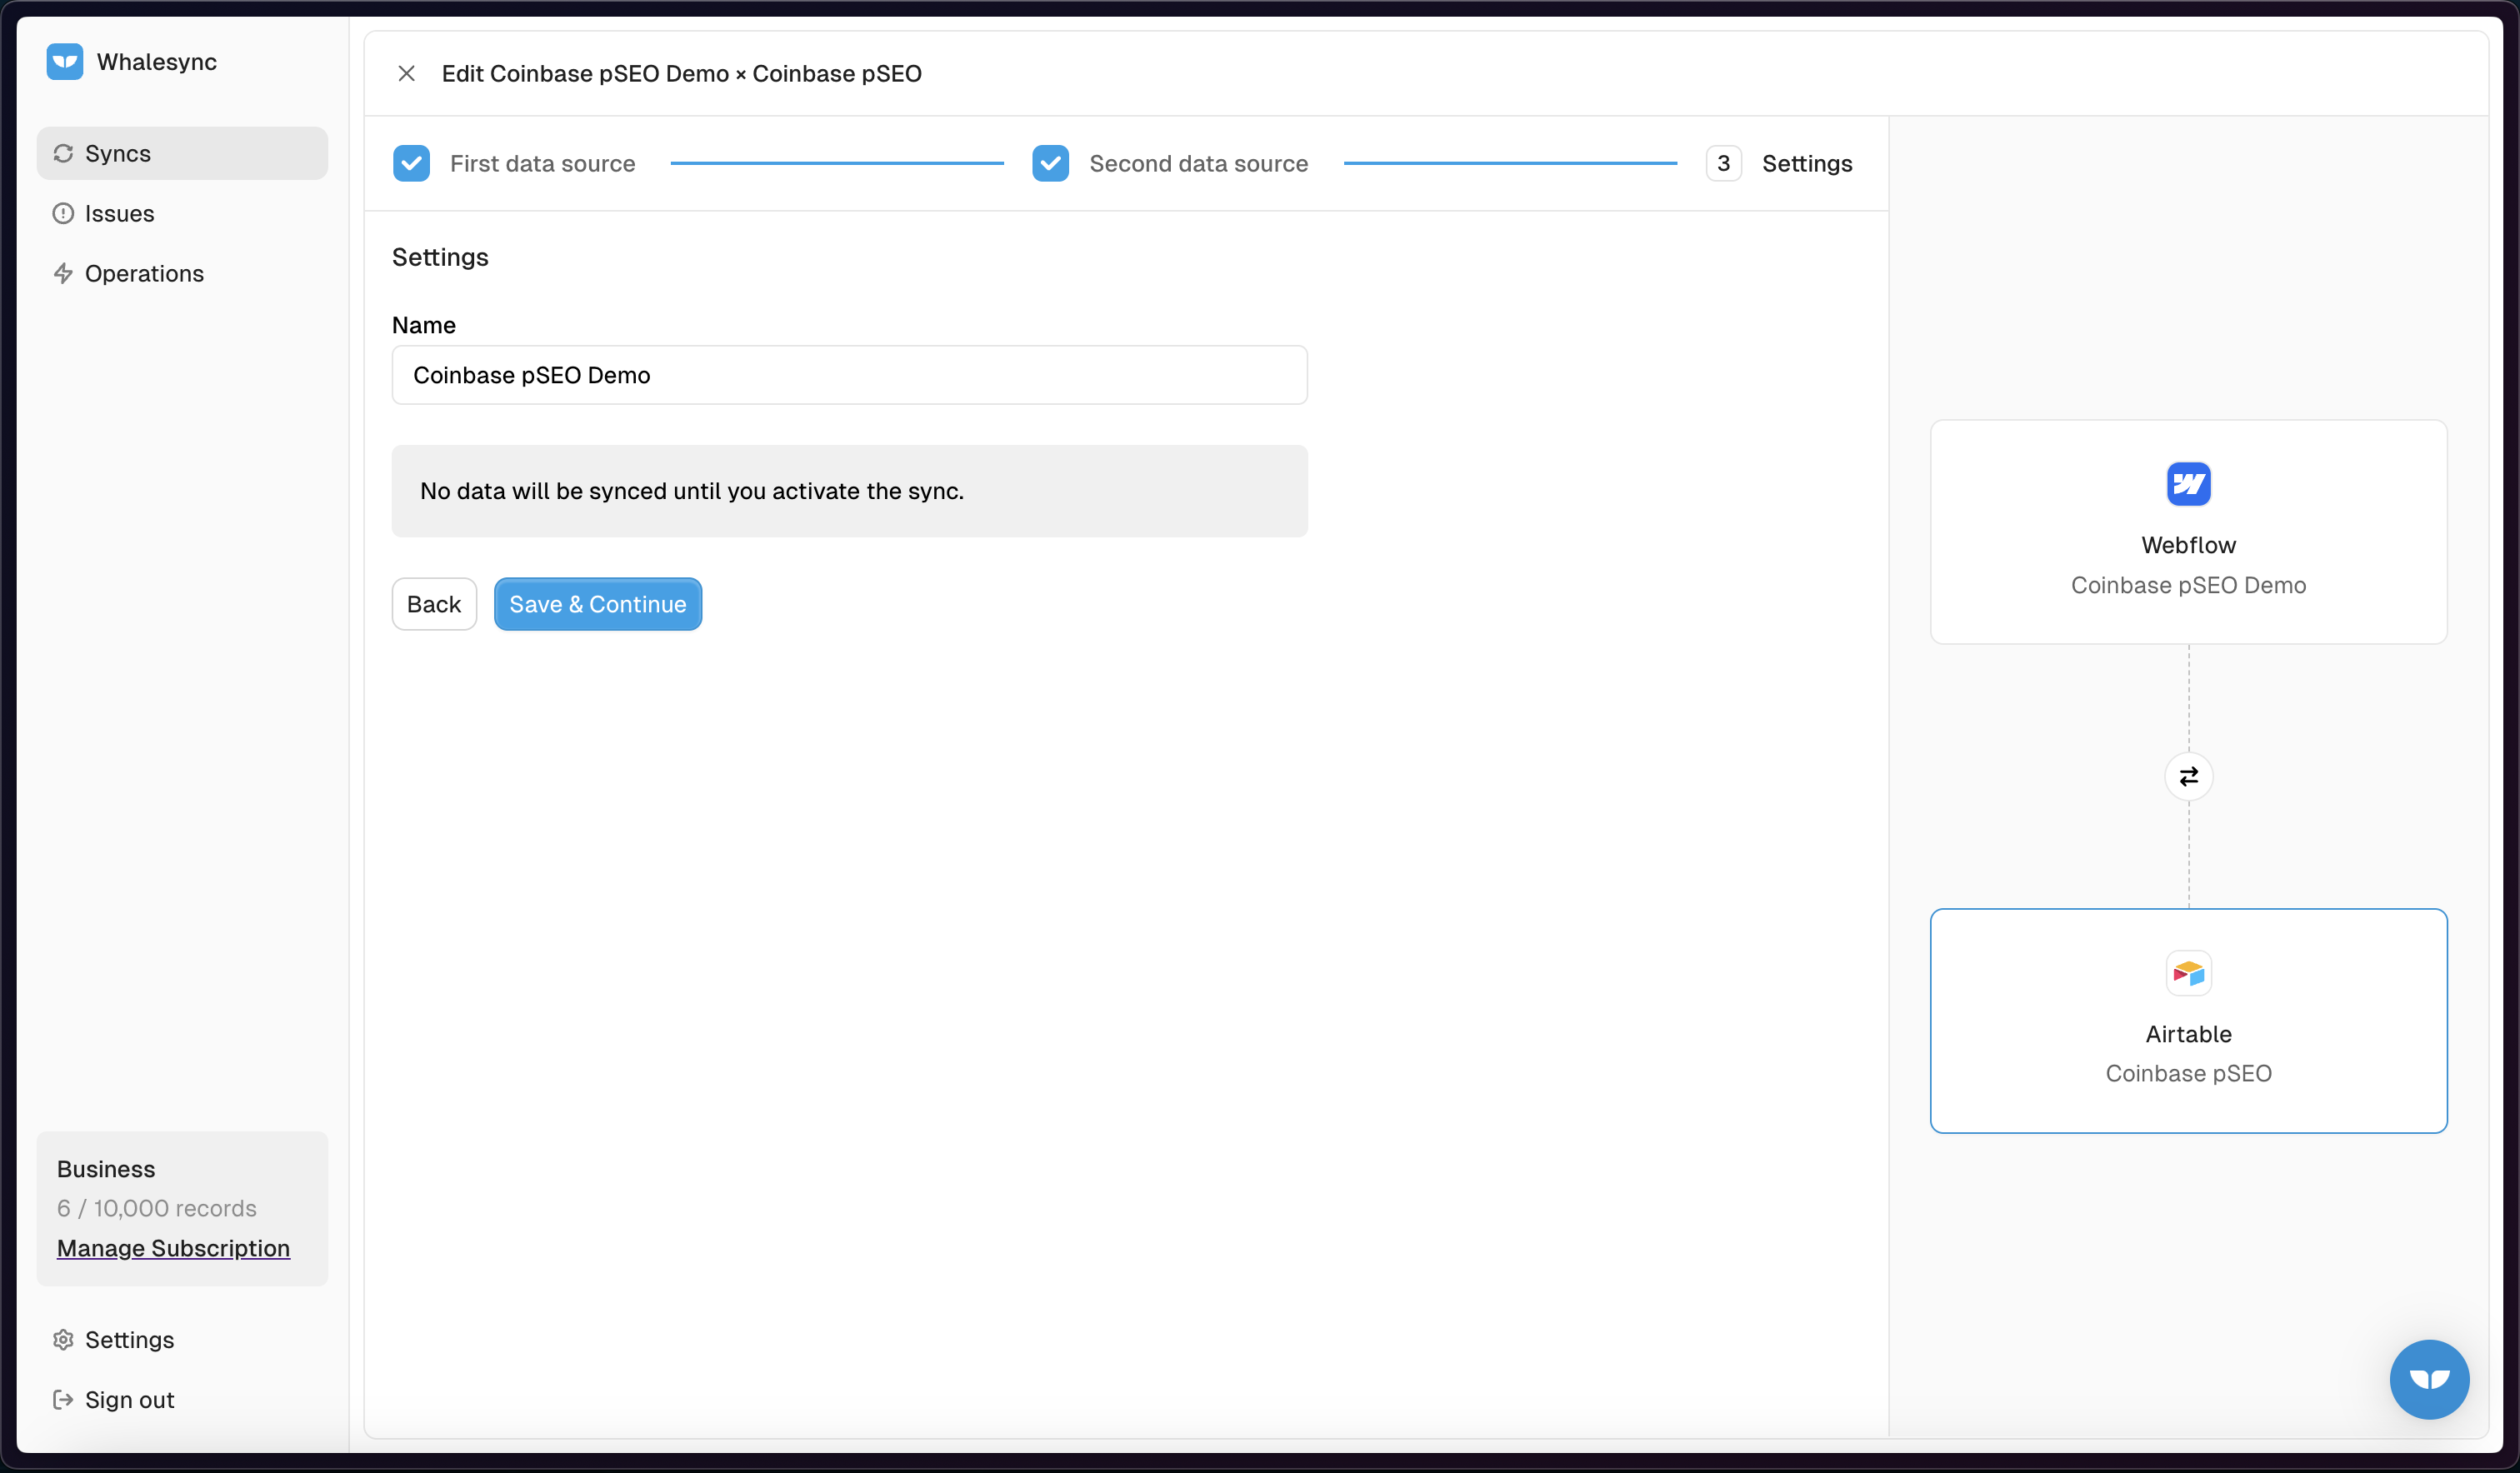
2) Select the table “Cryptocurrencies” in Webflow and “Create new table” in Airtable
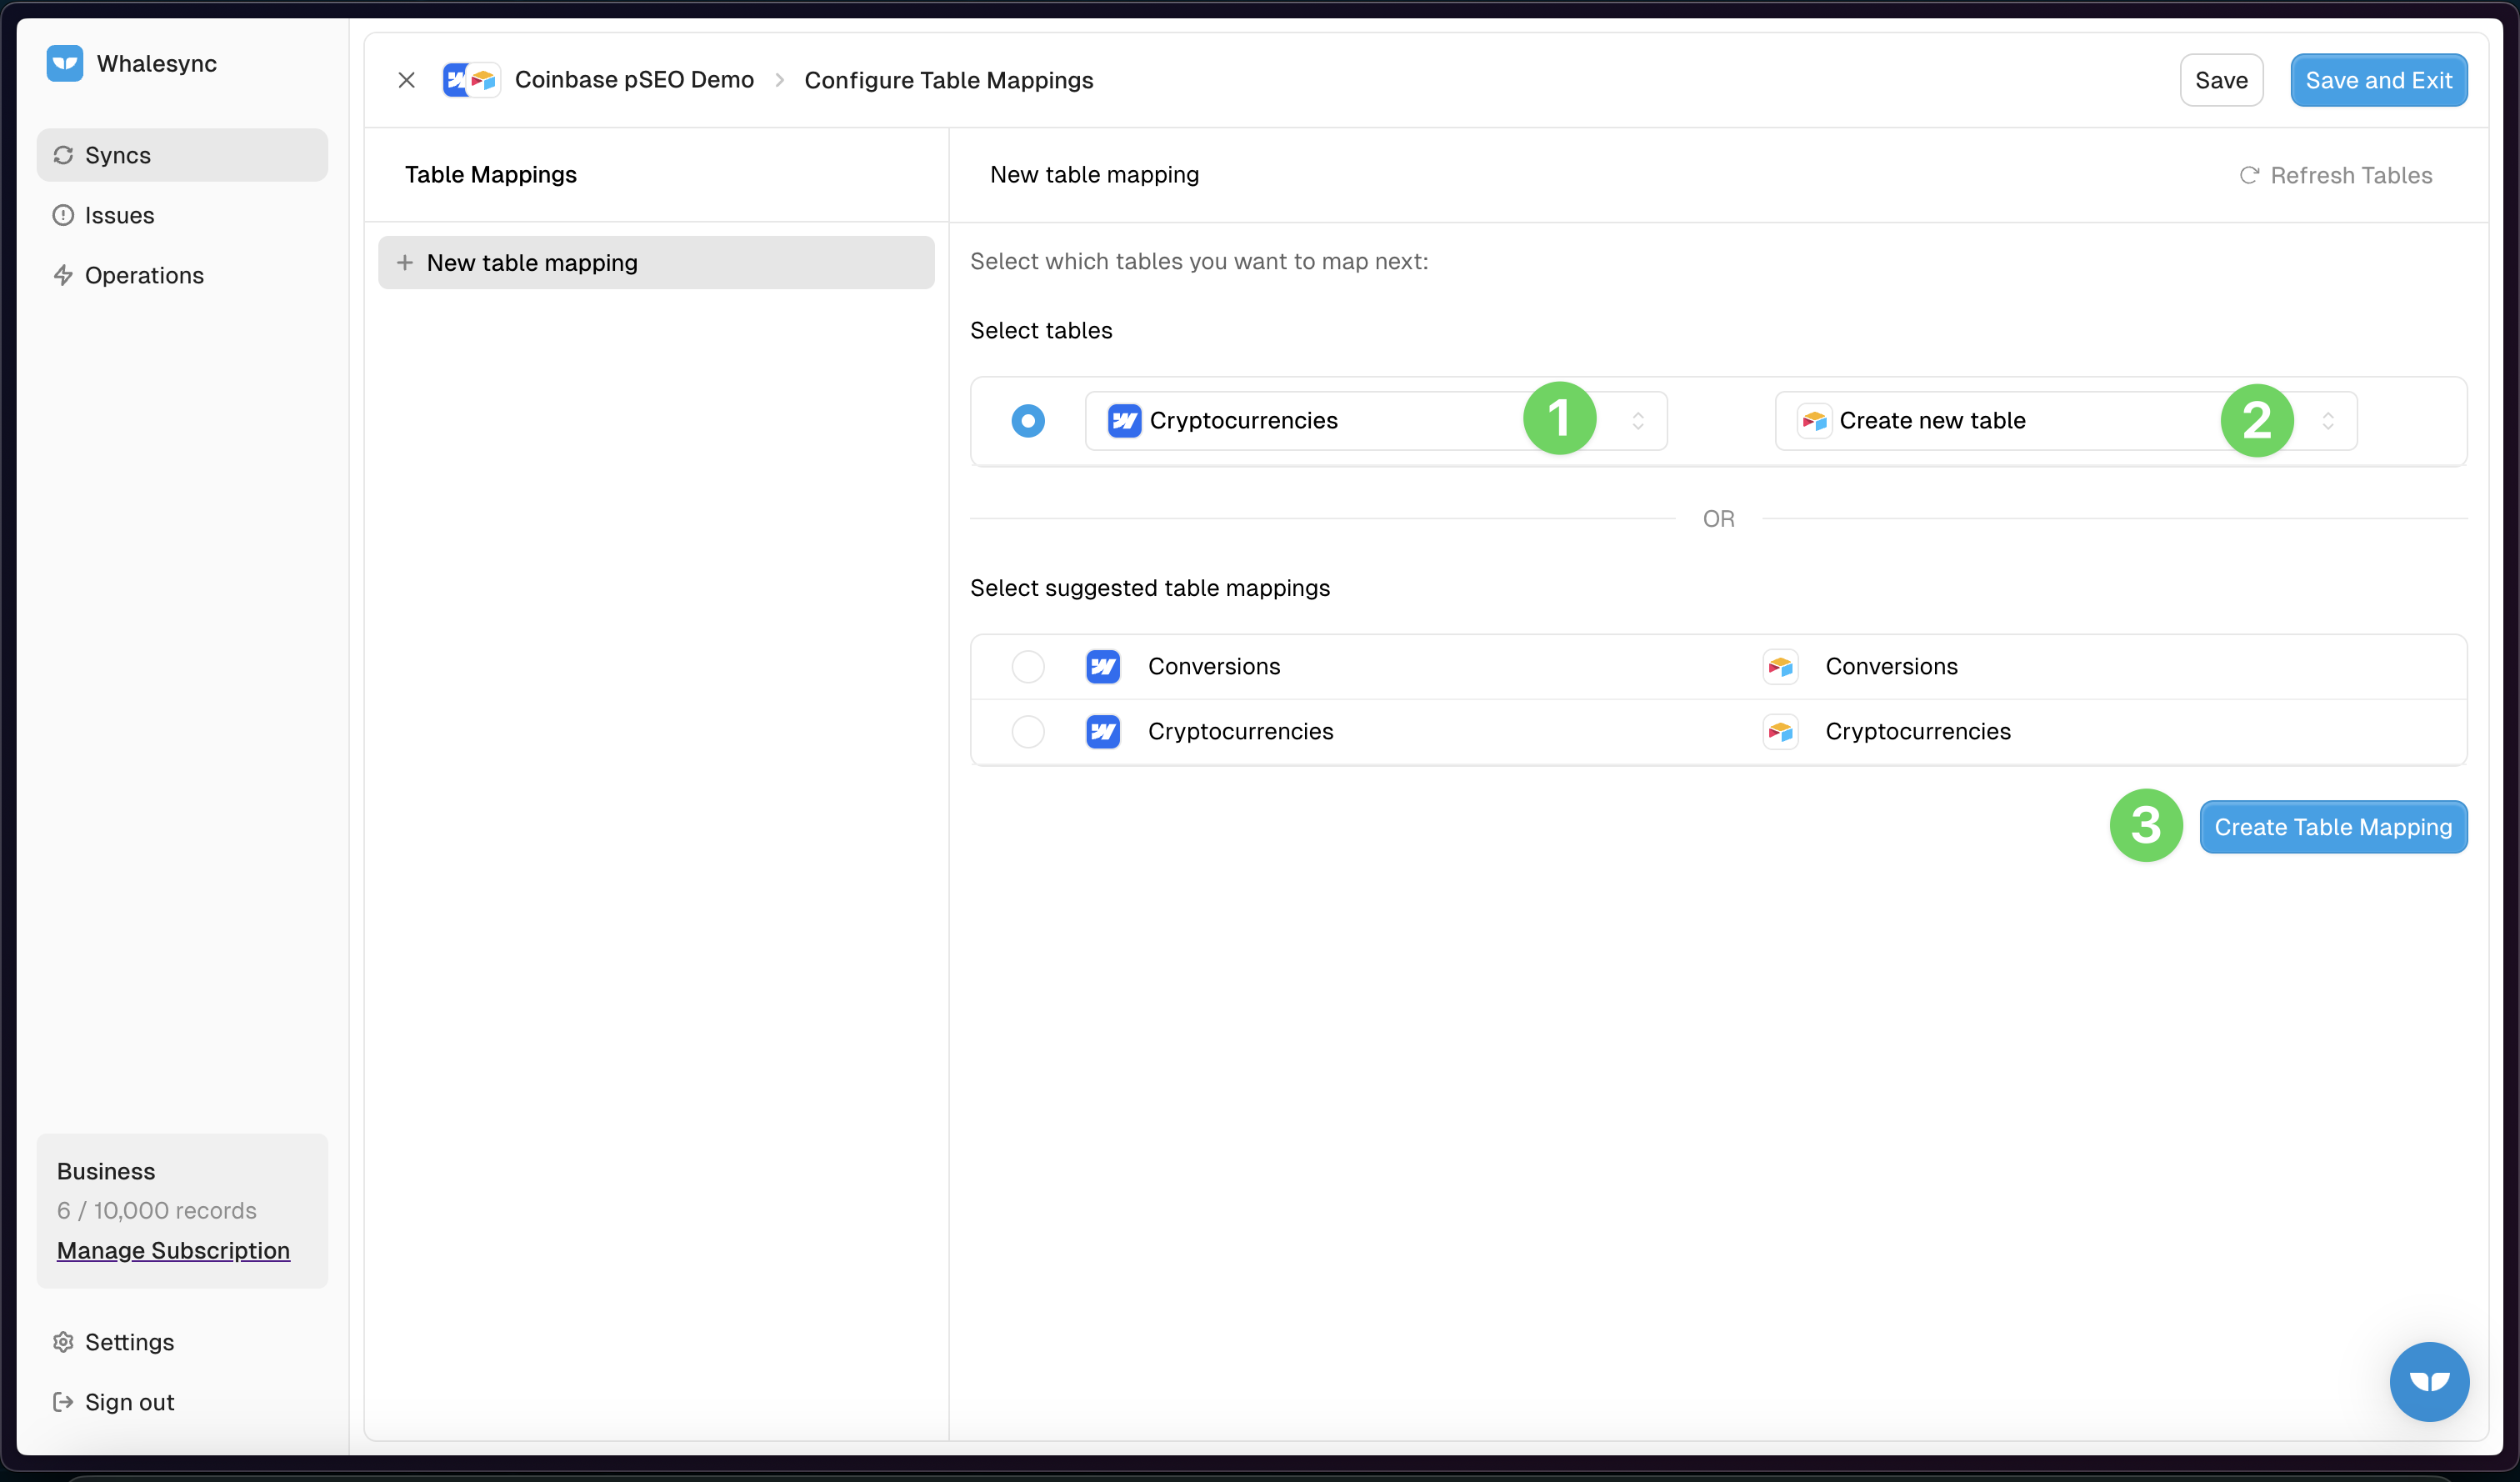
For every collection in Webflow, we’re going to map a corresponding table in Airtable. Similarly, for every field in our Webflow CMS, we’re going to map a corresponding field in Airtable.
Whalesync makes this process easier by letting you automatically create new tables in Airtable based on the collections you have in Webflow.
3) Select all fields and confirm the auto-created table in Airtable
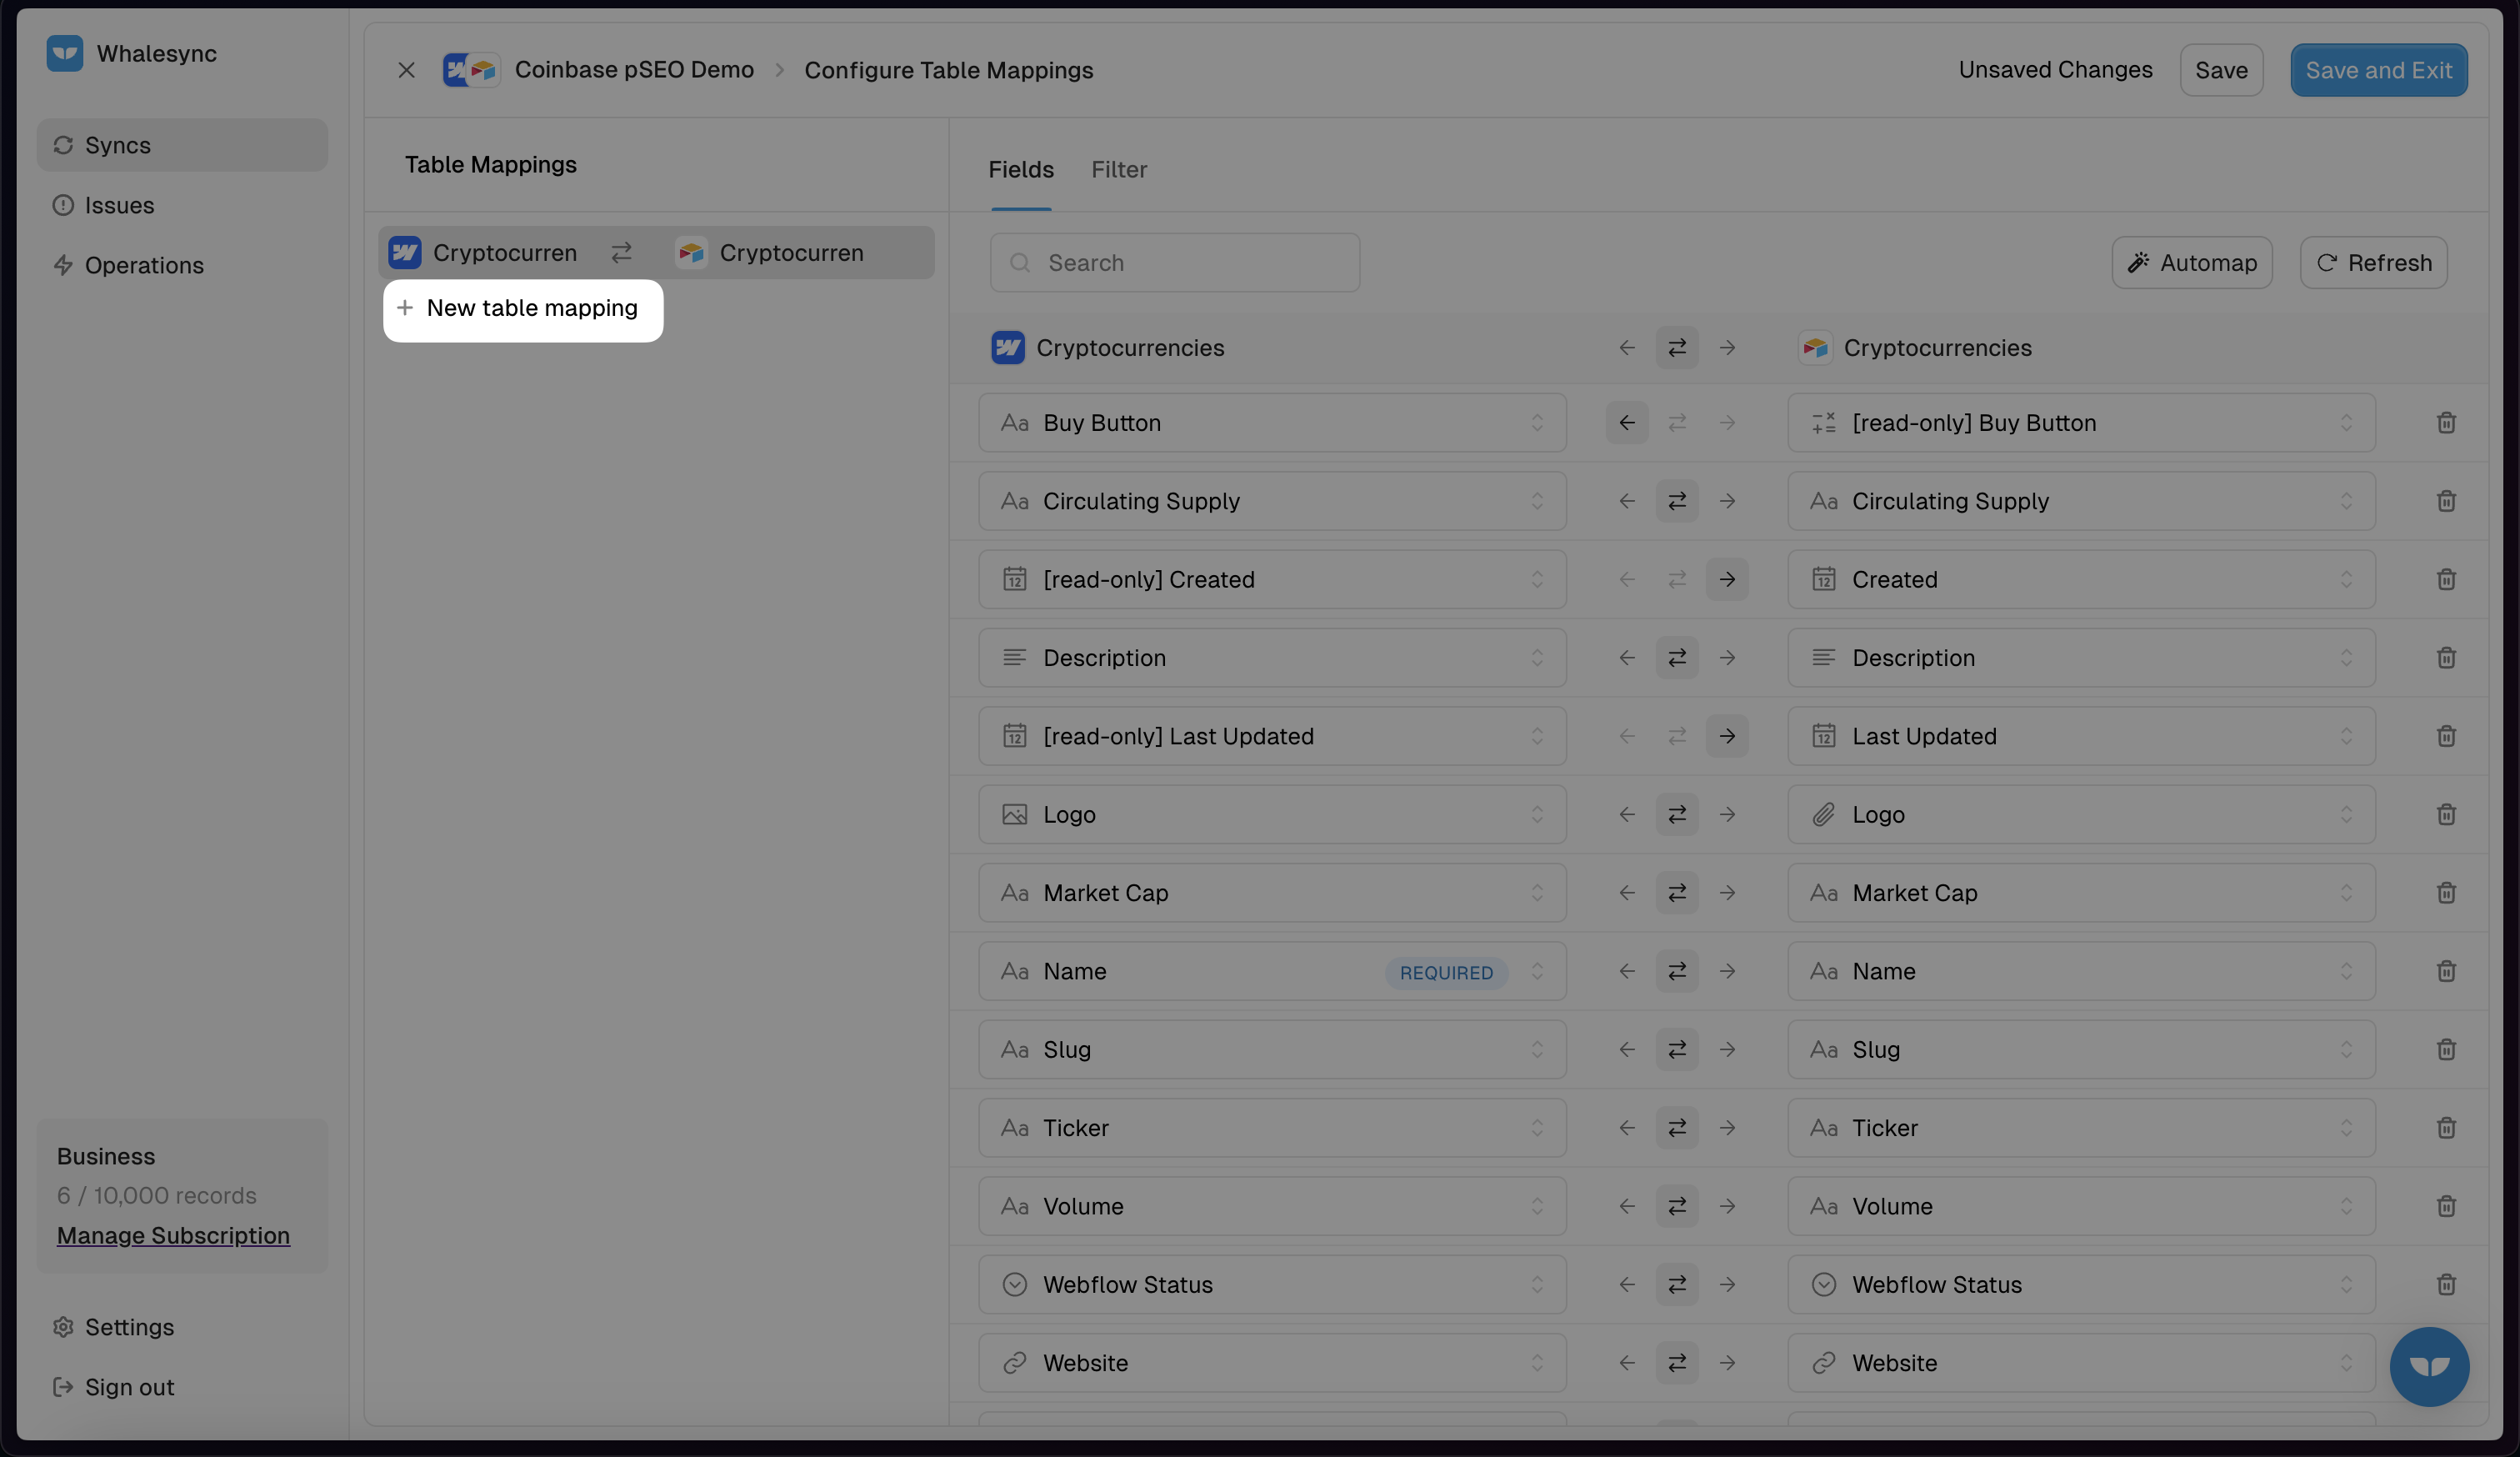
4) Automap all the fields

Once Whalesync has auto-created the Cryptocurrencies table in Airtable, it can also automap all the fields for you.
5) Click “New table mapping” and repeat steps for the “Conversions table
6) Prepare an initial sync and activate sync
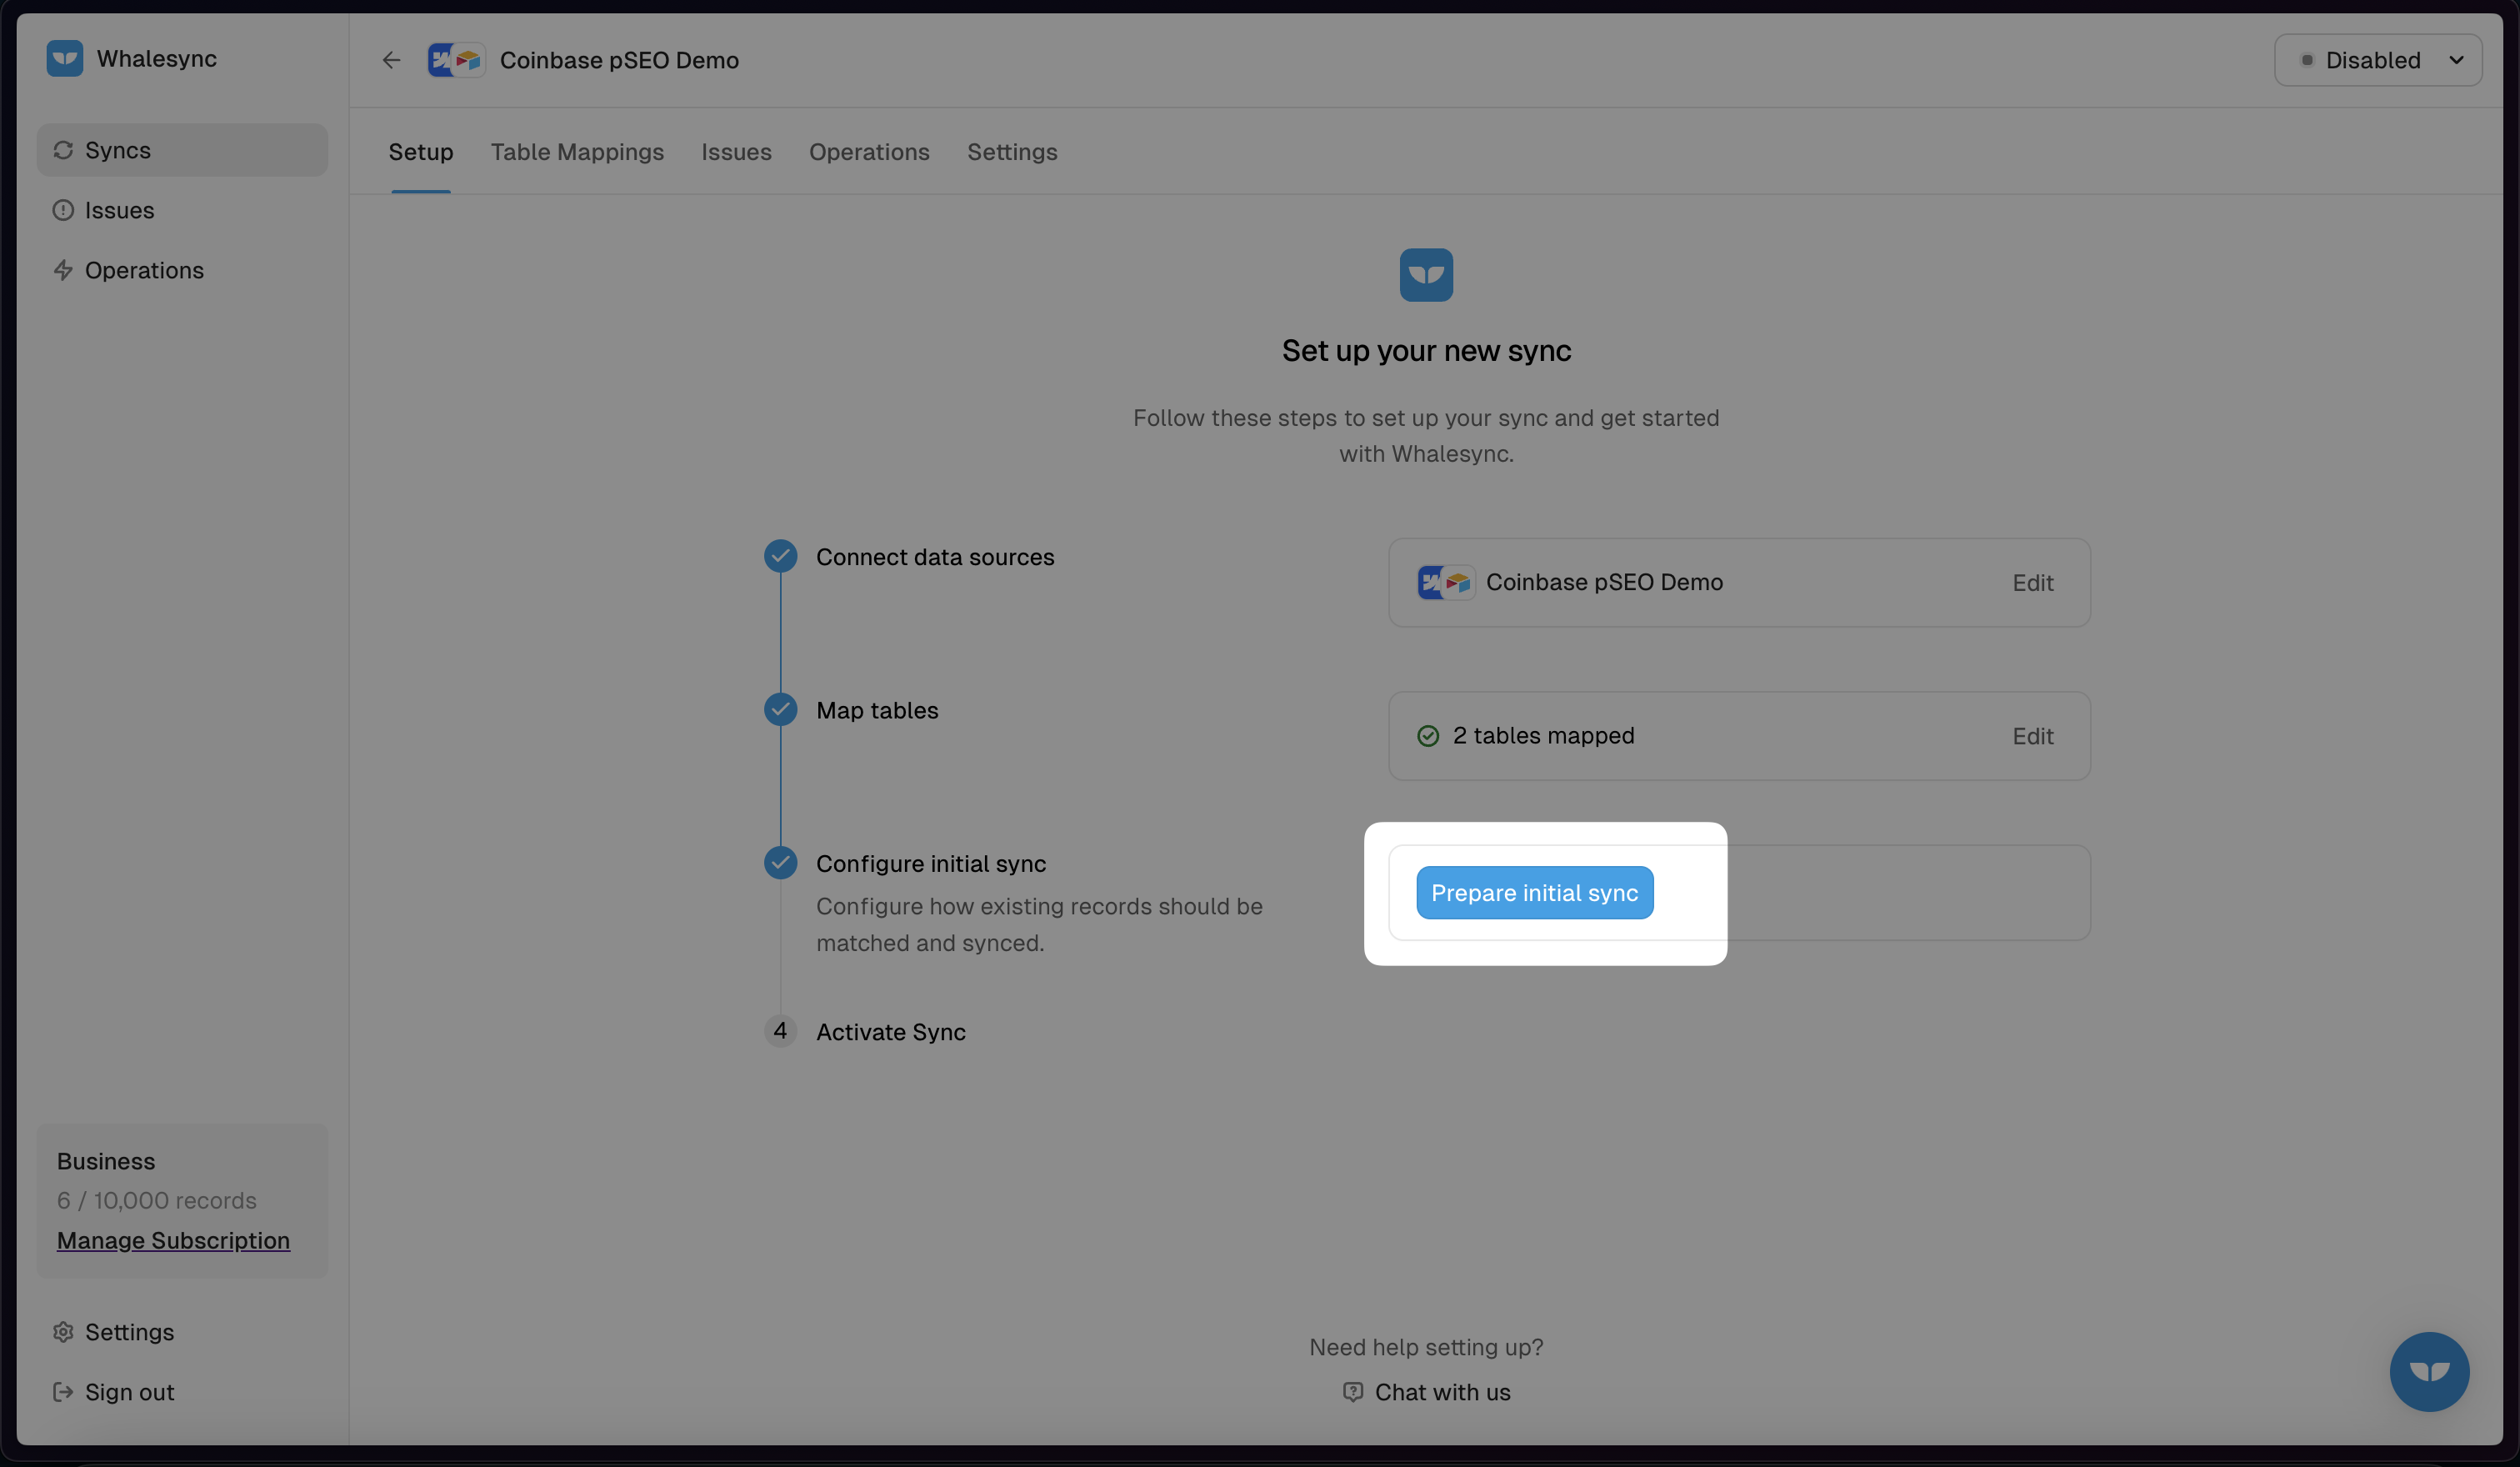
Now that you’ve mapped your tables and fields, you can activate your sync.
Whalesync will sync the test items in your Webflow CMS into Airtable. This is an exciting step on the journey to thousands of programmatic SEO pages!
Airtable
Now that you have Webflow hooked up to Airtable you can create and manage the data for all your pages from a spreadsheet! This is super powerful 💪
To take advantage of Airtable’s abilities and streamline our process, we can utilize Airtable’s formula and AI fields.
1) Convert the slug field into a formula
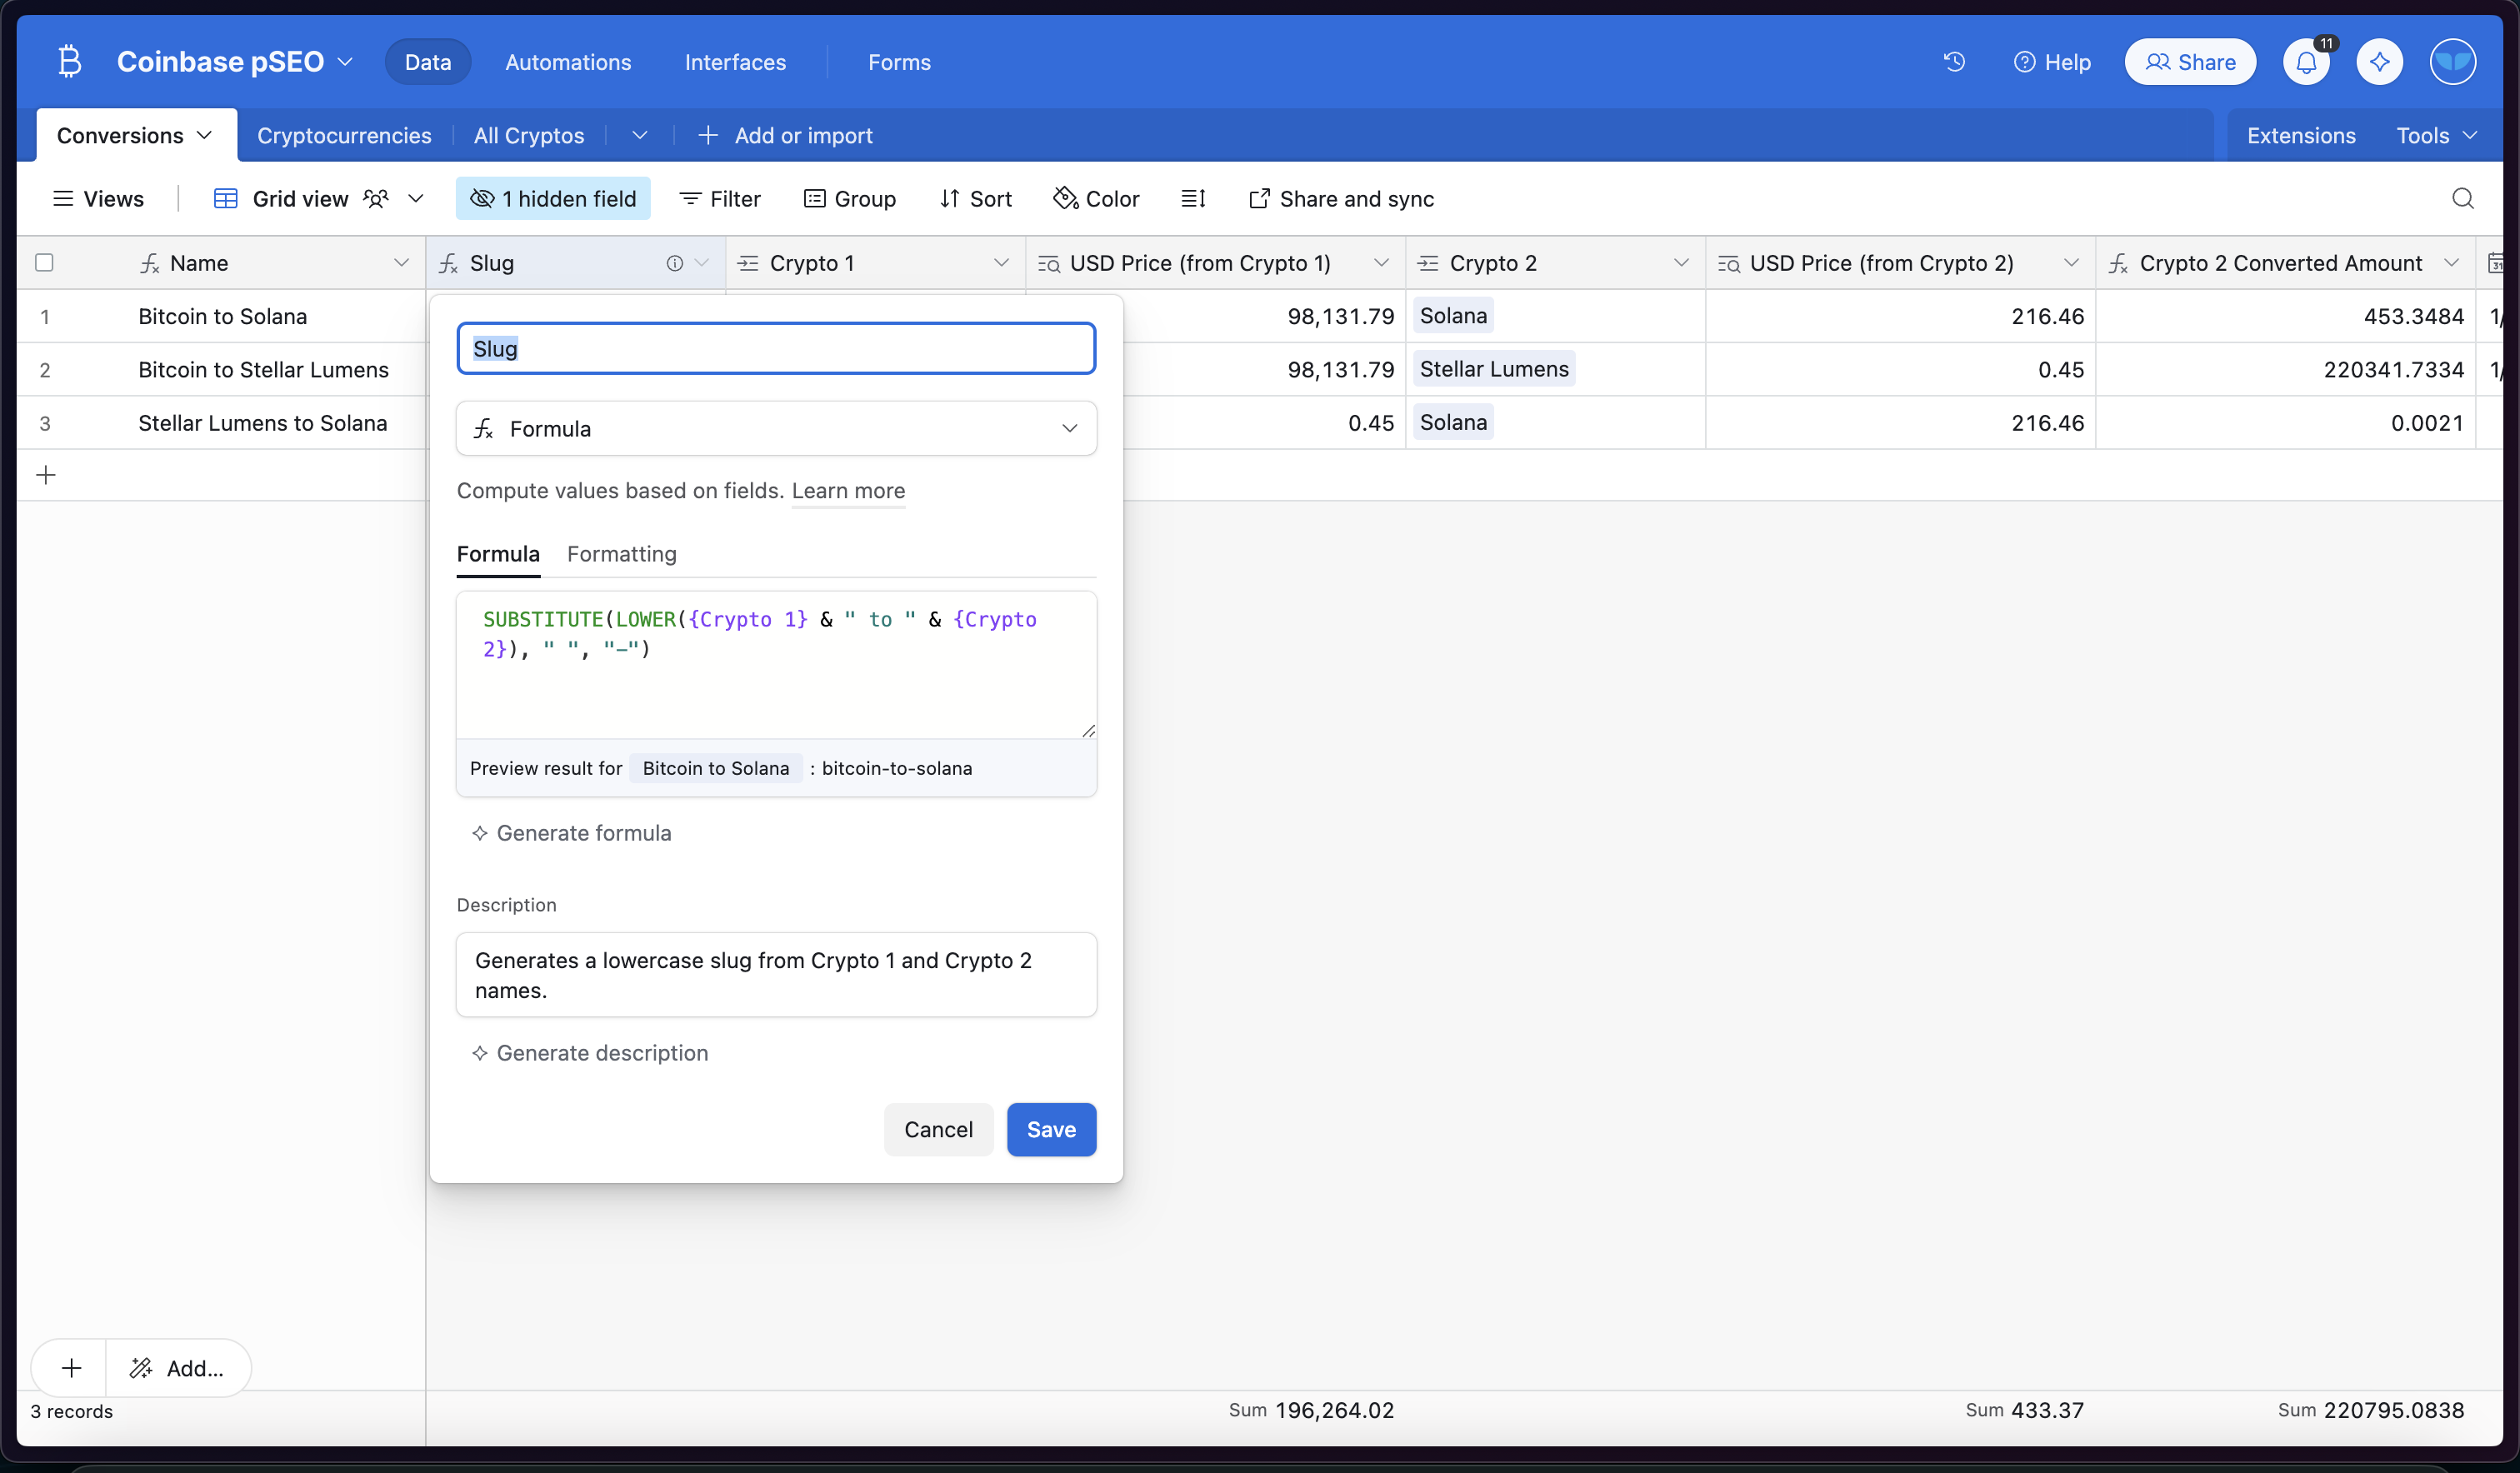
In as many places as we can, we want Airtable formula fields to calculate data for us. This will make our pSEO page creation more automated.
For example, instead of writing slugs ourselves for each page, we can have an Airtable formula create it for us.
Here’s the formula from that field:
SUBSTITUTE(LOWER({Crypto 1} & " to " & {Crypto 2}), " ", "-")
2) Use Lookup fields to bring crypto prices into our conversion table
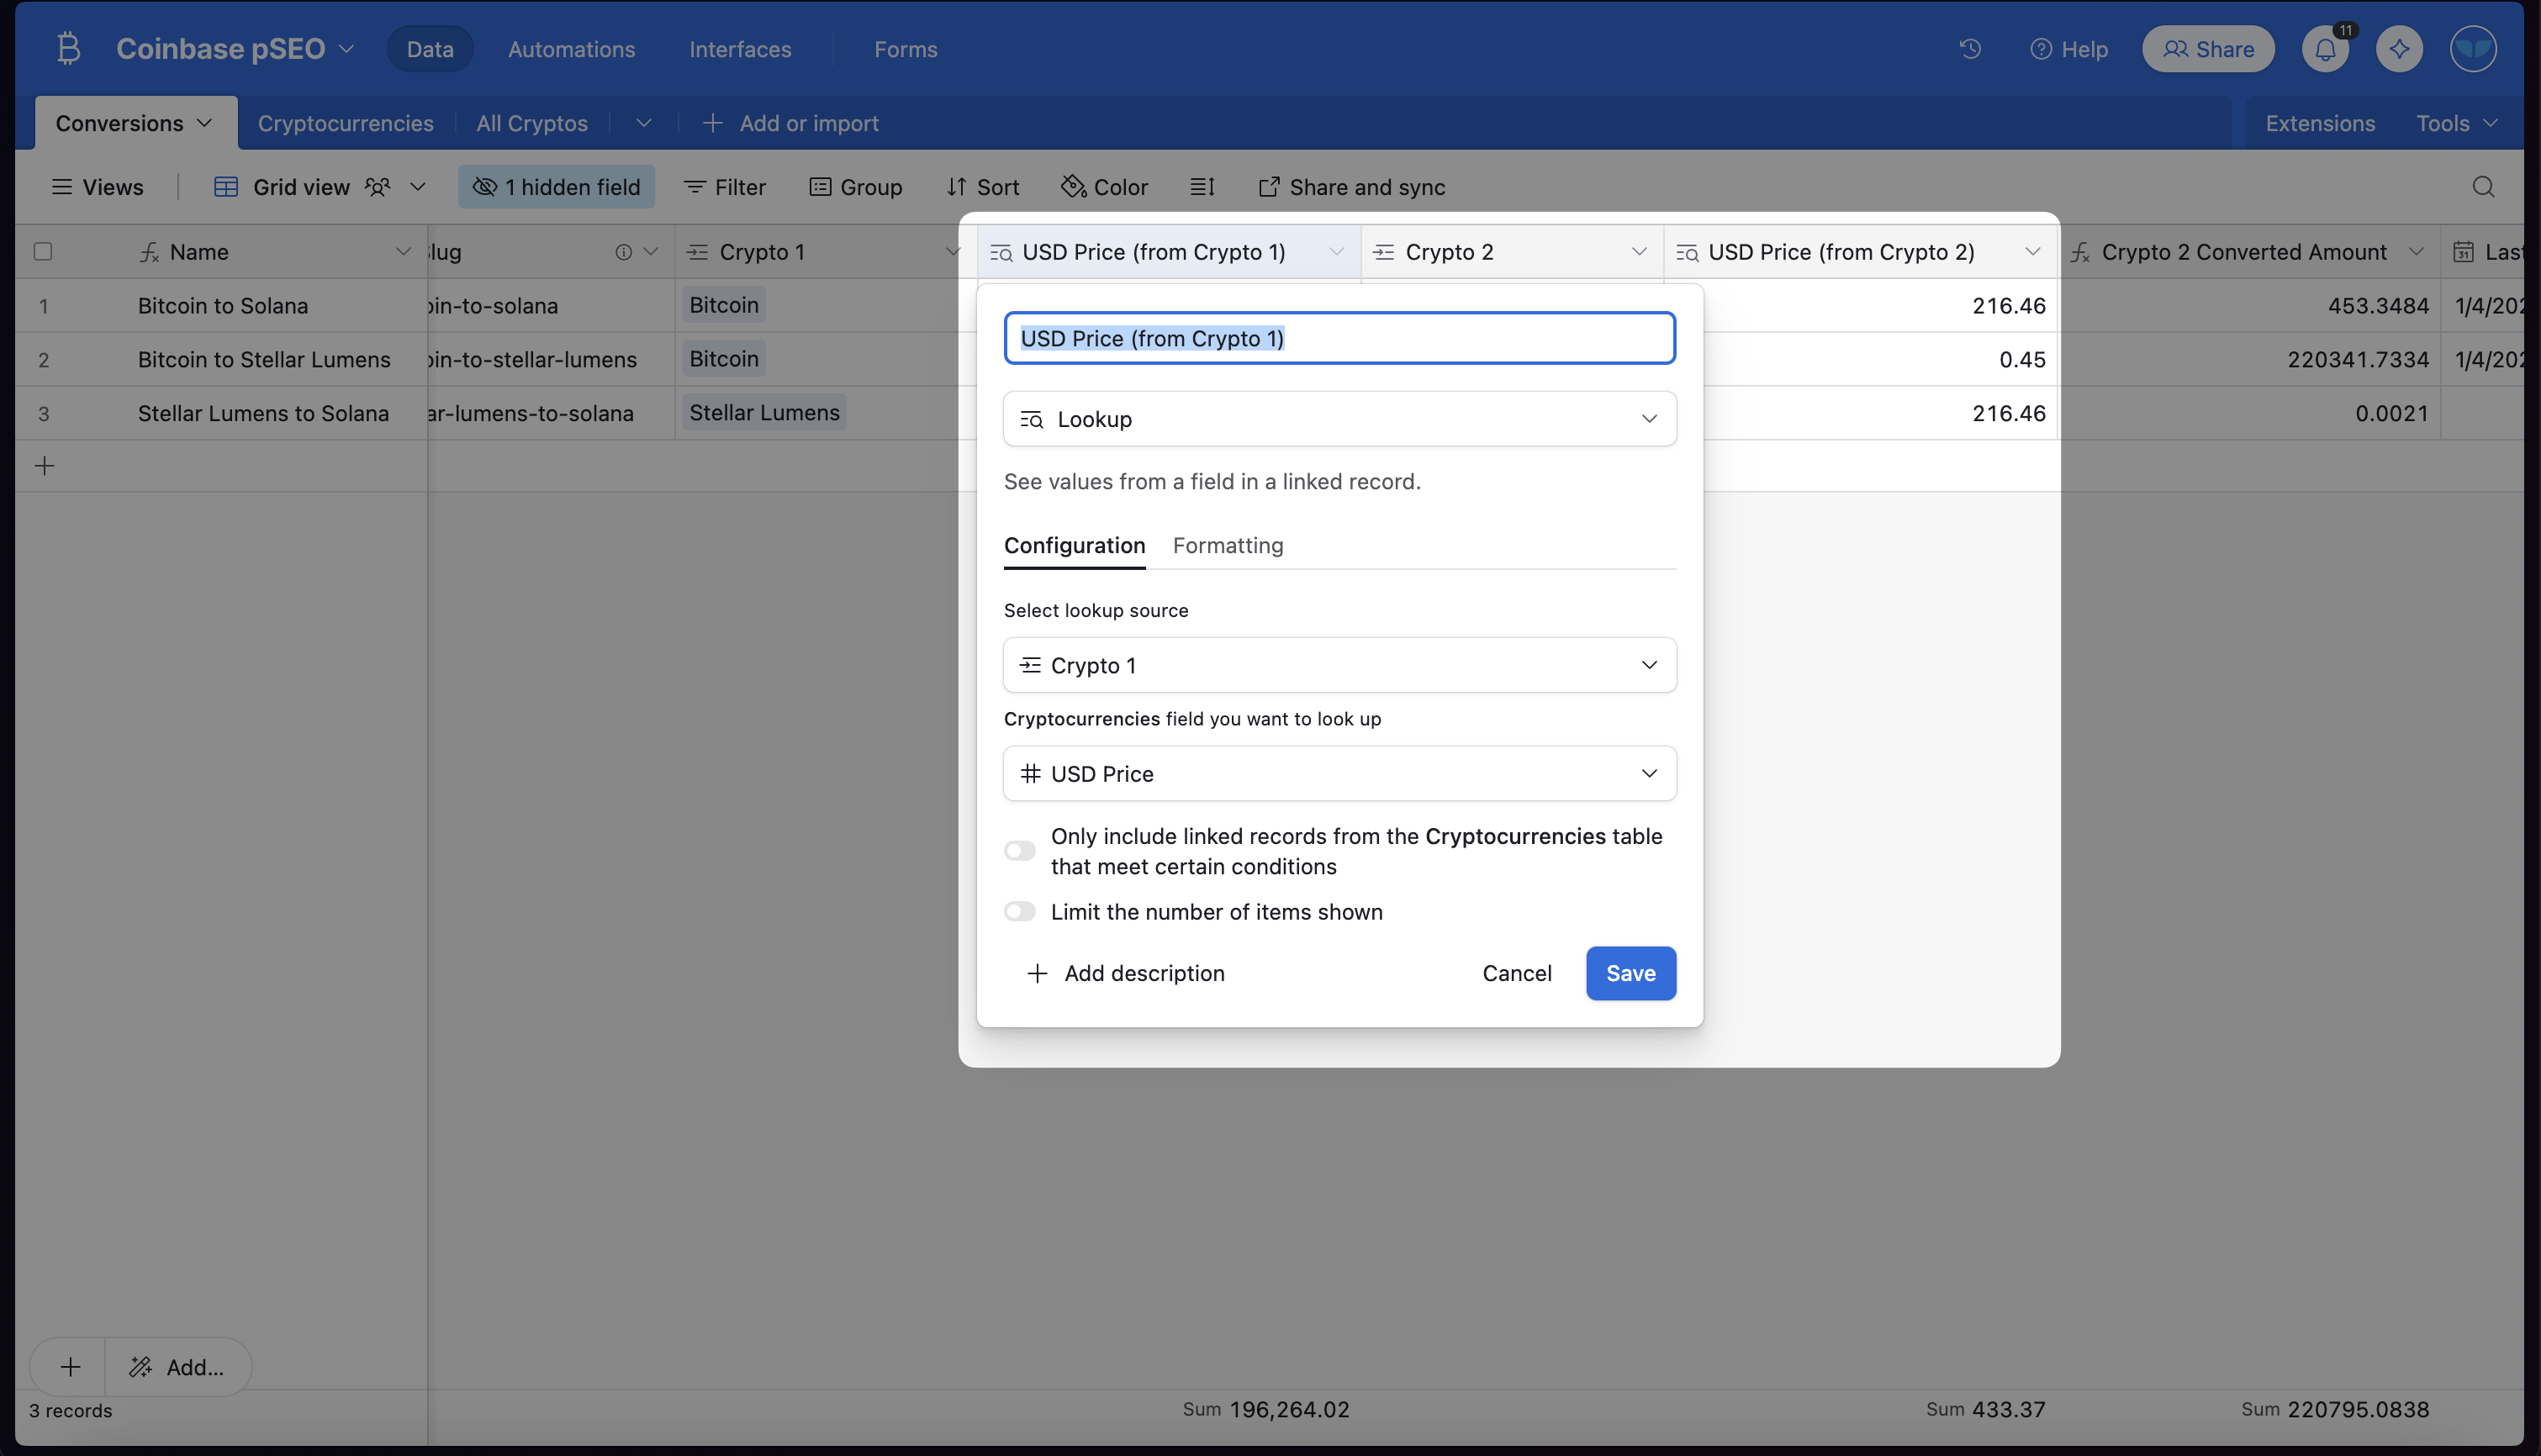
3) Use those lookup fields to calculate a converted amount

Because Whalesync syncs this data from Airtable to Webflow, we can display our conversion price (e.g. 454.35) directly on our website!
4) Use an AI field to write descriptions about each cryptocurrency

In the example above, we’ve converted our description field into an AI field. This saves us a ton of time. Instead of having to write descriptions for every cryptocurrency we add, AI will do it for us!
With those changes, Airtable is mostly set up! We now just need to bring in live cryptocurrency data. In the next section we’ll show you how to do that.
CoinMarketCap + Data Fetcher
CoinMarketCap is a website that provides live cryptocurrency data. Luckily for us, they have a free API that allows us to retrieve that data so we can display it on our site.
The following steps, we’ll show you how to get live cryptocurrency data from CoinMarketCap into Airtable using Data Fetcher.
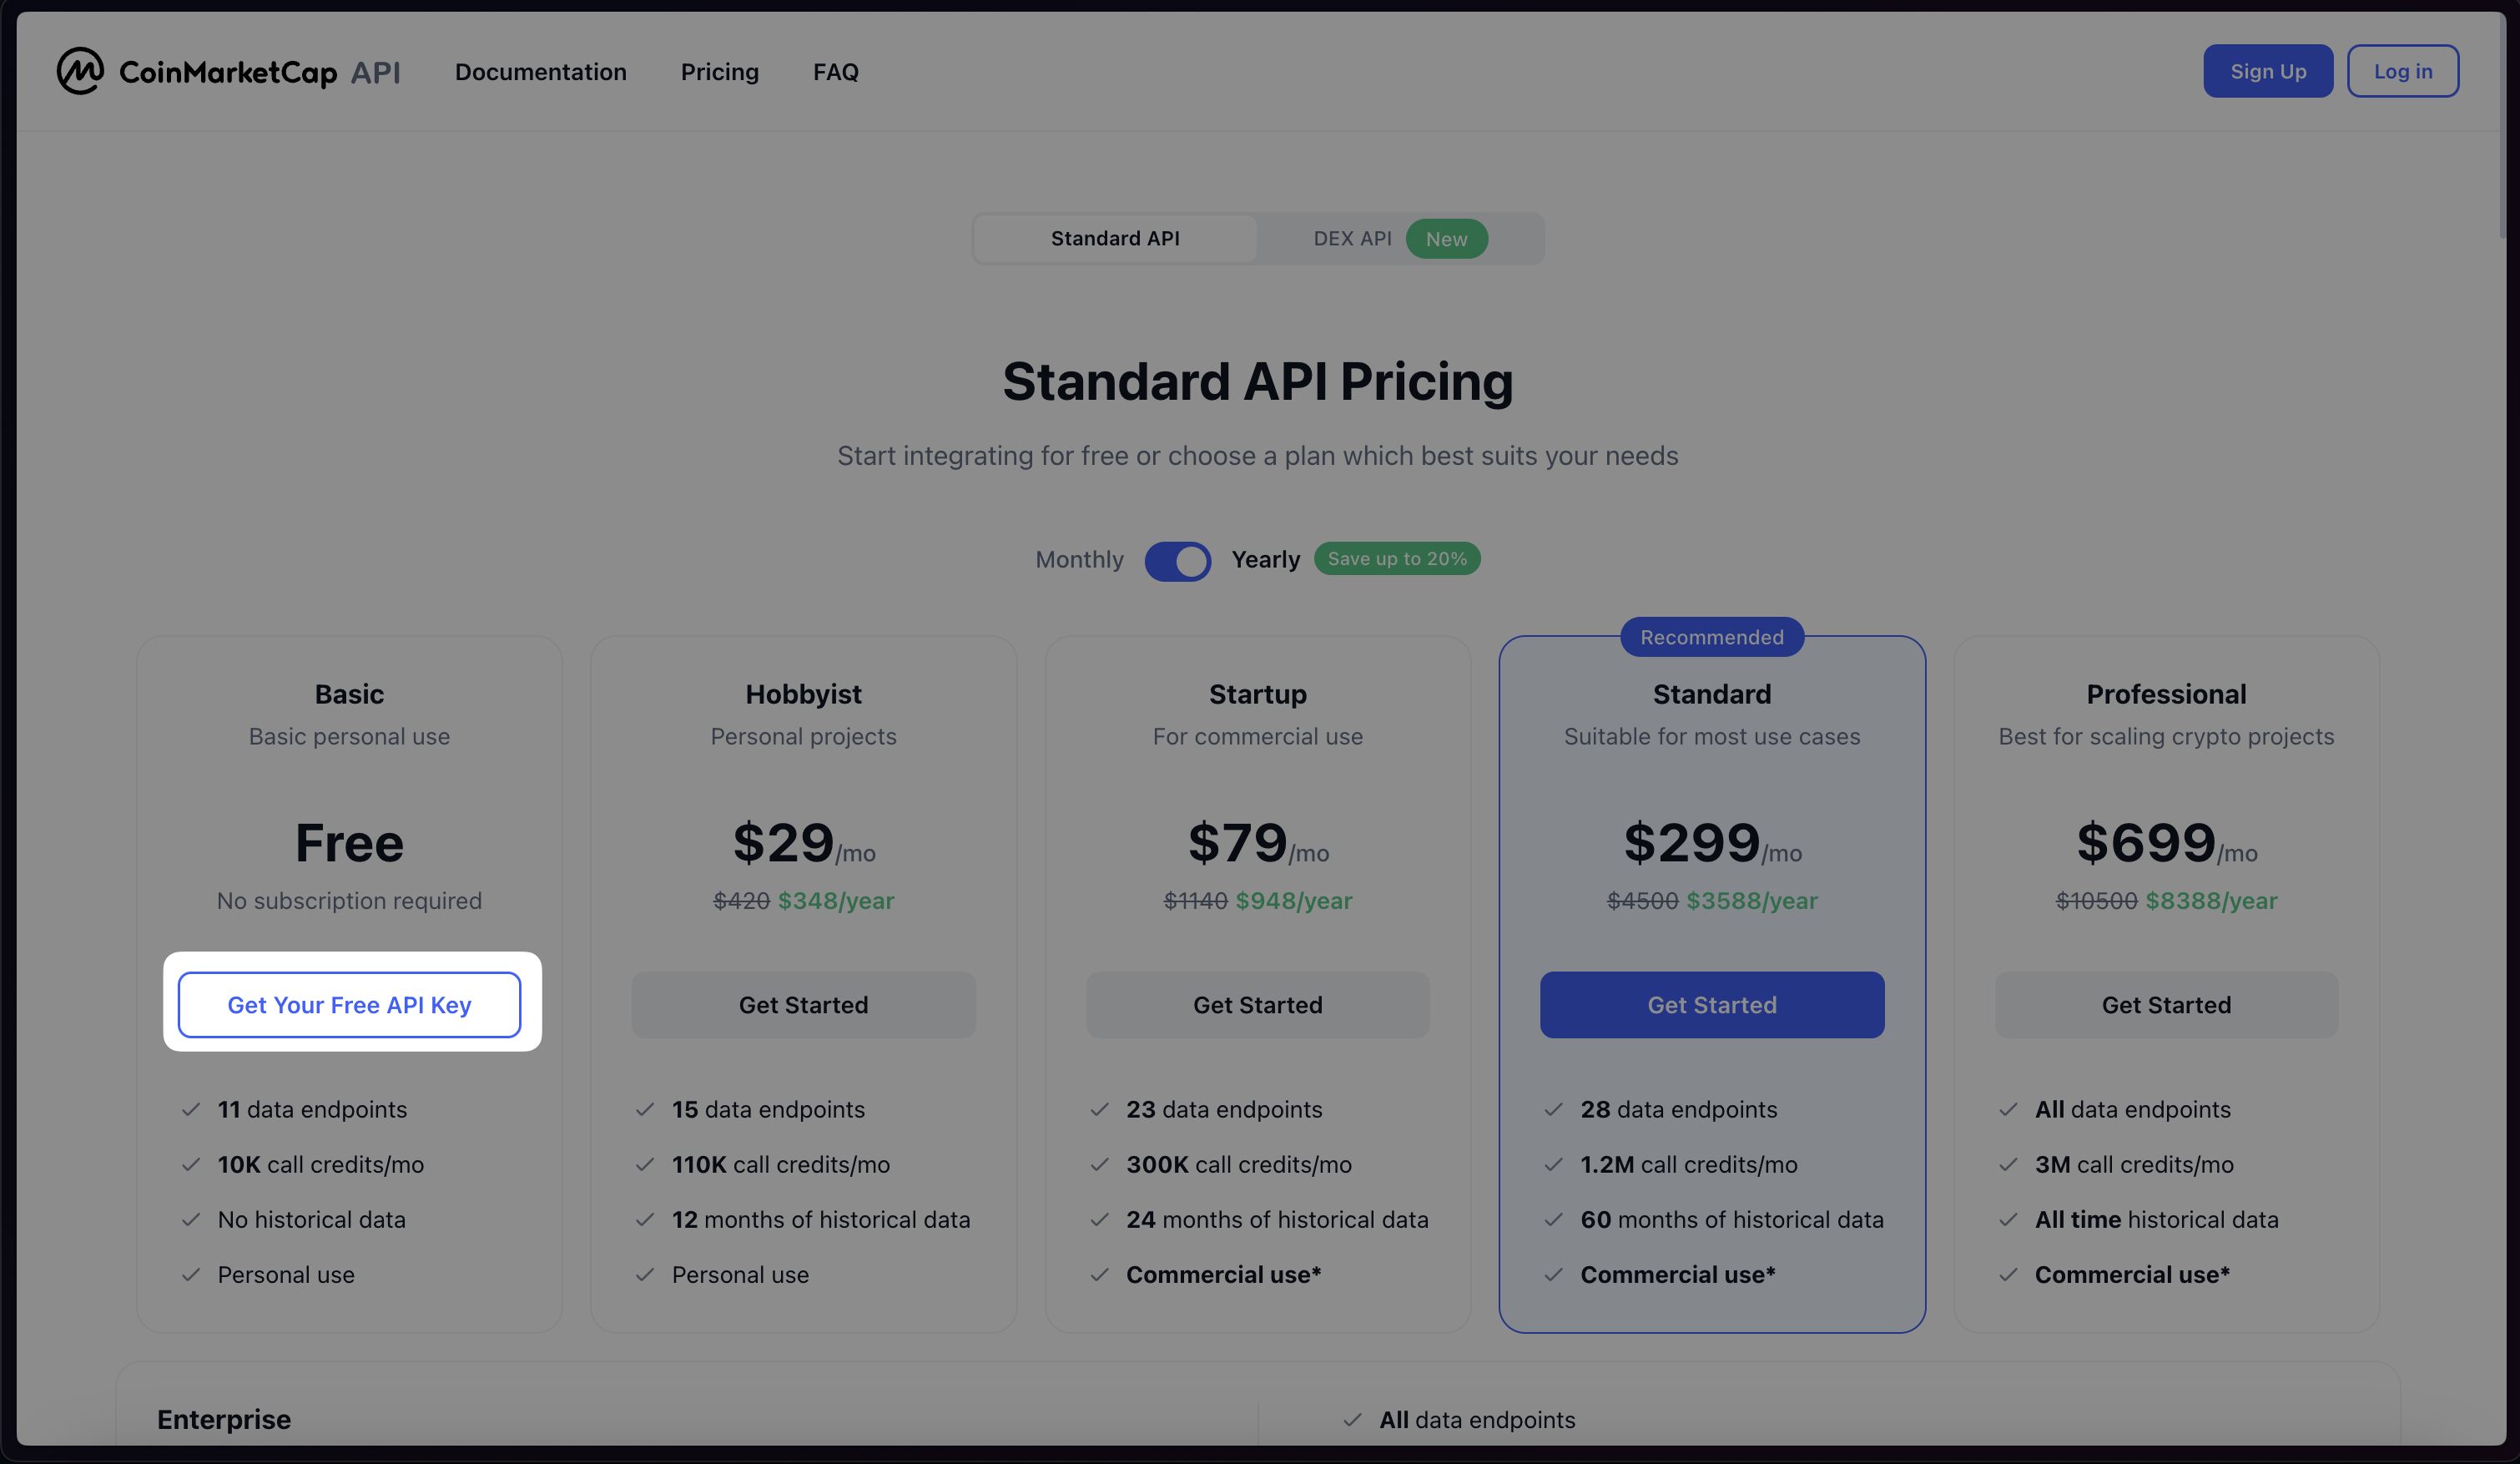
1) Go to CoinMarketCap.com and click “API”
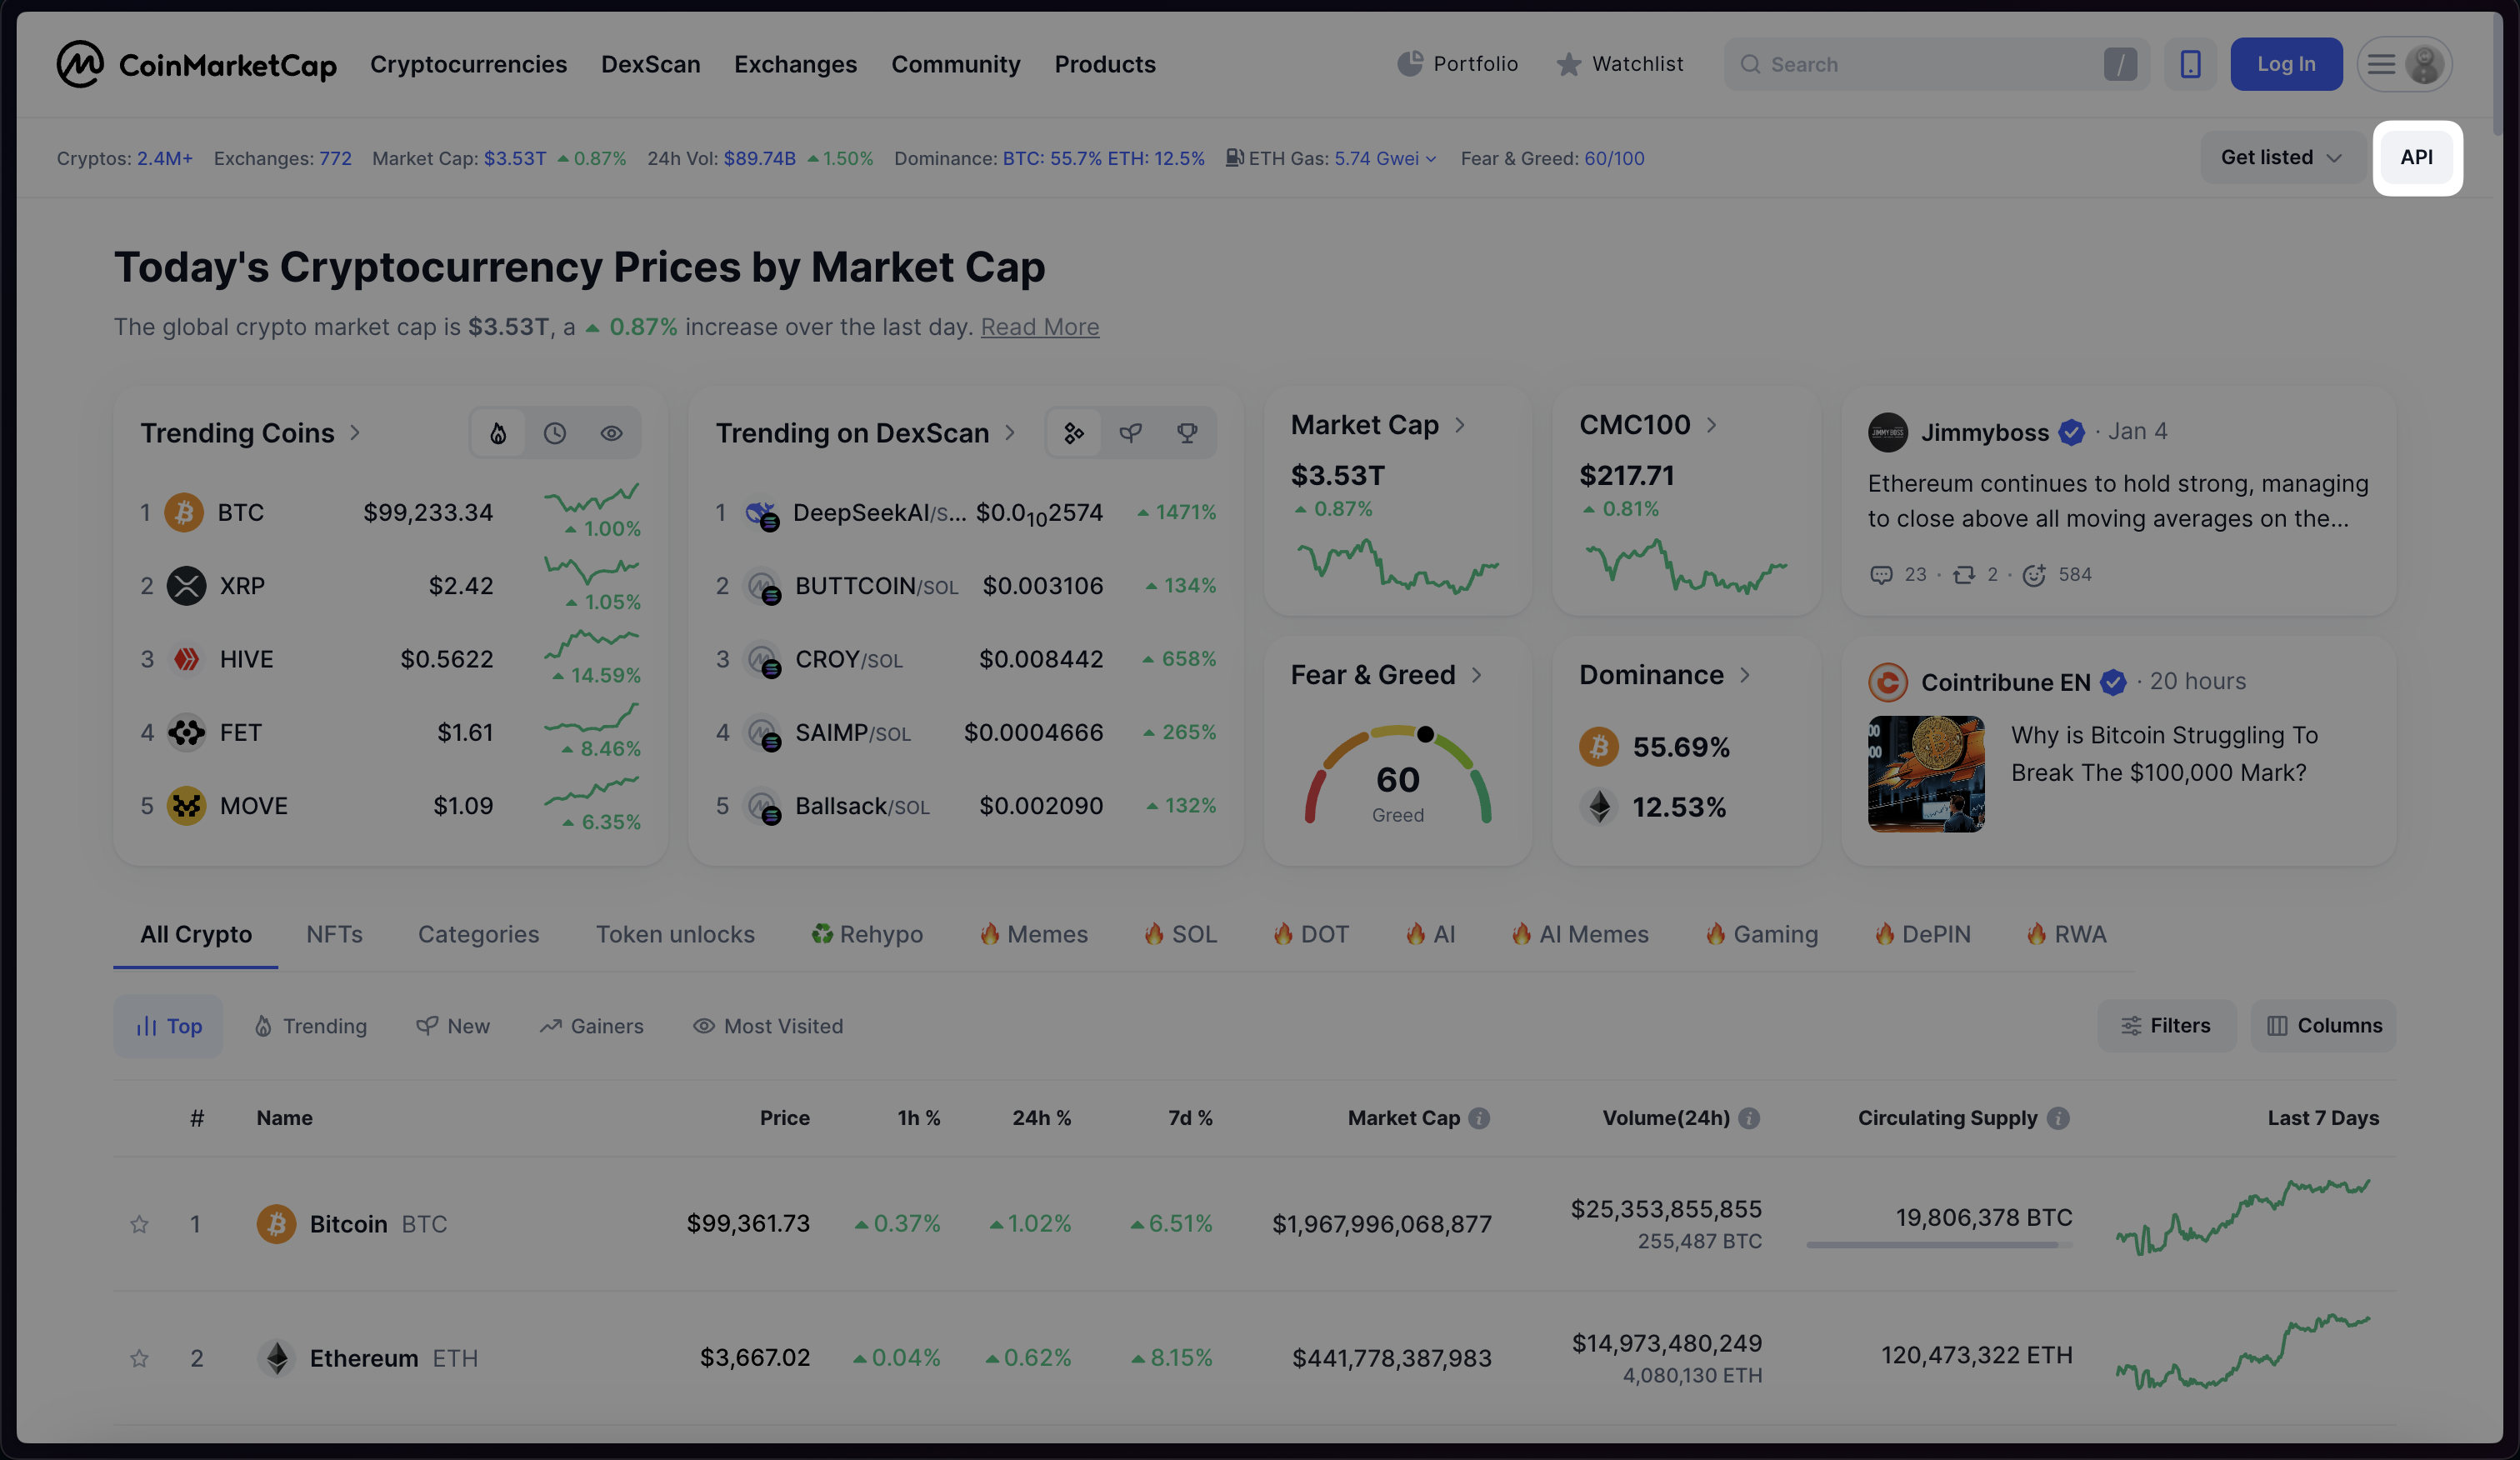
2) Click “Get Your Free API Key” and follow the steps to save your API key
3) Add the Data Fetcher extension
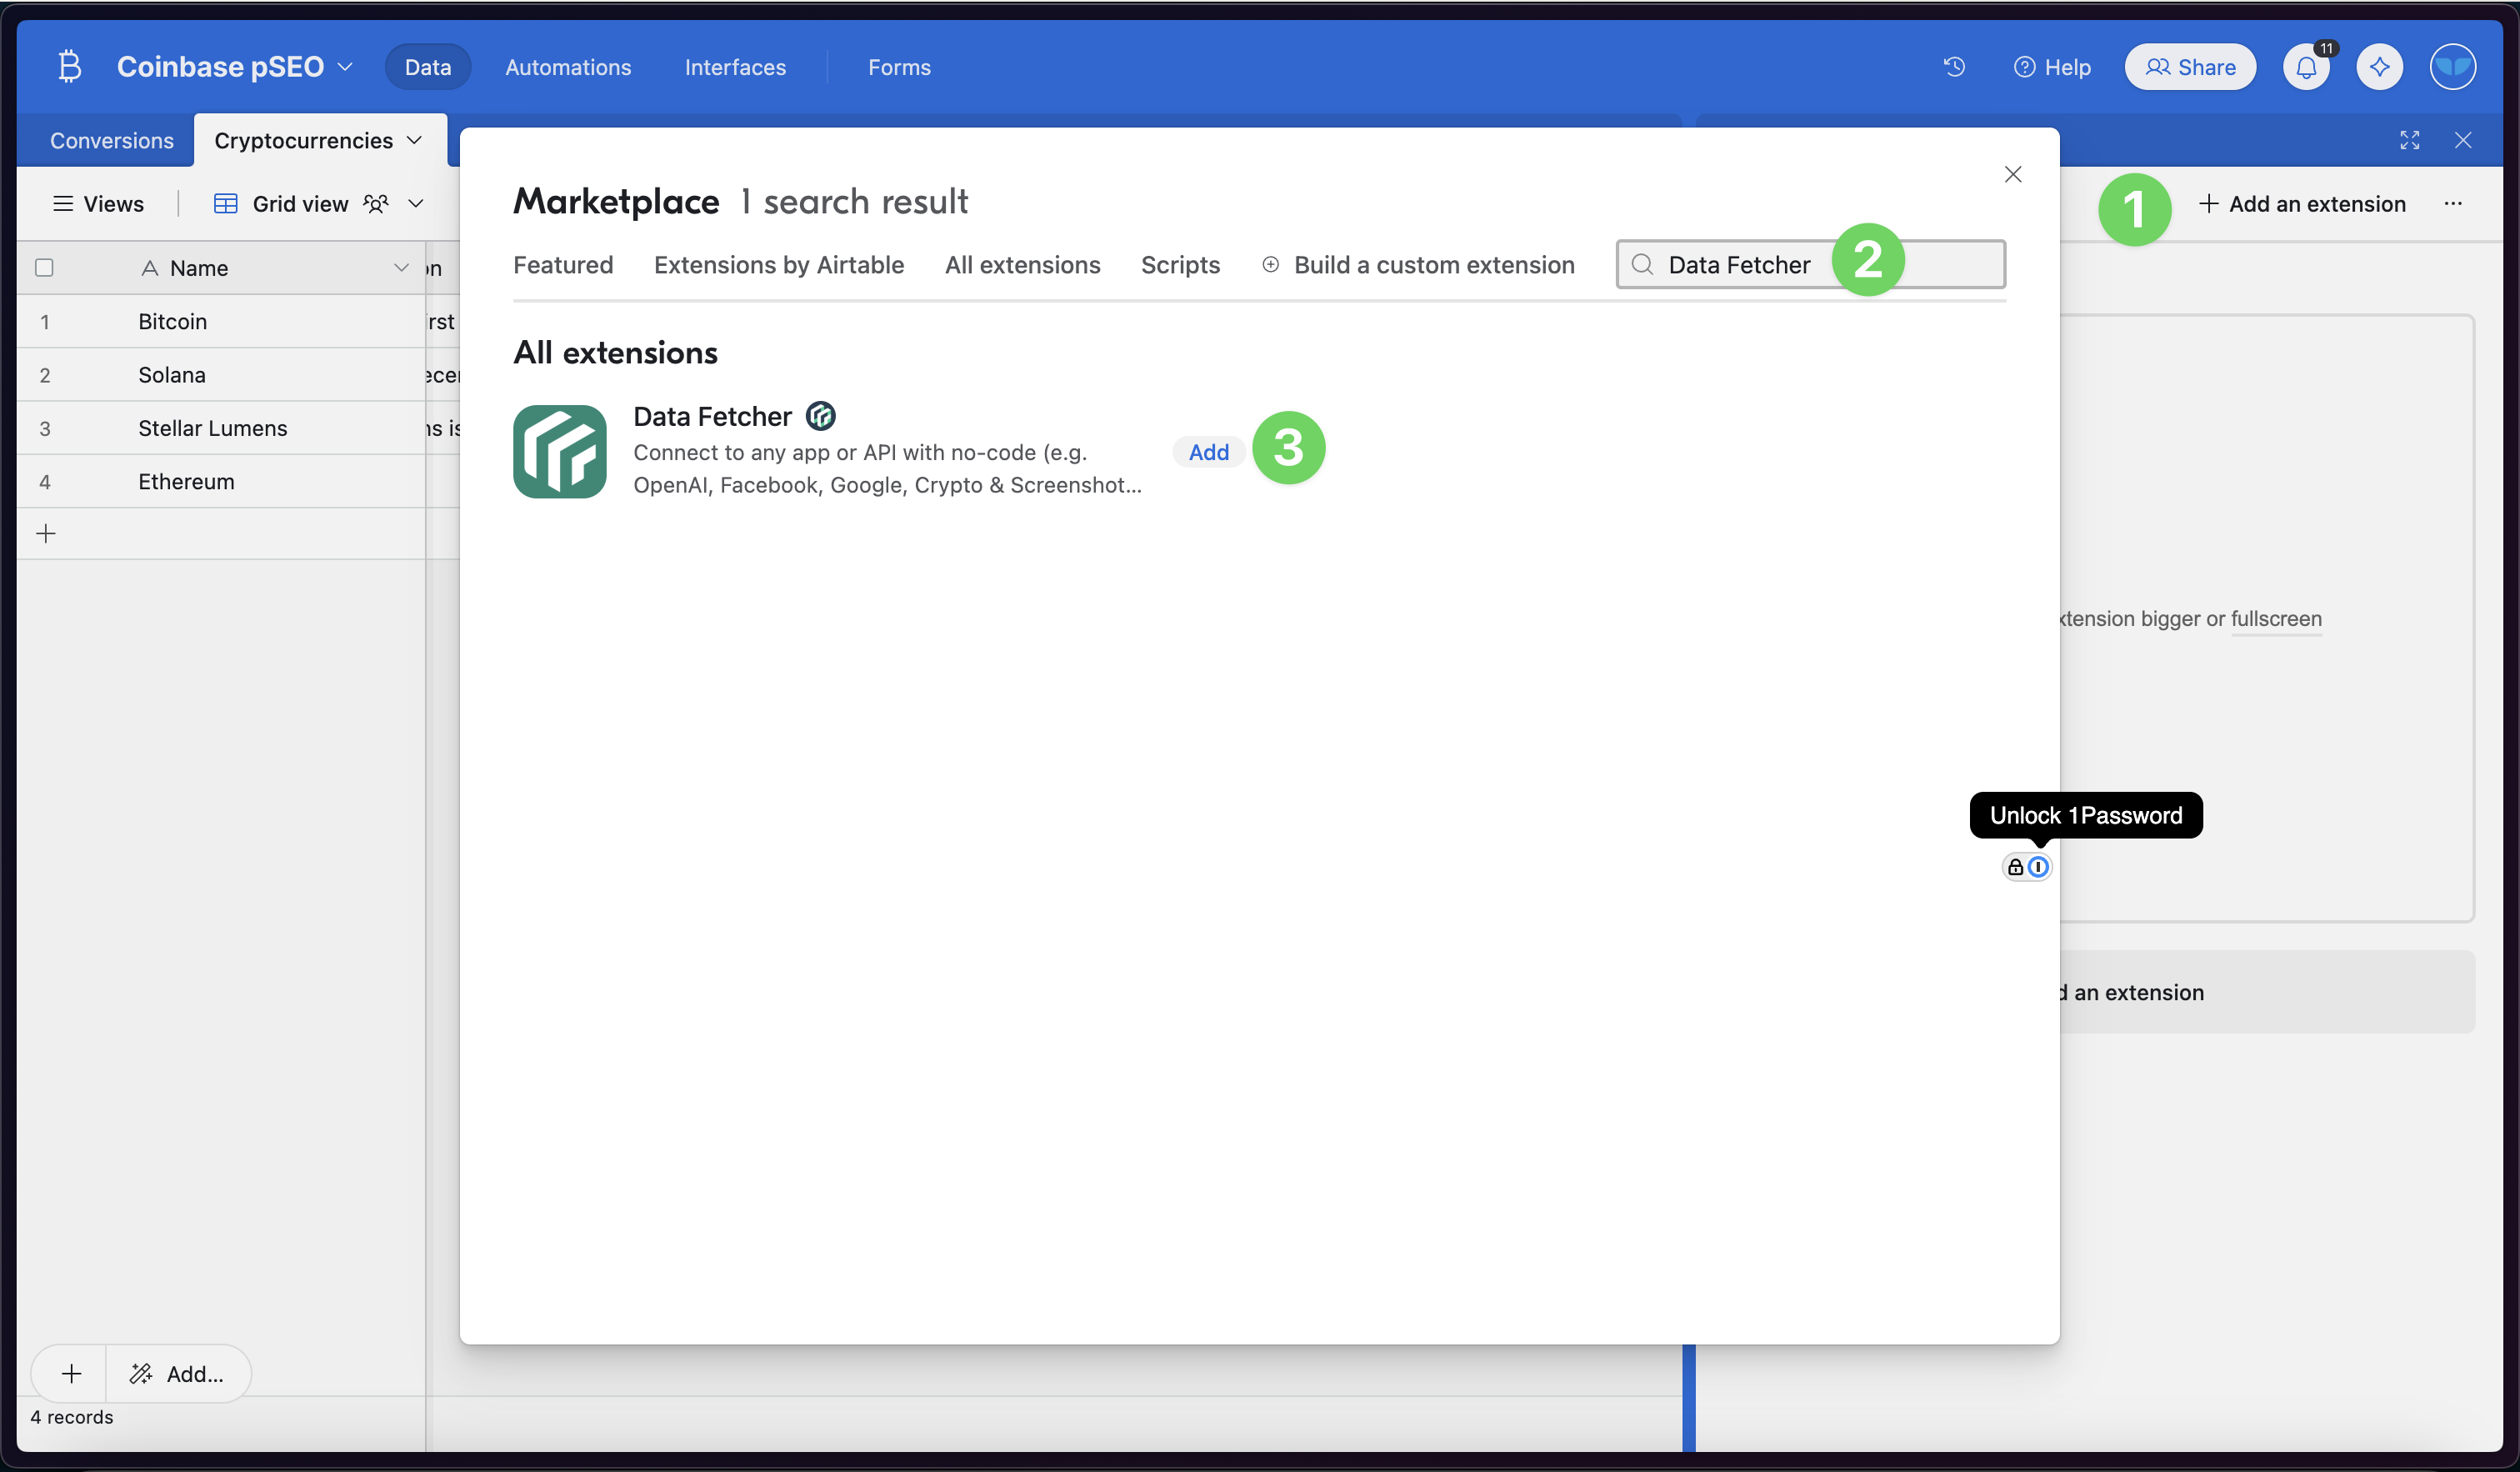
4) Click “Create request”

5) Choose CoinMarketCap, enter your API key, and choose the endpoint you want
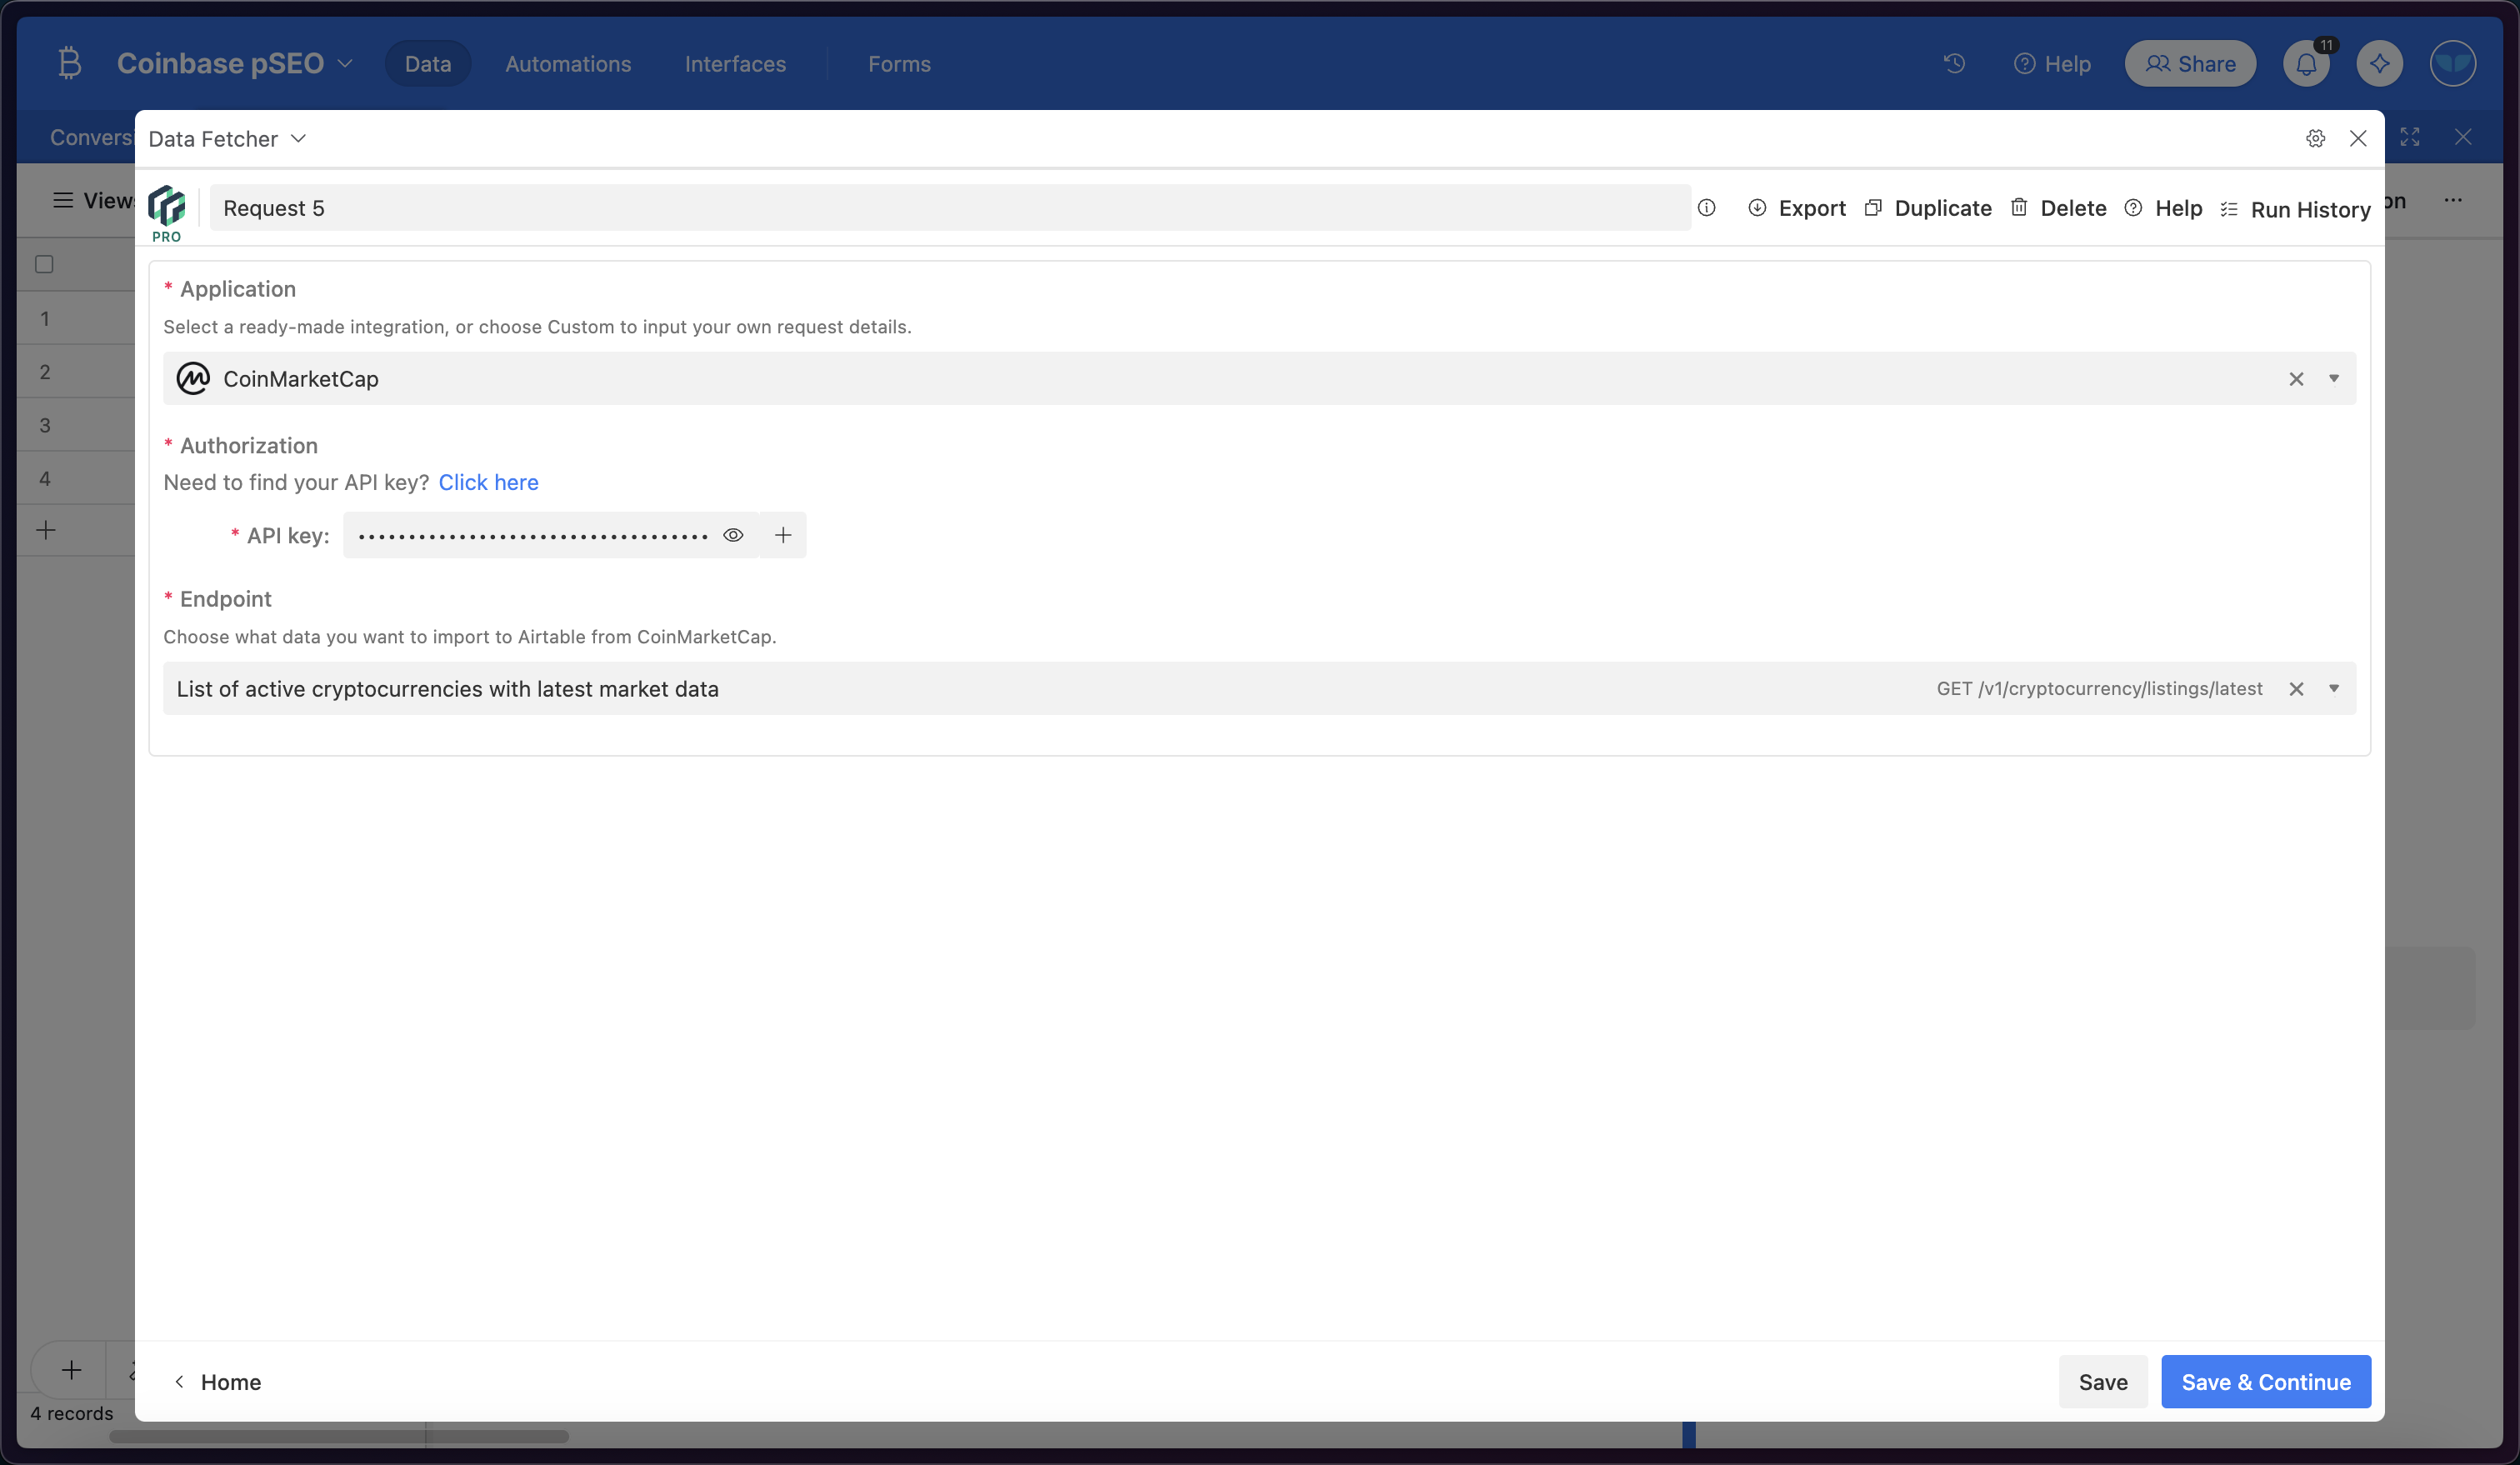
For this example we used “List of active cryptocurrencies with latest market data”.
6) Save and run the request to fetch all the latest crypto prices
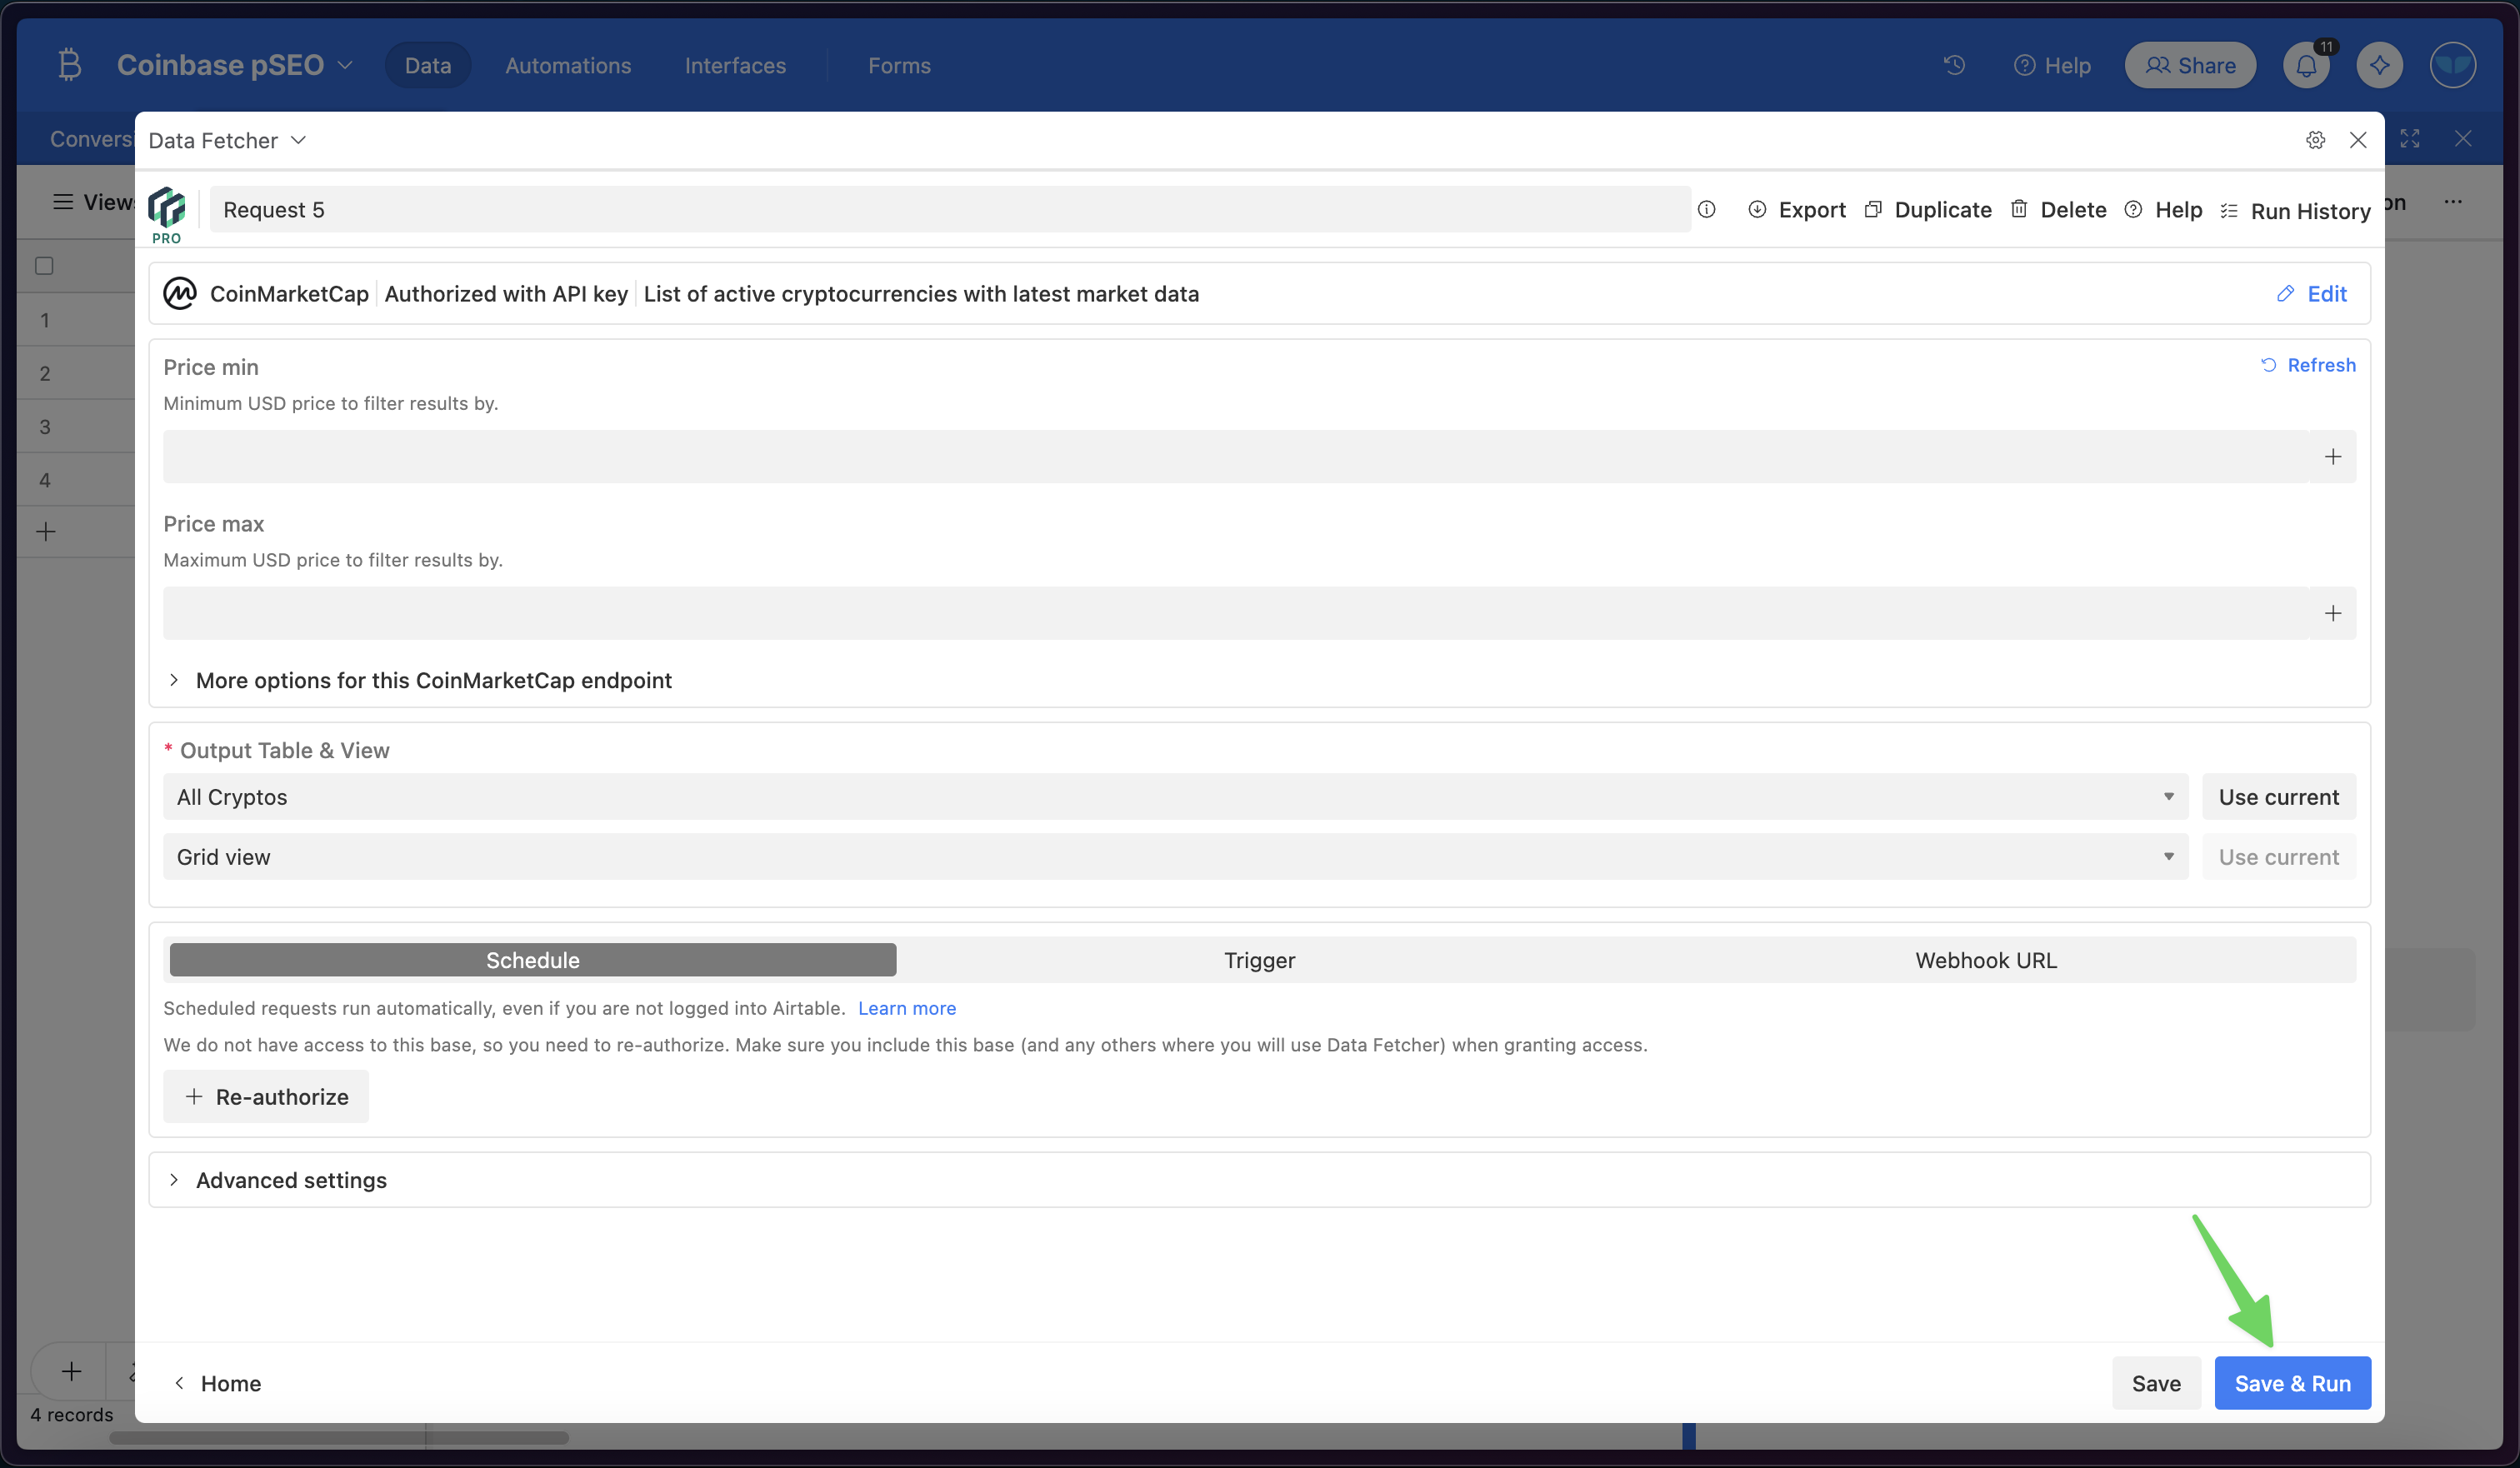
7) Choose the fields you want
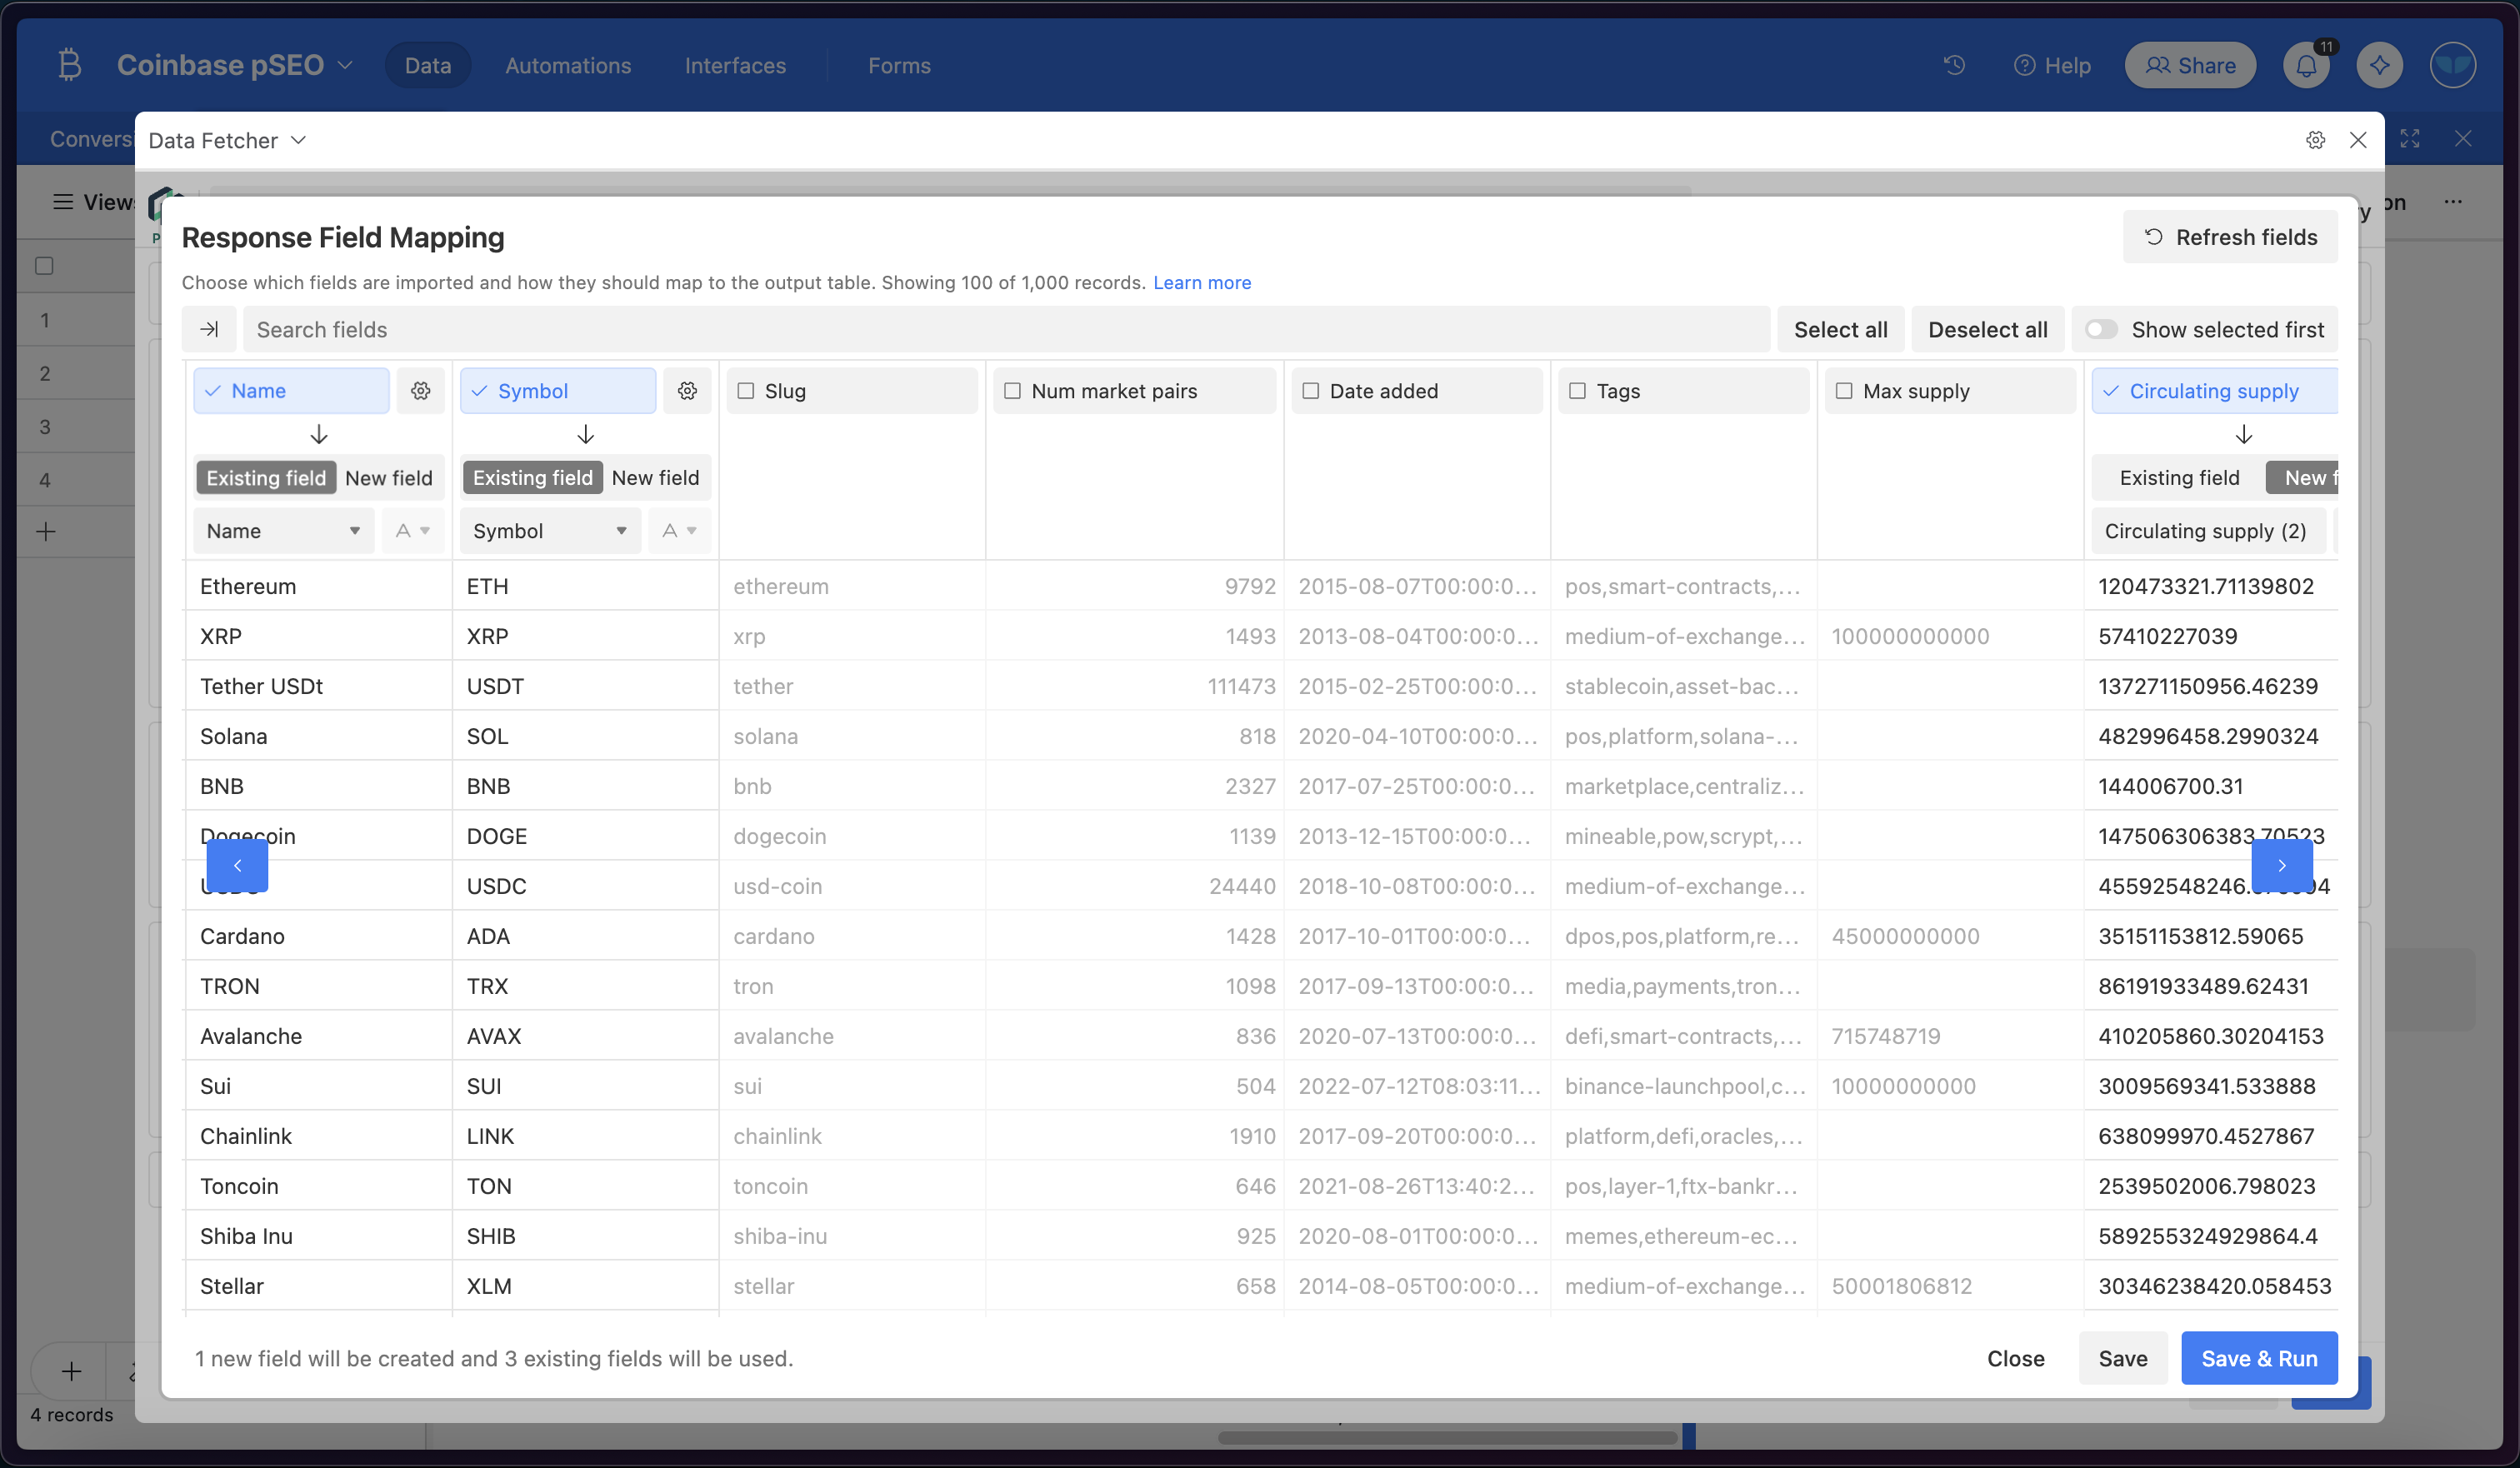
For our example, we’ll want to ensure the following fields sync into Airtable:
- Id
- Name
- Symbol
- Circulating supply
- Quote USD price
- Quote USD market cap
Airtable
1) Add more records into Airtable as you please!
Now that you’ve connected CoinMarketCap to Airtable and Airtable to Webflow you’re off to the races!
Simply add more cryptocurrencies to your Airtable, AI and formulas will fill in details, and Whalesync will sync them to Webflow automatically creating your pages.
Summary
With these steps, you’ve hopefully seen how you can create thousands of programmatic SEO pages with live data in just a few minutes!
Subscribe for more
Stay up to date with the latest no-code data news, strategies, and insights sent straight to your inbox!
Thank you for subscribing!
Related posts


.svg)


.svg)

